nginx 反向代理
ngx_http_proxy_module
https://nginx.org/en/docs/http/ngx_http_proxy_module.html
什么是反向代理
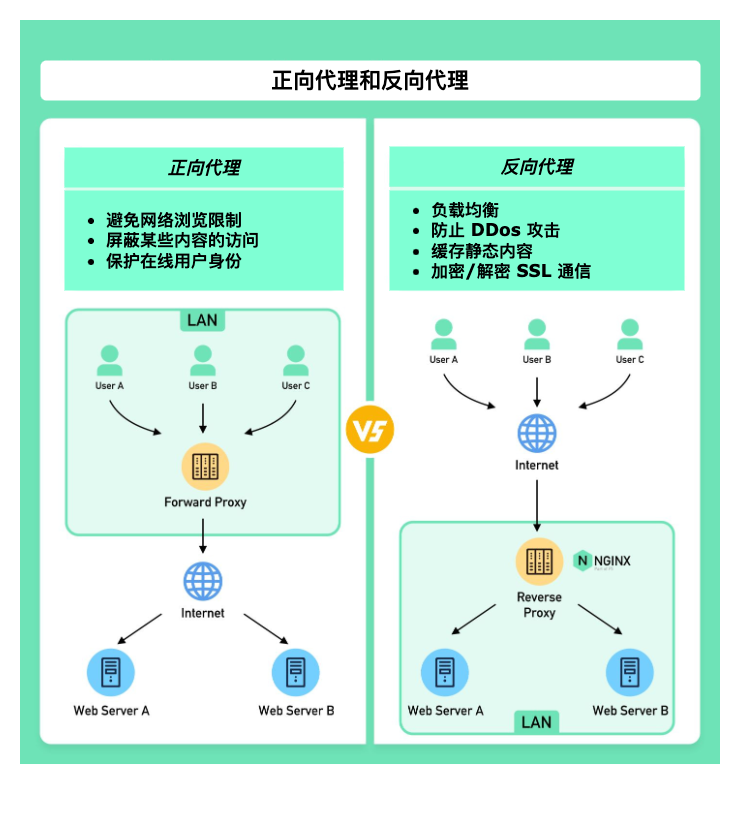
1. 正向代理(Forward Proxy)
正向代理位于用户设备和互联网之间的服务器。它代理的是客户端,站在用户这一方。在这种设置中,真实的客户端对外部服务器是不可见的。
正向代理通常用于:
- 保护客户端:隐藏客户端的真实 IP 地址,免受网络攻击。
- 突破访问限制:允许用户绕过地理或政策限制,访问全球互联网资源。
- 内容过滤:阻止用户访问特定的网络内容,符合企业政策或法规要求。
- 缓存内容:代理服务器通常具备较大的存储空间,可以缓存频繁请求的数据,提高数据访问速度。
2. 反向代理(Reverse Proxy)
反向代理是一种位于客户端和网络服务器之间的服务器。它接收客户端的请求,将其转发到内部服务器,然后再将服务器的响应返回给客户端,仿佛代理自己处理了这些请求一样。
反向代理代理的是服务端,站在网络服务器这一方。在这种设置中,真实的服务器对客户端是不可见的,这也是它被称为“反向”的原因。
反向代理可用于:
- 保护服务器:隐藏服务器的真实 IP 地址,防护网络攻击。
- 负载均衡:根据服务器的负载情况和访问流量,将请求合理分配到不同的服务器上。
- 缓存内容:缓存静态内容以及频繁变动的动态请求,减轻后端服务器的负载。
- 提供应用层防火墙:增强网络安全防护。
- SSL 终端:处理 SSL/TLS 加密和解密,保证数据传输安全。
参考文章 Nginx 反向代理为什么叫做“反向”? https://server.51cto.com/article/775550.html
nginx proxy_pass
官方文档 英文 https://nginx.org/en/docs/http/ngx_http_proxy_module.html#proxy_pass
Details
txt
Syntax:	proxy_pass URL;
Default:	—
Context:	location, if in location, limit_except
Sets the protocol and address of a proxied server and an optional URI to which a location should be mapped. As a protocol, “http” or “https” can be specified. The address can be specified as a domain name or IP address, and an optional port:
nginx
proxy_pass http://localhost:8000/uri/;or as a UNIX-domain socket path specified after the word “unix” and enclosed in colons:
nginx
proxy_pass http://unix:/tmp/backend.socket:/uri/;If a domain name resolves to several addresses, all of them will be used in a round-robin fashion. In addition, an address can be specified as a server group.
Parameter value can contain variables. In this case, if an address is specified as a domain name, the name is searched among the described server groups, and, if not found, is determined using a resolver.
A request URI is passed to the server as follows:
If the proxy_pass directive is specified with a URI, then when a request is passed to the server, the part of a normalized request URI matching the location is replaced by a URI specified in the directive:
nginx
location /name/ {
    proxy_pass http://127.0.0.1/remote/;
}
If proxy_pass is specified without a URI, the request URI is passed to the server in the same form as sent by a client when the original request is processed, or the full normalized request URI is passed when processing the changed URI:
nginx
location /some/path/ {
    proxy_pass http://127.0.0.1;
}
Before version 1.1.12, if proxy_pass is specified without a URI, the original request URI might be passed instead of the changed URI in some cases. In some cases, the part of a request URI to be replaced cannot be determined:
When location is specified using a regular expression, and also inside named locations. In these cases, proxy_pass should be specified without a URI.
When the URI is changed inside a proxied location using the rewrite directive, and this same configuration will be used to process a request (break):
nginx
location /name/ {
    rewrite /name/([^/]+) /users?name=$1 break;
    proxy_pass http://127.0.0.1;
}
In this case, the URI specified in the directive is ignored and the full changed request URI is passed to the server.
When variables are used in proxy_pass:
nginx
location /name/ {
    proxy_pass http://127.0.0.1$request_uri;
}
In this case, if URI is specified in the directive, it is passed to the server as is, replacing the original request URI. WebSocket proxying requires special configuration and is supported since version 1.3.13.
翻译后
以下是对 Nginx 官方文档中 proxy_pass 指令部分的中文翻译:
txt
语法:proxy_pass URL;
默认值:—
作用域:location, if in location, limit_except
设置代理服务器的协议和地址以及可选的 URI 映射。作为协议,可以指定“http”或“https”。地址可以是域名或 IP 地址,并可以指定可选的端口:
nginx
proxy_pass http://localhost:8000/uri/;或者作为 UNIX 域套接字路径,路径需放在“unix”单词后并用冒号括起来:
nginx
proxy_pass http://unix:/tmp/backend.socket:/uri/;如果域名解析到多个地址,这些地址将以轮询方式使用。此外,地址可以指定为服务器组。
参数值可以包含变量。在这种情况下,如果地址被指定为域名,则在描述的服务器组中搜索该名称,如果找不到,则使用解析器确定。
请求 URI 将按以下方式传递给服务器:
如果在 proxy_pass 指令中指定了 URI,则在请求传递到服务器时,与 location 匹配的规范化请求 URI 的部分将被指令中指定的 URI 替换:
nginx
location /name/ {
    proxy_pass http://127.0.0.1/remote/;
}
如果 proxy_pass 指定时没有 URI,客户端发送的请求 URI 将以相同的形式传递给服务器,或者在处理更改的 URI 时传递完整的规范化请求 URI:
nginx
location /some/path/ {
    proxy_pass http://127.0.0.1;
}
在 1.1.12 版本之前,如果 proxy_pass 指定时没有 URI,在某些情况下可能传递原始请求 URI 而非更改后的 URI。
在某些情况下,无法确定要替换的请求 URI 的部分:
- 当使用正则表达式指定 location,以及在命名的 location 内部时。 在这些情况下,应该在没有 URI 的情况下指定
proxy_pass。
当在代理 location 内部使用 rewrite 指令更改 URI,并且这种配置将用于处理请求(break)时:
nginx
location /name/ {
    rewrite /name/([^/]+) /users?name=$1 break;
    proxy_pass http://127.0.0.1;
}
在这种情况下,指令中指定的 URI 将被忽略,完整的更改后的请求 URI 将传递给服务器。
当在 proxy_pass 中使用变量时:
nginx
location /name/ {
    proxy_pass http://127.0.0.1$request_uri;
}
在这种情况下,如果在指令中指定了 URI,则它将按原样传递给服务器,替换原始请求 URI。
WebSocket 代理需要特殊配置,并自 1.3.13 版本起得到支持。
nginx proxy 常用的指令介绍
- proxy_pass
- proxy_max_temp_file_size
- proxy_set_header
- proxy_set_header
- proxy_set_header
- proxy_cookie_path
1. proxy_pass
- 作用: 指定所有传入的请求应当转发到哪个服务器。
- 语法:
proxy_pass URL; - 应用场景: 用于定义请求应被转发的后端服务器的地址,可以是 HTTP 或 HTTPS 地址,也可以是一个 Unix 域套接字。
2. proxy_max_temp_file_size
- 作用: 定义存储在代理服务器上的临时文件的最大大小。
- 语法:
proxy_max_temp_file_size size; - 默认值:
1024m(1 GB) - 应用场景: 当响应体非常大,不能直接存储在内存中时,使用临时文件来存储响应内容。设置为
0禁止使用临时文件,直接从后端服务器流式传输数据到客户端,可以减少磁盘 I/O,适用于高性能环境。
3. proxy_set_header
- 作用: 向后端服务器转发或修改请求头。
- 语法:
proxy_set_header header value; - 应用场景: 通常用于传递客户端的真实 IP 地址到后端服务器(如
X-Real-IP),或添加其他安全相关的头信息,如X-Forwarded-For、X-Forwarded-Proto等。
4. proxy_cookie_path
- 作用: 修改从后端服务器返回的
Set-Cookie头中的路径。 - 语法:
proxy_cookie_path path replacement; - 默认值: —
- 应用场景: 用于增加 cookie 的安全属性,如将路径设为
/并添加HttpOnly、Secure选项。这样可以提高通过代理服务的 Web 应用的安全性。
这些指令是构建 Nginx 反向代理配置的基础,通过精确地控制如何处理客户端的请求和服务器的响应,可以极大地增强应用的性能、安全性和可靠性。
反向代理的例子
1. 前端开发环境反向代理例子
在前端开发过程中,使用 Nginx 作为反向代理可以有效解决跨域请求问题,同时还可以模拟生产环境的行为。
以下是在 Windows、Mac 以及 Windows/Mac 下的 Docker Desktop 环境中配置 Nginx 反向代理的指南。
Windows 和 Mac 上的 Nginx 反向代理
安装 Nginx
- Windows:访问 Nginx 官网 下载 Windows 版本的 Nginx,解压缩到你的工作目录。
- Mac:使用 Homebrew 安装 Nginx,打开终端,运行命令
brew install nginx。
配置反向代理
打开 Nginx 配置文件:对于 Windows,通常位于解压缩的 Nginx 目录下的
conf/nginx.conf。对于 Mac,通常位于/usr/local/etc/nginx/nginx.conf。编辑配置文件:找到
server块,修改或添加如下配置,假设你的前端项目运行在localhost:5173,而 API 服务运行在https://docs.ffffee.com:8443:
Details
nginx
#user nobody;
worker_processes 1;
#error_log logs/error.log;
#error_log logs/error.log notice;
#error_log logs/error.log info;
#pid logs/nginx.pid;
events {
worker_connections 1024;
}
http {
include mime.types;
default_type application/octet-stream;
#log_format main '$remote_addr - $remote_user [$time_local] "$request" '
# '$status $body_bytes_sent "$http_referer" '
# '"$http_user_agent" "$http_x_forwarded_for"';
#access_log logs/access.log main;
sendfile on;
#tcp_nopush on;
#keepalive_timeout 0;
keepalive_timeout 65;
#gzip on;
server {
listen 80;
server_name localhost;
启动/重启 Nginx:
- Windows:运行
start nginx、.\nginx -s stop、.\nginx -s reload或重新启动 Nginx 以应用配置更改。 - Mac:运行
sudo nginx或sudo nginx -s reload以重新加载配置。
- Windows:运行
Docker Desktop 环境下的 Nginx 反向代理
在使用 Docker Desktop 时,配置 Nginx 反向代理主要考虑网络隔离和服务发现。
1. 创建 Nginx 配置文件
在项目目录中创建 nginx.conf,配置如下,其中 api-service 是你的 API 容器的名称或者使用 host.docker.internal 指向宿主机:
Details
nginx
# 定义事件模块配置,这里设置了 worker 进程能够同时打开的最大连接数为 1024。
events {
    worker_connections  1024;
}

# http 模块用于定义 HTTP 服务的配置。
http {
    # server 块定义了一个虚拟服务器,用于处理客户端的请求。
    server {
        listen  80; # 监听 80 端口,这是 HTTP 默认的端口号。

        # location / 用于匹配所有请求的根路径。
        # 所有指向根路径的请求都会被转发到指定的代理地址。
        location / {
            proxy_pass http://host.docker.internal:5173; # 代理传递请求到宿主机的 5173 端口,通常用于前端项目。
        }

        # location /api/ 用于匹配所有以 /api/ 开头的请求路径。
        location /api/ {
            # proxy_pass http://api-service:3000; # 将请求代理到 Docker 容器中名为 api-service 的服务,监听在 3000 端口。
            proxy_pass https://docs.ffffee.com:8443; # 或者,代理请求到外部的后端 API 服务,此处以 https://docs.ffffee.com:8443 为例。

            # 设置代理请求的头部信息,以确保后端服务能够接收到正确的客户端信息。
            proxy_set_header Host $host;
            proxy_set_header X-Real-IP $remote_addr;
            proxy_set_header X-Forwarded-For $proxy_add_x_forwarded_for;
        }
    }
}
2. 创建 Dockerfile 文件
文件内容如下
Dockerfile
# 使用官方 Nginx 镜像作为基础镜像。
FROM nginx:latest

# 将本地的 Nginx 配置文件复制到容器内的指定位置,替换掉默认配置。
# 这一步是将我们定制化的 nginx.conf 文件放到容器中 Nginx 默认读取配置文件的位置。
COPY nginx.conf /etc/nginx/nginx.conf
3. 构建镜像
bash
docker build -t my-nginx .docker build: Docker 命令用来构建镜像。-t my-nginx:-t选项用于为新建的镜像指定一个标签,这里标签为my-nginx。这样,你就可以通过标签来引用镜像,而不仅仅是 ID。.: 指定 Dockerfile 文件的位置。这里的.表示当前目录,Docker 会在当前目录查找名为Dockerfile的文件。
4. 运行容器
bash
docker run --name my-nginx-proxy -p 80:80 -d my-nginxdocker run: Docker 命令用来运行一个新容器。--name my-nginx-proxy: 为运行的容器指定一个名称my-nginx-proxy。这允许你通过名字来引用容器,而不只是通过容器的 ID。-p 80:80: 端口映射选项。将容器内的 80 端口映射到宿主机的 80 端口。格式为<宿主机端口>:<容器端口>。-d: 以守护(后台)模式运行容器。my-nginx: 使用的镜像名称,这里是之前构建的my-nginx镜像。
5. 常用 Docker 容器操作命令
Details
- 查看正在运行的容器
bash
docker ps- 查看所有容器(包括未运行的)
bash
docker ps -a- 停止运行中的容器
bash
docker stop my-nginx-proxy使用 docker stop 后跟容器名或 ID 来停止一个运行中的容器。
- 启动已停止的容器
bash
docker start my-nginx-proxy使用 docker start 后跟容器名或 ID 来启动一个已停止的容器。
- 重启容器
bash
docker restart my-nginx-proxy使用 docker restart 后跟容器名或 ID 来重启一个容器。
- 查看容器的日志
bash
docker logs my-nginx-proxy使用 docker logs 后跟容器名或 ID 来查看容器的输出日志。
- 删除容器
bash
docker rm my-nginx-proxy使用 docker rm 后跟容器名或 ID 来删除已停止的容器。如果要删除运行中的容器,需要先停止容器,或使用 -f(force)选项强制删除。
- 进入容器
bash
docker exec -it my-nginx-proxy /bin/bash使用 docker exec 后跟 -it(交互式 tty)和容器名或 ID,以及要执行的命令(如 /bin/bash)来进入运行中的容器内部。这对于调试或配置容器内部环境非常有用。
6. docker compose 的方式
如果你想通过 docker-compose.yml 文件来启动 Nginx 反向代理服务,你可以创建一个包含 Nginx 服务定义的 docker-compose.yml 文件。这种方式可以简化服务的部署和管理,特别是当你需要同时运行多个服务时。
yaml
version: "3" # 指定使用的 Docker Compose 文件版本。版本3是较新的版本之一,提供了大量功能。

services: # 定义了要运行的服务容器。这里我们定义了一个服务。
  nginx: # 服务的名称,这里使用 nginx 作为服务名称。
    image: my-nginx # 指定服务容器使用的镜像,这里使用之前构建的 my-nginx 镜像。
    ports: # 端口映射配置,将容器的端口映射到宿主机的端口。
      - "80:80" # 将容器的 80 端口映射到宿主机的 80 端口,允许通过宿主机的 80 端口访问 Nginx 服务。
    volumes: # 卷映射配置,将宿主机的文件或目录挂载到容器内的指定路径。
- ./nginx.conf:/etc/nginx/nginx.conf:ro # 将宿主机当前目录下的 nginx.conf 文件挂载到容器内的 /etc/nginx/nginx.conf,只读模式。- 停止并删除容器、网络、卷和镜像
bash
docker compose down这个命令会停止并删除通过 docker-compose.yml 文件定义的所有服务的容器,以及默认网络。如果配合 -v 参数使用,则也会删除所有挂载的卷。
- 构建并启动服务
bash
docker compose up --build -d--build参数表示在启动服务之前先构建(或重新构建)镜像。-d参数(即--detach)表示在后台运行服务,不会在当前终端显示日志输出。
7. 其他 Docker Compose 常用命令
Details
- 查看服务日志
bash
docker compose logs这个命令用于查看服务的输出日志。如果只想查看某个特定服务的日志,可以在命令后添加服务名。
- 列出运行的容器
bash
docker compose ps该命令用于列出当前目录下 docker-compose.yml 文件定义的所有服务的容器状态。
- 重新启动服务
bash
docker compose restart该命令用于重新启动一个或多个服务。
- 停止服务
bash
docker compose stop该命令用于停止运行中的服务,不会删除容器。
- 启动服务
bash
docker compose start用于启动已经存在但被停止的服务容器。
访问应用
无论是直接在 Windows/Mac 上配置,还是在 Docker Desktop 环境下,你现在可以通过 http://localhost 访问你的前端应用,并且 /api/ 路径的请求将被代理到指定的 API 服务。
以上是在不同环境下配置 Nginx 反向代理的基本步骤,帮助前端开发环境解决跨域问题,以及模拟更复杂的生产环境配置。
2. 请求指定路径(/api/)开头的反向代理到后端的服务
nginx
# 配置一个 location 块来处理以 "/api/" 开头的请求
location ^~ /api/ {
  # 添加 HTTP/3 预连接服务提示,指示浏览器可以使用 HTTP/3 连接到端口 8443,有效期为一天
  add_header alt-svc 'h3=":8443"; ma=86400';

  # 添加一个响应头,用于标记是否通过 HTTP/3 (QUIC) 协议服务请求
  # $http3 变量在 Nginx 中用于表示请求是否使用了 HTTP/3
  add_header QUIC-Status $http3; # 当使用QUIC时发送此头部

  # 将所有匹配当前 location 的请求代理到指定的后端服务器群组
  # “loadbackend” 需要在上游服务器配置块中预先定义
  proxy_pass http://loadbackend;

  # 禁止使用临时文件“解决图片加载失败的问题” <-----
  # 如果不希望使用临时文件存储响应,可以启用以下配置
  # 这有助于解决大文件传输问题,如大图片或视频加载失败的问题
  # proxy_max_temp_file_size 0; # 禁止使用临时文件

  # 设置要转发到后端服务器的 HTTP 头部信息
  proxy_set_header Host $host;  # 将请求的 Host 头部信息转发到后端
  proxy_set_header X-Real-IP $remote_addr;  # 将客户端的 IP 地址转发到后端
  proxy_set_header X-Forwarded-For $proxy_add_x_forwarded_for;  # 追加客户端的 IP 地址到 X-Forwarded-For 头部,用于维护原始的 IP 地址信息

  # 设置 cookie 路径和相关属性,增强安全性
  # httponly 防止 JavaScript 访问 cookie
  # secure 表示 cookie 仅通过 HTTPS 传输
  # SameSite=Strict 表示 cookie 仅能在同一站点请求中被发送,防止 CSRF 攻击
  proxy_cookie_path / "/; httponly; secure; SameSite=Strict";
}
参考链接
- nginx 之 proxy_pass 详解 https://blog.csdn.net/z69183787/article/details/131548753
- Nginx 反向代理 location 与 proxy_pass 配置规则总结 https://blog.csdn.net/qq_36528215/article/details/123570962