环境配置-Windows 安装 VS2020
环境安装 - 运行项目 - 其他
一、环境安装
1.下载安装 Visual Studio 2022
上面链接下载的内容
vs_community__789ff72b1cae4bc0926e0f730fadfa39.exe双击它安装 Visual Studio 2022
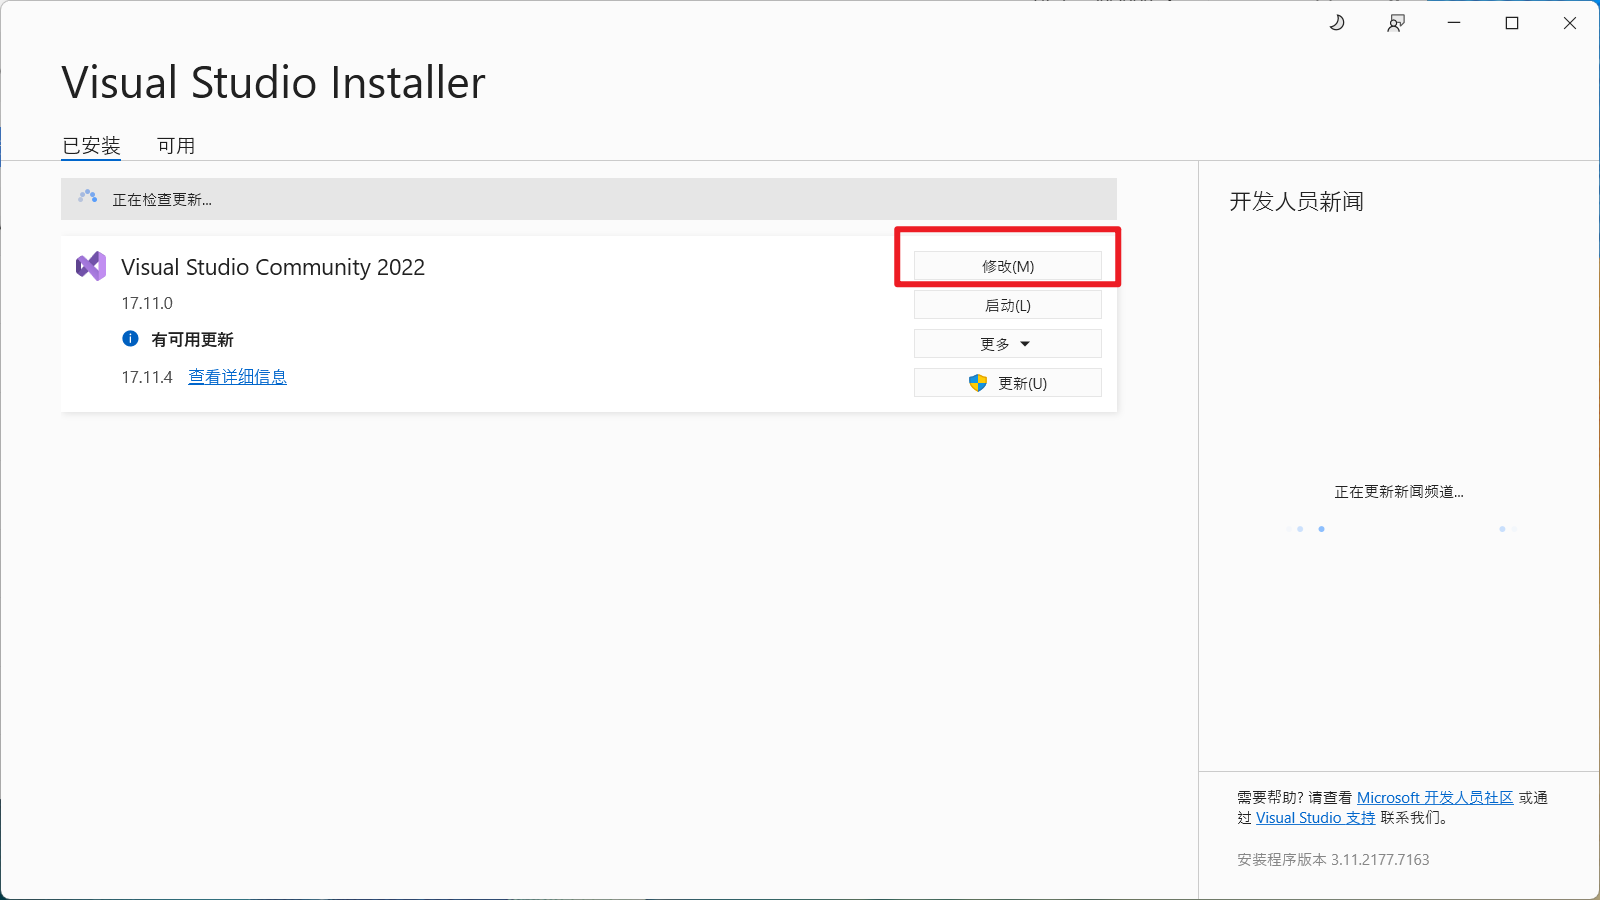
工作负荷 - 勾选 ✔
使用C++的桌面开发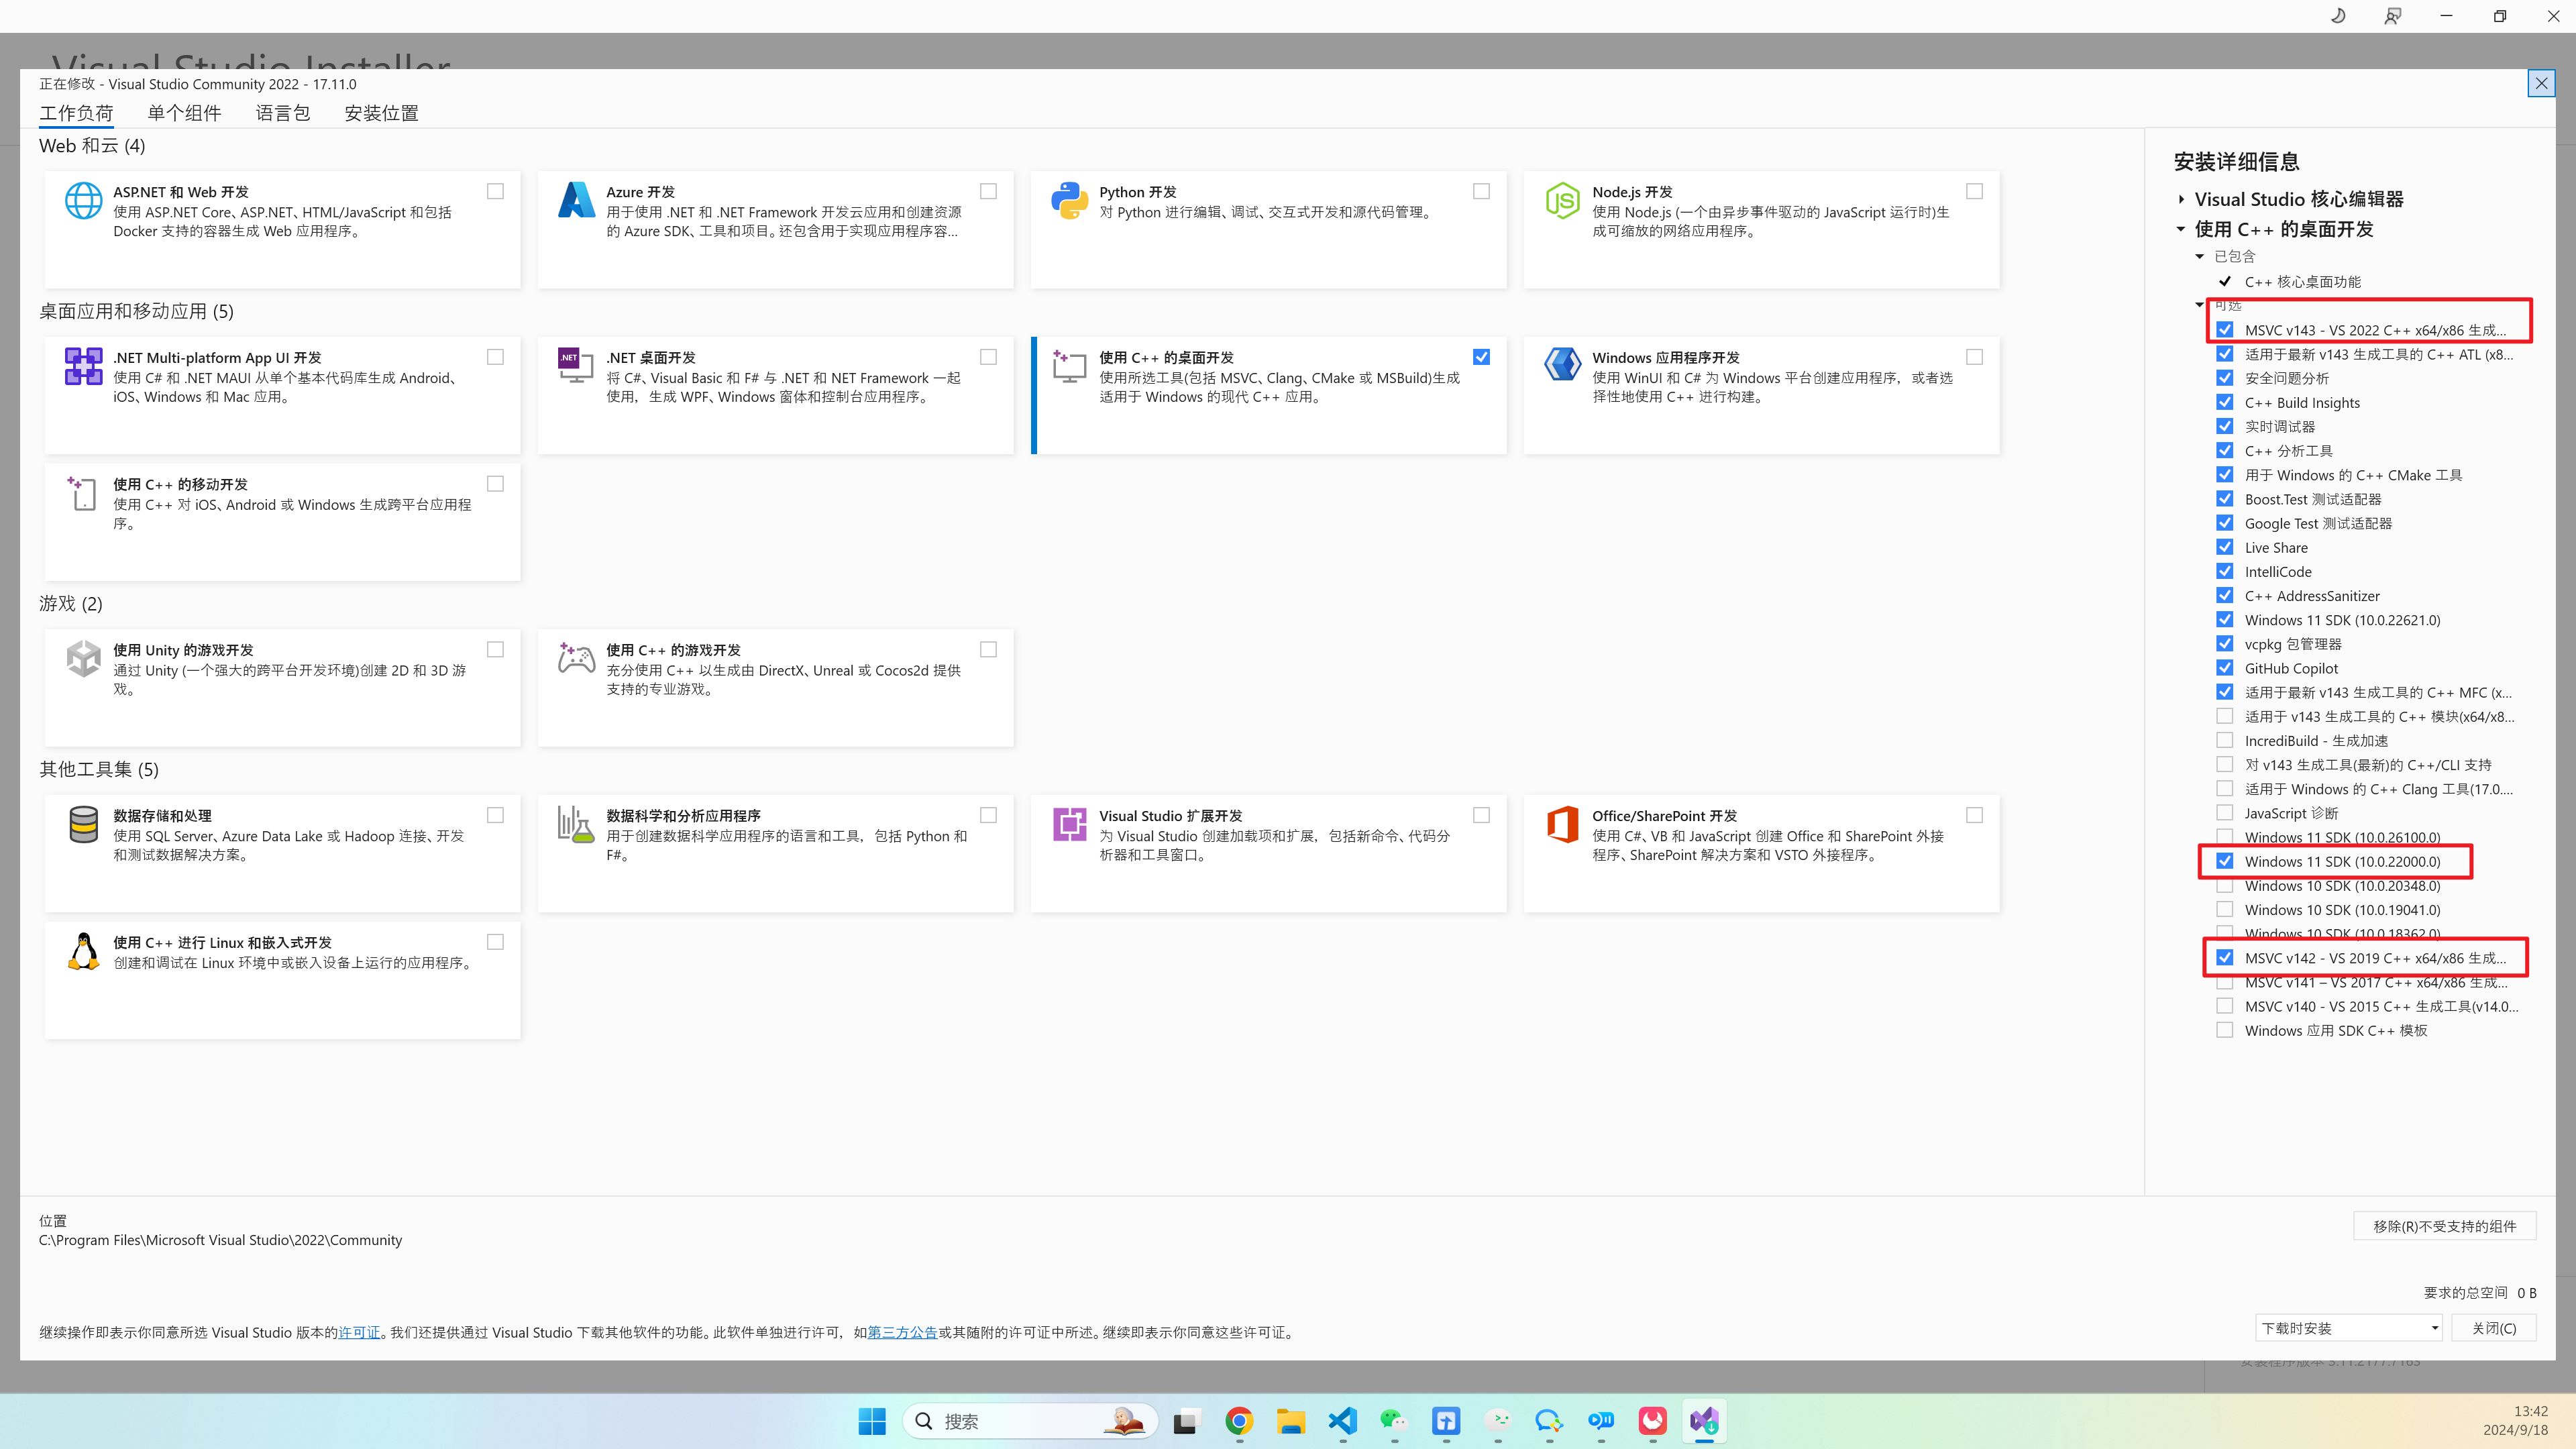
勾选
MSVC v142 编译器- 点击更改(或者安装)
electron 官网 Native modules(原生模块)
提示
如果您使用原生模块,则必须确保它们使用 v142 的 MSVC 编译器(在 Visual Studio 2017 中提供)进行编译。 您还必须检查 native module 提供或引用的 .dll 或 .lib 文件是否可用于 Arm 上的 Windows

2. 安装 Node.js 环境
镜像地址:https://registry.npmmirror.com/binary.html?path=node/latest-v18.x/
v18.16.0 https://registry.npmmirror.com/-/binary/node/latest-v18.x/node-v18.16.0-x64.msi
点击上面链接安装 Node.js 18.16.0 版本就可以了,一直下一步就可以
3. 安装 python 环境
镜像地址:https://registry.npmmirror.com/binary.html?path=python/3.9.12/
安装 python3.9.12 https://registry.npmmirror.com/-/binary/python/3.9.12/python-3.9.12-amd64.exe
bash
python --version
Python 3.9.12
4. 全局安装 node-gyp
bash
npm install node-gyp -g如果出现下面的问题
powershell
PS C:\Users\1\Desktop>  node-gyp -v
node-gyp : 无法加载文件 C:\Users\1\AppData\Roaming\npm\node-gyp.ps1,因为在此系统上禁止运行脚本。有关详细信息,请参阅 https:/go.microsoft.com/fwlink/?LinkID=135170 中的 about_Execution_Policies。
所在位置 行:1 字符: 2
+  node-gyp -v
+  ~~~~~~~~
    + CategoryInfo          : SecurityError: (:) [],PSSecurityException
    + FullyQualifiedErrorId : UnauthorizedAccess
打开 power shell,输入 Get-ExecutionPolicy 看是否输出 Restricted
powershell
PS C:\Users\1\Desktop> Get-ExecutionPolicy
Restricted
可以通过 Set-ExecutionPolicy RemoteSigned 命令允许运行脚本,如果出现下面错误,是要求你在管理员的 powershell 下运行或者Set-ExecutionPolicy -Scope CurrentUser
powershell
PS C:\Users\1\Desktop>Set-ExecutionPolicy RemoteSigned

执行策略更改
执行策略可帮助你防止执行不信任的脚本。更改执行策略可能会产生安全风险,如 https:/go.microsoft.com/fwlink/?LinkID=135170
中的 about_Execution_Policies 帮助主题所述。是否要更改执行策略?
[Y] 是(Y)  [A] 全是(A)  [N] 否(N)  [L] 全否(L)  [S] 暂停(S)  [?] 帮助 (默认值为“N”): A
Set-ExecutionPolicy : 对注册表项“HKEY_LOCAL_MACHINE\SOFTWARE\Microsoft\PowerShell\1\ShellIds\Microsoft.PowerShell”的访
问被拒绝。 要更改默认(LocalMachine)作用域的执行策略,请使用“以管理员身份运行”选项启动 Windows PowerShell。要更改当前用
户的执行策略,请运行 "Set-ExecutionPolicy -Scope CurrentUser"。
所在位置 行:1 字符: 1
+ Set-ExecutionPolicy RemoteSigned
+ ~~~~~~~~~~~~~~~~~~~~~~~~~~~~~~~~
    + CategoryInfo          : PermissionDenied: (:) [Set-ExecutionPolicy], UnauthorizedAccessException
    + FullyQualifiedErrorId : System.UnauthorizedAccessException,Microsoft.PowerShell.Commands.SetExecutionPolicyCommand
PS C:\Users\1\Desktop>
二、运行项目
1. 安装模块
npm install2. 编译原生模块
screenshot/main.mm、shared_memory/main.mm(仅Windows)
npm run rebuild3. 启动 electron
npm start4. 打包构建
npm run rebuildnpm run dist注意
mac 打包后需要代码签名后才可以截屏,否则会出现开发环境正常,打包后出现白屏的情况。
5. 快捷键
截图 ctrl + shift + A

取消(退出截图) ESC
三、已知问题
1. 绘制矩形窗口的时候,从下往上绘制,绘制完成后移动窗口可以把矩形移动到窗口以外
已修复
2. 缩放比在 125% 175% 图片会失真的问题 (系统的问题)
3. 5k 显示器 400% 缩放比,窗口识别会失败
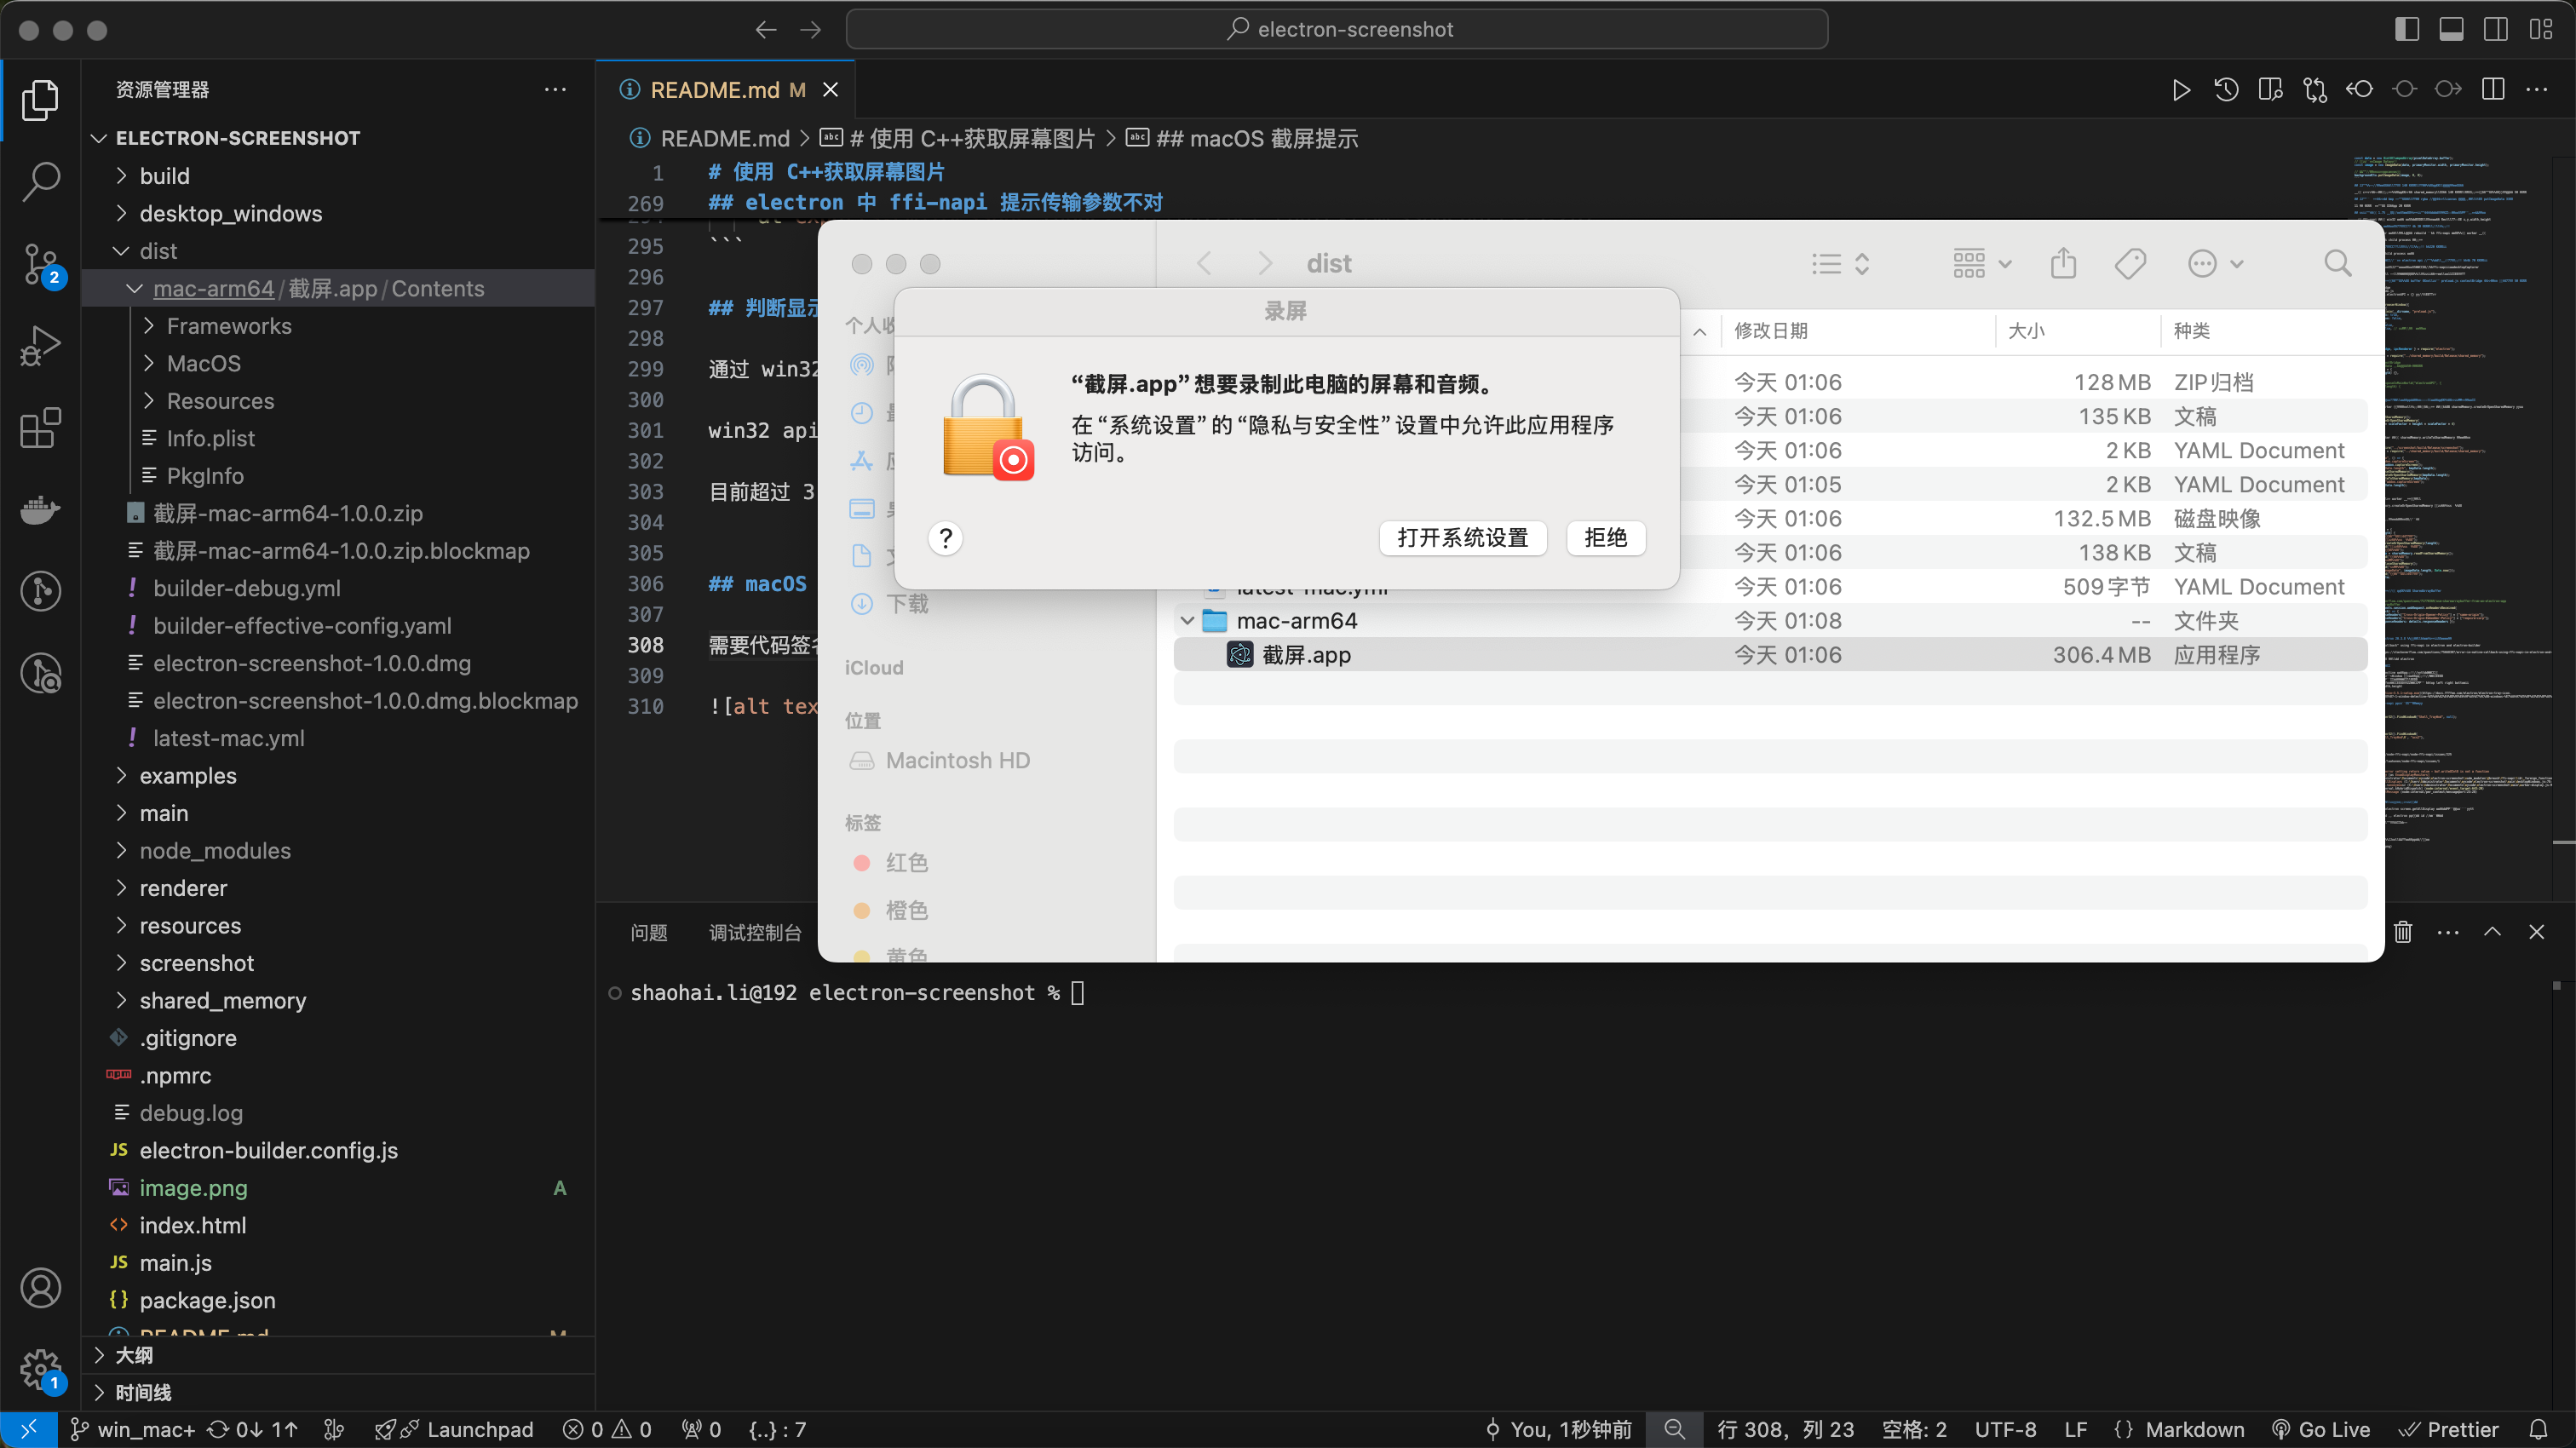
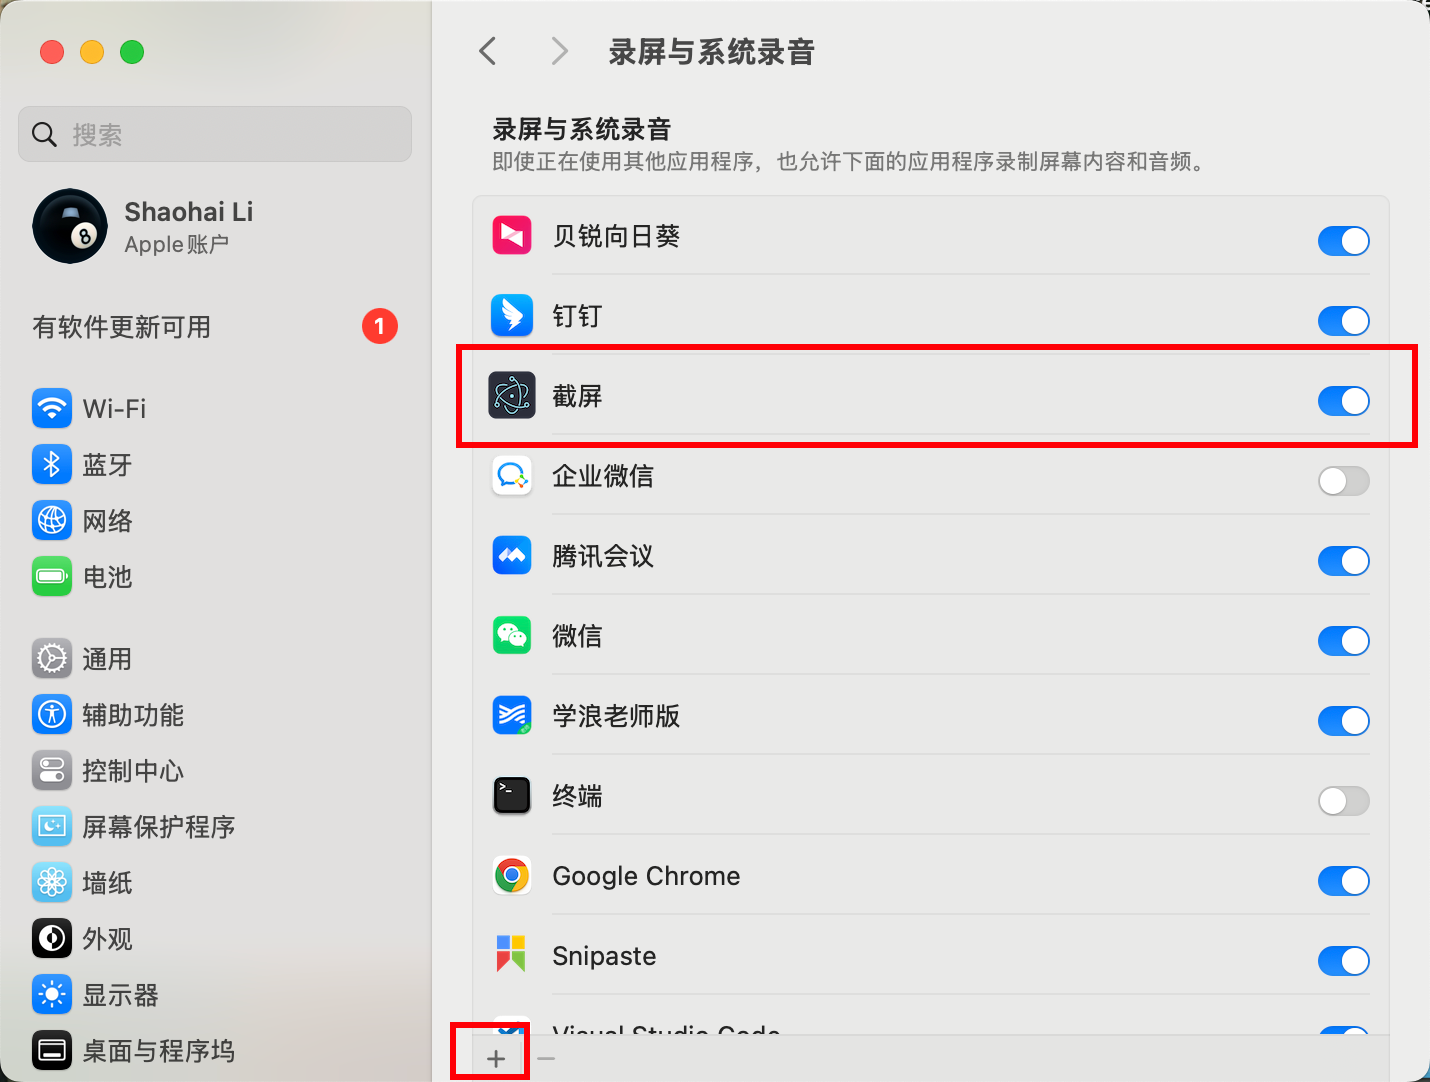
4. macOS 截屏提示
需要代码签名后放可以截屏,否则获取到的是白屏
5. 判断显示器的位置,相对与主显示器的
通过 win32 api 和 electron screen.getAllDisplay 获取的坐标无法一一对应 - api 使用错误导致的
win32 api 返回的 id 和 electron 提供的 id 是不一样的
目前超过 3 个屏幕,暂时没有适配
四、性能优化
c++直接返回 rgba 数据 让 JavaScript 端处理
https://chat.openai.com/c/58ef482d-16f3-49e8-b07d-f3edb95b69c6
c++ 返回的图片是 BGRA 格式
如果直接返回需要 JavaScript 进行转换,比较耗时(4k 32 毫秒)
故在 c++端转换 (4k 16 毫秒)
JS
convertBGRAtoRGBA(pixelDataArray);

export default function convertBGRAtoRGBA(buffer) {
  for (let i = 0; i < buffer.length; i += 4) {
    // Swap the red and blue channels
    const temp = buffer[i];
    buffer[i] = buffer[i + 2];
    buffer[i + 2] = temp;
  }
  return buffer;
}
cpp
    GetDIBits(hdcWindow, hbmCapture, 0, height, rgbaData.data(), &bi, DIB_RGB_COLORS);
    auto conversion_start = std::chrono::high_resolution_clock::now();
    // 转换从BGRA到RGBA
    for (size_t i = 0; i < rgbaData.size(); i += 4) {
        std::swap(rgbaData[i], rgbaData[i + 2]);
    }
    auto conversion_end = std::chrono::high_resolution_clock::now();
    log << "Time for [BGRA to RGBA conversion]: " << std::chrono::duration<double, std::milli>(conversion_end - conversion_start).count() << " ms\n";
把 rgba 像素绘制到 canvas 上, 开始使用了 Uint8ClampedArray.from 比较耗时(4k 69 毫秒)
改成 new Uint8ClampedArray(pixelDataArray.buffer) 直接使用 buffer 耗时可以降到到 21 毫秒
js
// const data = Uint8ClampedArray.from(pixelDataArray);
console.time("创建一个Image Data对象");
const data = new Uint8ClampedArray(pixelDataArray.buffer);
// 创建一个Image Data对象
const image = new ImageData(data, primaryMonitor.width, primaryMonitor.height);

// 将图像数据绘制到canvas上
backgroundCtx.putImageData(image, 0, 0);
截图以前是写入文件,耗时 140 毫秒,改成内存共享,无需写入文件
使用 c++插件实现跨进程内存共享插件 shared_memory,优化 140 毫秒,渲染进程读取图片内存依然需要 50 毫秒
截图一开始返回的 bmp 位图文件,改成 rgba 像素返回,canvas 无需转成,直接 putImageData 即可
由 90 毫秒加载图片 优化到 20 毫秒
当缩放比在 1.75 也就是屏幕不可以被缩放比整除的时候会出现屏幕坐标和宽度错误
使用 ffi-napi 调用 win32 获取 屏幕的句柄,然后获取 Rect,算出来 x,y,width,height
使用 ffi-napi 获取屏幕耗时较长 4k 30 毫秒,是同步任务
使用 node.js worker 获取,这里需要 rebuild 一下 ffi-napi 才可以在 worker 使用
当然也可以使用 fork child process 子进程
获取屏幕是截图耗时较长,并且是同步任务 (220 毫秒)
使用 worker 或者 child process 获取
获取桌面所有的窗口是一个 electron api 是异步的,也是耗时任务 (4k 70 毫秒)
Promise.all 跟获取屏幕截图、获取屏幕窗口大小(ffi-napi)、desktopCapturer
放到一个 Promise.all 中,这样子就可以同时做三件事情,减少等待时间
electron 渲染进程读取图片内存 buffer 之后,通过 preload.js contextBridge 返回数据 导致耗时 50 毫秒
- 去掉 contextBridge
- 设置运行访问 node.js
- 代码改成 window.electronAPI = {} 方式直接暴露
js
mainWindow = new BrowserWindow({
  webPreferences: {
    preload: path.join(__dirname, "preload.js"),
    nodeIntegration: true,
    contextIsolation: false,
    sandbox: false,
    webSecurity: false,
    spellcheck: false, // 关闭拼写检查错误
  },
});
js
const { contextBridge, ipcRenderer } = require("electron");

const sharedMemory = require("../shared_memory/build/Release/shared_memory");

// 这里不使用 contextBridge
// 原因是 getImageData 转换需要50~90毫秒
window.electronAPI = {
  getImageData(length) {},
};

// contextBridge.exposeInMainWorld("electronAPI", {
//   getImageData(length) {
// });
共享内存跨进程无法访问,获取到的数据为空,获取共享内存显示操作错误等
- 父子进程或者 worker 读写数据,必须先在父进程 调用下面 sharedMemory.createOrOpenSharedMemory 方法
js
sharedMemory.closeSharedMemory();
sharedMemory.createOrOpenSharedMemory(
  Math.ceil(width * scaleFactor * height * scaleFactor * 4)
);
然后在子进程或 worker 调用 sharedMemory.writeToSharedMemory 写入数据
js
const addon = require("../screenshot/build/Release/screenshot");
const sharedMemory = require("../shared_memory/build/Release/shared_memory");

process.on("message", () => {
  console.time("addon.captureScreen");
  const bmpData = addon.captureScreen();
  console.log("bmpData.length", bmpData.length);
  sharedMemory.closeSharedMemory();
  sharedMemory.createOrOpenSharedMemory(bmpData.length);
  sharedMemory.writeToSharedMemory(bmpData);
  console.timeEnd("addon.captureScreen");
  process.send(bmpData.length);
});- 非父子派生进程,非 worker 线程读写,
必须要先 sharedMemory.createOrOpenSharedMemory 创建或者打开内存
然后再读取 数据
读取的数据必须是要和写入的数据大小一致
js
window.electronAPI = {
  getImageData(length) {
    console.time("读取图片完整耗时");
    console.time("创建或者打开内存");
    sharedMemory.createOrOpenSharedMemory(length);
    console.timeEnd("创建或者打开内存");
    console.time("读取内存");
    const imageData = sharedMemory.readFromSharedMemory();
    console.timeEnd("读取内存");
    console.time("关闭内存");
    sharedMemory.closeSharedMemory();
    console.timeEnd("关闭内存");
    console.log("imageData", imageData.length, Date.now());
    console.timeEnd("读取图片完整耗时");
    return imageData;
  },
electron 渲染进程启用 共享内存 SharedArrayBuffer
js
// https://stackoverflow.com/questions/71770369/use-sharearraybuffer-from-an-electron-app
// Enable SharedArrayBuffer
mainWindow.webContents.session.webRequest.onHeadersReceived(
  (details, callback) => {
    details.responseHeaders["Cross-Origin-Opener-Policy"] = ["same-origin"];
    details.responseHeaders["Cross-Origin-Embedder-Policy"] = ["require-corp"];
    callback({ responseHeaders: details.responseHeaders });
  }
);
ffi-napi 在 electron 20.3.8 以上版本(不包含)引入报错
"Error in native callback" using ffi-napi in electron and electron-builder
stack overflow https://stackoverflow.com/questions/75668307/error-in-native-callback-using-ffi-napi-in-electron-and-electron-builder
使用小于等于 20.3.8 版本的 electron
获取桌面任务栏窗口
- 使用 Window Detective 获取到任务栏对应的窗口类
- 使用 ffi-napi 通过“Window 类”获取到任务栏窗口句柄
- 通过窗口句柄遍历所有的子窗口,句柄
- 通过 ffi-napi 根据窗口句柄然会窗口坐标 (top left right bottom)
- 最后转成 x,y,width,height
使用 Window-Detective-3.5.1-setup.exe
electron 中 ffi-napi 提示传输参数不对
js
// 失败
const hwnd = getUser32().FindWindowW("Shell_TrayWnd", null);
js
// 成功
const hwnd = getUser32().FindWindowW(
  Buffer.from(`Shell_TrayWnd\0`, "ucs2"),
  null
);
https://github.com/node-ffi-napi/node-ffi-napi/issues/225
https://github.com/lwahonen/node-ffi-napi/issues/1
bash
Error: TypeError: error setting return value - buf.writeUInt8 is not a function
    at Object.proxy [as EnumDisplayMonitors] (C:\Users\Administrator\Documents\mycode\electron-screenshot\node_modules\@breush\ffi-napi\lib\_foreign_function.js:61:14)
    at Object.getAllDisplays (C:\Users\Administrator\Documents\mycode\electron-screenshot\main\desktopWindows.js:78:15)
    at MessagePort.<anonymous> (C:\Users\Administrator\Documents\mycode\electron-screenshot\main\worker-display.js:9:10)
    at [nodejs.internal.kHybridDispatch] (node:internal/event_target:643:20)
    at exports.emitMessage (node:internal/per_context/messageport:23:28)