nginx https
nginx https 主要是由 ngx_http_ssl_module 模块支持
https://nginx.org/en/docs/http/ngx_http_ssl_module.html
https 是什么
HTTPS(全称为超文本传输协议安全版)是一种用于安全通信的协议。它是 HTTP(超文本传输协议)的一个扩展,通过使用 SSL(安全套接层)或 TLS(传输层安全)协议来增加数据传输的安全性。这意味着 HTTPS 可以帮助保护用户的数据免受中间人攻击,确保在互联网上的数据传输是加密的。
使用 HTTPS,网站与浏览器之间交换的所有信息,如密码、信用卡号等敏感数据,都将进行加密。当你浏览网站时,在网址栏中看到“https://”开头,而不是普通的“http://”,就表示该网站使用了 HTTPS,提供了额外的安全保护。
nginx https 自签名方式
1. 下载安装 openssl
openssl 官网 https://slproweb.com/products/Win32OpenSSL.html
也可以直接点击下载安装包 https://slproweb.com/download/Win64OpenSSL_Light-3_3_0.exe
powershell
PS C:\Users\Administrator\Desktop> openssl -v
OpenSSL 3.2.0 23 Nov 2023 (Library: OpenSSL 3.2.0 23 Nov 2023)
2. 创建私钥和证书签名请求(CSR)
powershell
openssl req -new -newkey rsa:2048 -nodes -keyout localhost.key -out localhost.csr日志
powershell
PS C:\Users\Administrator\Desktop\nginx-course\nginx-https> openssl req -new -newkey rsa:2048 -nodes -keyout localhost.key -out localhost.csr
...+.........+.+.....+...+....+......+..+.......+..+...+......+.+...+......+..+.......+...+..............+...+......+......+.+..............+.+...+..+.........+......+....+...+..+++++++++++++++++++++++++++++++++++++++*.+......+.........+.+...+...........+.+......+...+............+..+++++++++++++++++++++++++++++++++++++++*..+......+....+............+.........+...+.....+......+....+...+..+.......+.....+....+.....+.+..................+..+.+........+....+..+......+...+......+.+............+.....+...+.......+.................+.+..............+......+..........+........+.+...+..+.............+...+...+..+....+.........+..+...+.......+...++++++
....+......+.........+......+.........+.........+.........+..+.+..+...+...+++++++++++++++++++++++++++++++++++++++*...+++++++++++++++++++++++++++++++++++++++*..+.+............+...............+..+......+............+.+............+..+.............+...+...........+...+.+..+............+.......+...+...+........+......+...+...............+.............+...+..+.......+..+.+...............+.....+...+....+..+...+......+..........+.....+......+..........+...+.....+.......+........+...+............+.......+.....+...+......+.+..................+...........+....+...+....................+..........+..............+.+..+.+...........+.+..+............+.+............+..+....+.....+....+...+...+......+...+.....+.............+...+..+...+......+.+...+......+.....++++++
-----
You are about to be asked to enter information that will be incorporated
into your certificate request.
What you are about to enter is what is called a Distinguished Name or a DN.
There are quite a few fields but you can leave some blank
For some fields there will be a default value,
If you enter '.', the field will be left blank.
-----
Country Name (2 letter code) [AU]:CN
State or Province Name (full name) [Some-State]:Beijing
Locality Name (eg, city) []:Beijing
Organization Name (eg, company) [Internet Widgits Pty Ltd]:lizhongyi
Organizational Unit Name (eg, section) []:it
Common Name (e.g. server FQDN or YOUR name) []:localhost
Email Address []:

Please enter the following 'extra' attributes
to be sent with your certificate request
A challenge password []:
An optional company name []:
PS C:\Users\Administrator\Desktop\nginx-course\nginx-https> ls


    目录: C:\Users\Administrator\Desktop\nginx-course\nginx-https


Mode                 LastWriteTime         Length Name
----                 -------------         ------ ----
-a----         2024/4/30      3:00           1018 localhost.csr
-a----         2024/4/30      2:59           1732 localhost.key


PS C:\Users\Administrator\Desktop\nginx-course\nginx-https>
3. 创建自签名证书 - localhost.crt
powershell
openssl x509 -req -days 365 -in localhost.csr -signkey localhost.key -out localhost.crt日志
powershell
PS C:\Users\Administrator\Desktop\nginx-course\nginx-https> openssl x509 -req -days 365 -in localhost.csr -signkey localhost.key -out localhost.crt
Certificate request self-signature ok
subject=C=CN, ST=Beijing, L=Beijing, O=lizhongyi, OU=it, CN=localhost
PS C:\Users\Administrator\Desktop\nginx-course\nginx-https> ls


    目录: C:\Users\Administrator\Desktop\nginx-course\nginx-https


Mode                 LastWriteTime         Length Name
----                 -------------         ------ ----
-a----         2024/4/30      3:02           1290 localhost.crt
-a----         2024/4/30      3:00           1018 localhost.csr
-a----         2024/4/30      2:59           1732 localhost.key
4. 启动一个 nginx 容器,拷贝默认的 nginx.conf 文件 和 conf.d 目录
启动一个 nginx 测试容器,--rm 是容器退出后删除
powershell
docker run --rm -it --name https-nginx -p 8088:80 nginx拷贝容器的 nginx.conf 文件到当前目录下
powershell
docker cp https-nginx:/etc/nginx/nginx.conf nginx.confDetails
nginx
user  nginx;
worker_processes  auto;

error_log  /var/log/nginx/error.log notice;
pid        /var/run/nginx.pid;


events {
    worker_connections  1024;
}


http {
    include       /etc/nginx/mime.types;
    default_type  application/octet-stream;

    log_format  main  '$remote_addr - $remote_user [$time_local] "$request" '
                      '$status $body_bytes_sent "$http_referer" '
                      '"$http_user_agent" "$http_x_forwarded_for"';

    access_log  /var/log/nginx/access.log  main;

    sendfile        on;
    #tcp_nopush     on;

    keepalive_timeout  65;

    #gzip  on;

    include /etc/nginx/conf.d/*.conf;
}
拷贝容器的 conf.d 目录
powershell
docker cp https-nginx:/etc/nginx/conf.d .日志
powershell
PS C:\Users\Administrator\Desktop\nginx-course\nginx-https> docker cp https-nginx:/etc/nginx/nginx.conf nginx.conf
Successfully copied 2.56kB to C:\Users\Administrator\Desktop\nginx-course\nginx-https\nginx.conf
PS C:\Users\Administrator\Desktop\nginx-course\nginx-https> docker cp https-nginx:/etc/nginx/conf.d .
Successfully copied 3.58kB to C:\Users\Administrator\Desktop\nginx-course\nginx-https\.
PS C:\Users\Administrator\Desktop\nginx-course\nginx-https> code .
PS C:\Users\Administrator\Desktop\nginx-course\nginx-https> ls


    目录: C:\Users\Administrator\Desktop\nginx-course\nginx-https


Mode                 LastWriteTime         Length Name
----                 -------------         ------ ----
d-----         2024/4/30      3:09                conf.d
-a----         2024/4/30      3:02           1290 localhost.crt
-a----         2024/4/30      3:00           1018 localhost.csr
-a----         2024/4/30      2:59           1732 localhost.key
-a----         2024/2/15      0:13            648 nginx.conf


PS C:\Users\Administrator\Desktop\nginx-course\nginx-https>
5. 添加一个 conf.d/https.conf 配置文件,由 conf.d/default.conf 文件修改而来
conf.d/default.conf 文件内容如下
nginx
server {
    listen       80;
    listen  [::]:80;
    server_name  localhost;

    #access_log  /var/log/nginx/host.access.log  main;

    location / {
        root   /usr/share/nginx/html;
        index  index.html index.htm;
    }

    #error_page  404              /404.html;

    # redirect server error pages to the static page /50x.html
    #
    error_page   500 502 503 504  /50x.html;
    location = /50x.html {
        root   /usr/share/nginx/html;
    }

    # proxy the PHP scripts to Apache listening on 127.0.0.1:80
    #
    #location ~ \.php$ {
    #    proxy_pass   http://127.0.0.1;
    #}

    # pass the PHP scripts to FastCGI server listening on 127.0.0.1:9000
    #
    #location ~ \.php$ {
    #    root           html;
    #    fastcgi_pass   127.0.0.1:9000;
    #    fastcgi_index  index.php;
    #    fastcgi_param  SCRIPT_FILENAME  /scripts$fastcgi_script_name;
    #    include        fastcgi_params;
    #}

    # deny access to .htaccess files, if Apache's document root
    # concurs with nginx's one
    #
    #location ~ /\.ht {
    #    deny  all;
    #}
}
创建 https.conf 配置文件,内容如下:
powershell
ni conf.d/https.confconf.d/https.conf
配置参数 nginx ngx_http_ssl_module 官网 https://nginx.org/en/docs/http/ngx_http_ssl_module.html
nginx
server {
listen 443 ssl;
keepalive_timeout 70;
6. 创建 Dockerfile
创建 Dockerfile 文件 (mac/linux 使用 touch Dockerfile)
powershell
ni DockerfileDockerfile 文件内容如下
Dockerfile
FROM nginx
# 创建SSL证书目录并清理默认配置
RUN mkdir -p /etc/nginx/ssl && rm -rf /etc/nginx/conf.d/*

# 设置工作目录
WORKDIR /etc/nginx/ssl

# 复制证书和配置文件到容器中
COPY ./localhost.crt /etc/nginx/ssl/
COPY ./localhost.key /etc/nginx/ssl/
COPY ./nginx.conf /etc/nginx/nginx.conf
COPY ./conf.d/ /etc/nginx/conf.d/

# 暴露80和443端口
EXPOSE 80 443
构建镜像
powershell
docker build -t https-nginx .运行容器
powershell
docker run -d --name my-nginx-container -p 80:80 -p 443:443 https-nginx7. 测试 http
使用 curl 方式
powershell
.\curl.exe -I -k https://localhost:443powershell
PS C:\Users\Administrator\Desktop\nginx-course\curl-8.7.1_7-win64-mingw\bin> .\curl.exe -I -k https://localhost:443
HTTP/1.1 200 OK
Server: nginx/1.25.4
Date: Mon, 29 Apr 2024 19:46:23 GMT
Content-Type: text/html
Content-Length: 615
Last-Modified: Wed, 14 Feb 2024 16:03:00 GMT
Connection: keep-alive
ETag: "65cce434-267"
Accept-Ranges: bytes

PS C:\Users\Administrator\Desktop\nginx-course\curl-8.7.1_7-win64-mingw\bin>
使用浏览器测试
8. 访问 http 重定向到 https
conf.d/default.conf 文件内容如下
nginx
server {
    listen       80;
    listen  [::]:80;
    server_name  localhost;
    return 301 https://$server_name$request_uri;
}
强制停止容器 (不要在生产环境使用-f 命令)
docker rm -f my-nginx-container构建镜像
powershell
docker build -t https-nginx .运行容器
powershell
docker run -d --name my-nginx-container -p 80:80 -p 443:443 https-nginx查看容器运行状态
powershell
PS C:\Users\Administrator\Desktop\nginx-course\nginx-https> docker ps -a
CONTAINER ID   IMAGE         COMMAND                   CREATED         STATUS         PORTS                                      NAMES
18e1ce9c54ba   https-nginx   "/docker-entrypoint.…"   5 seconds ago   Up 5 seconds   0.0.0.0:80->80/tcp, 0.0.0.0:443->443/tcp   my-nginx-container
PS C:\Users\Administrator\Desktop\nginx-course\nginx-https>
访问 http://localhost/ 将会自动跳转到 https://localhost/
nginx https 免费证书(需要域名)
云服务器申请免费证书(需要注册域名)
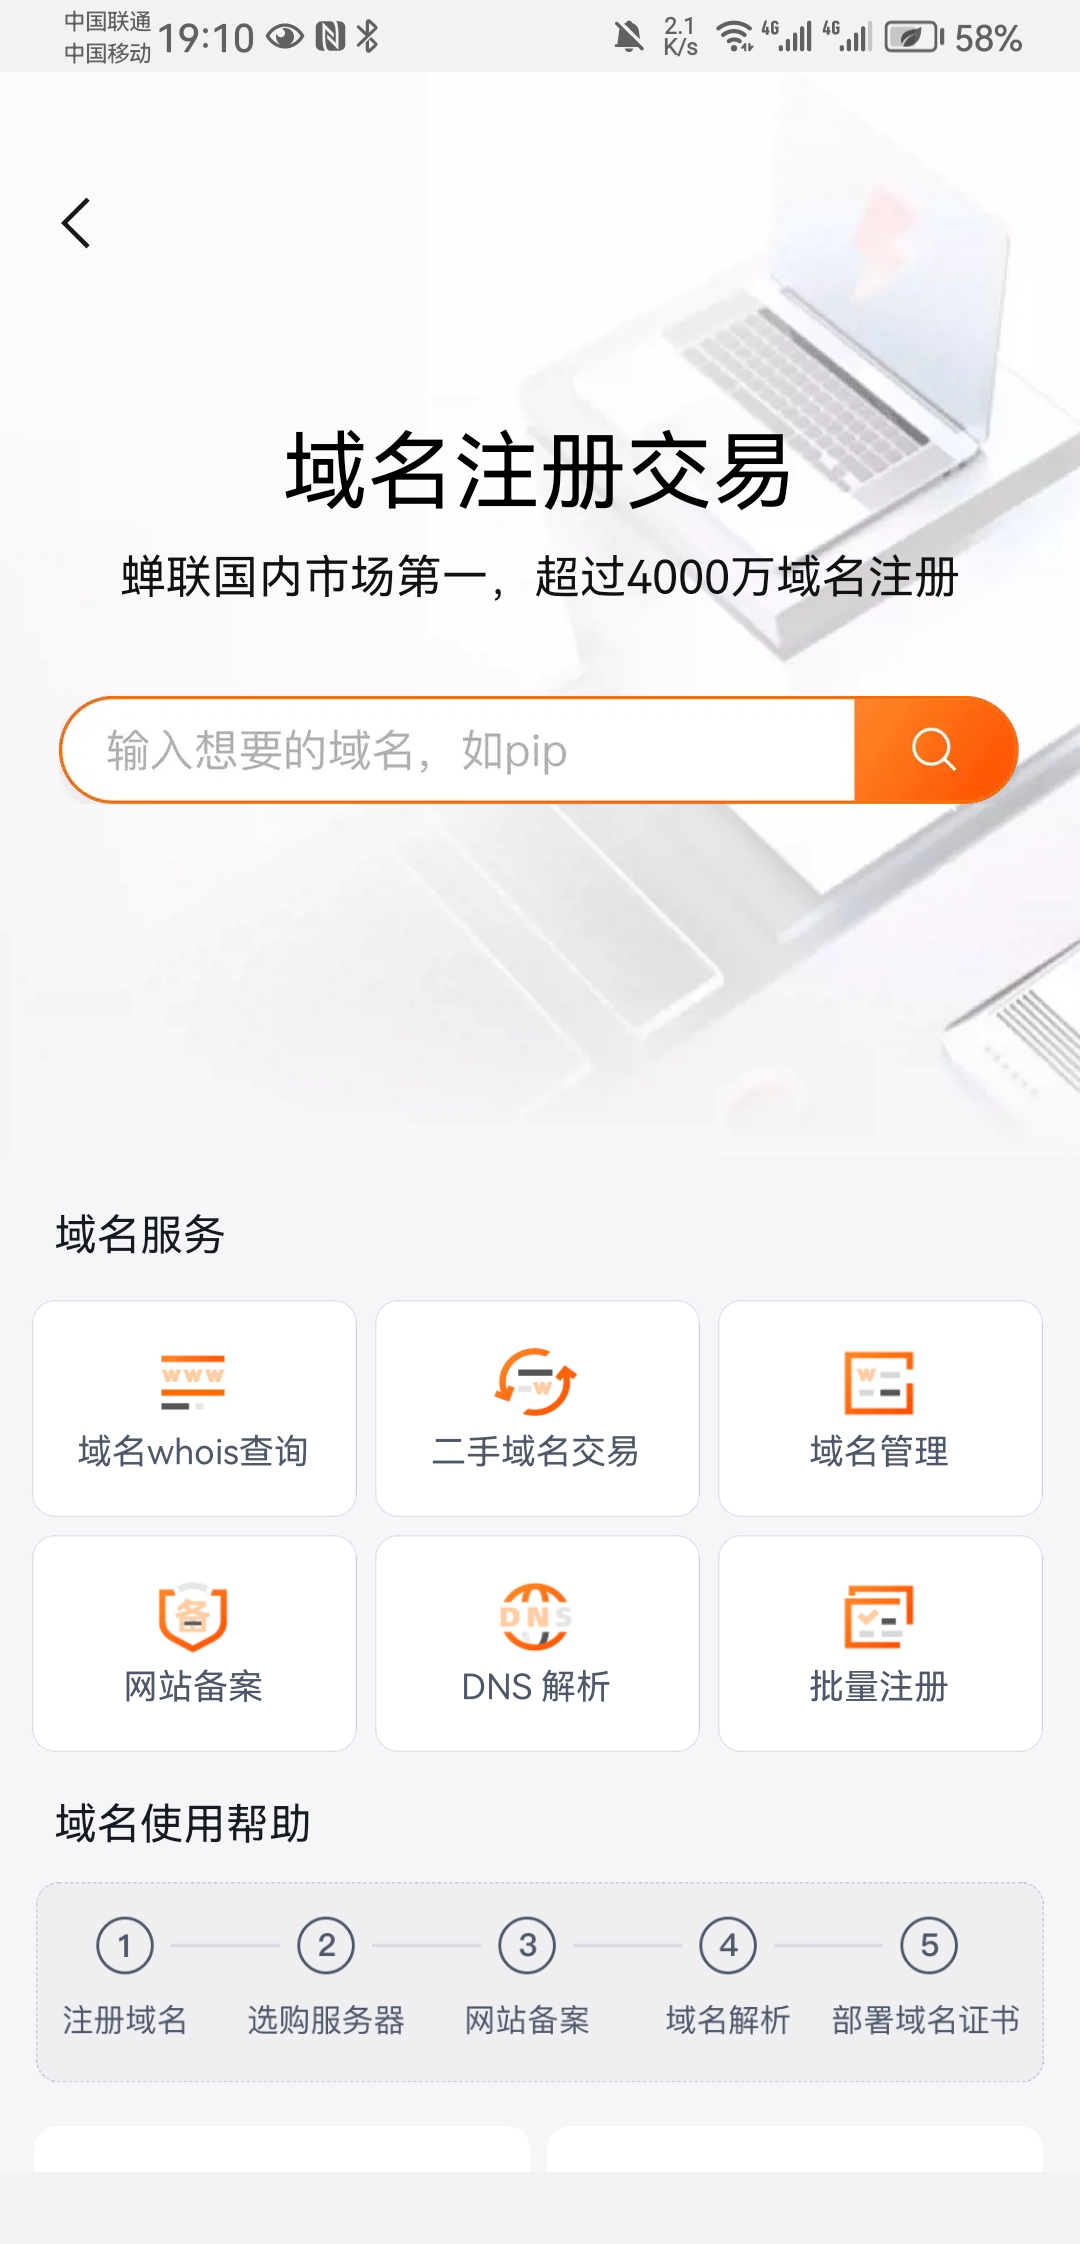
1. 注册域名(自行 阿里云 APP - 运维 - 域名注册)
- 底部点击
运维-域名注册
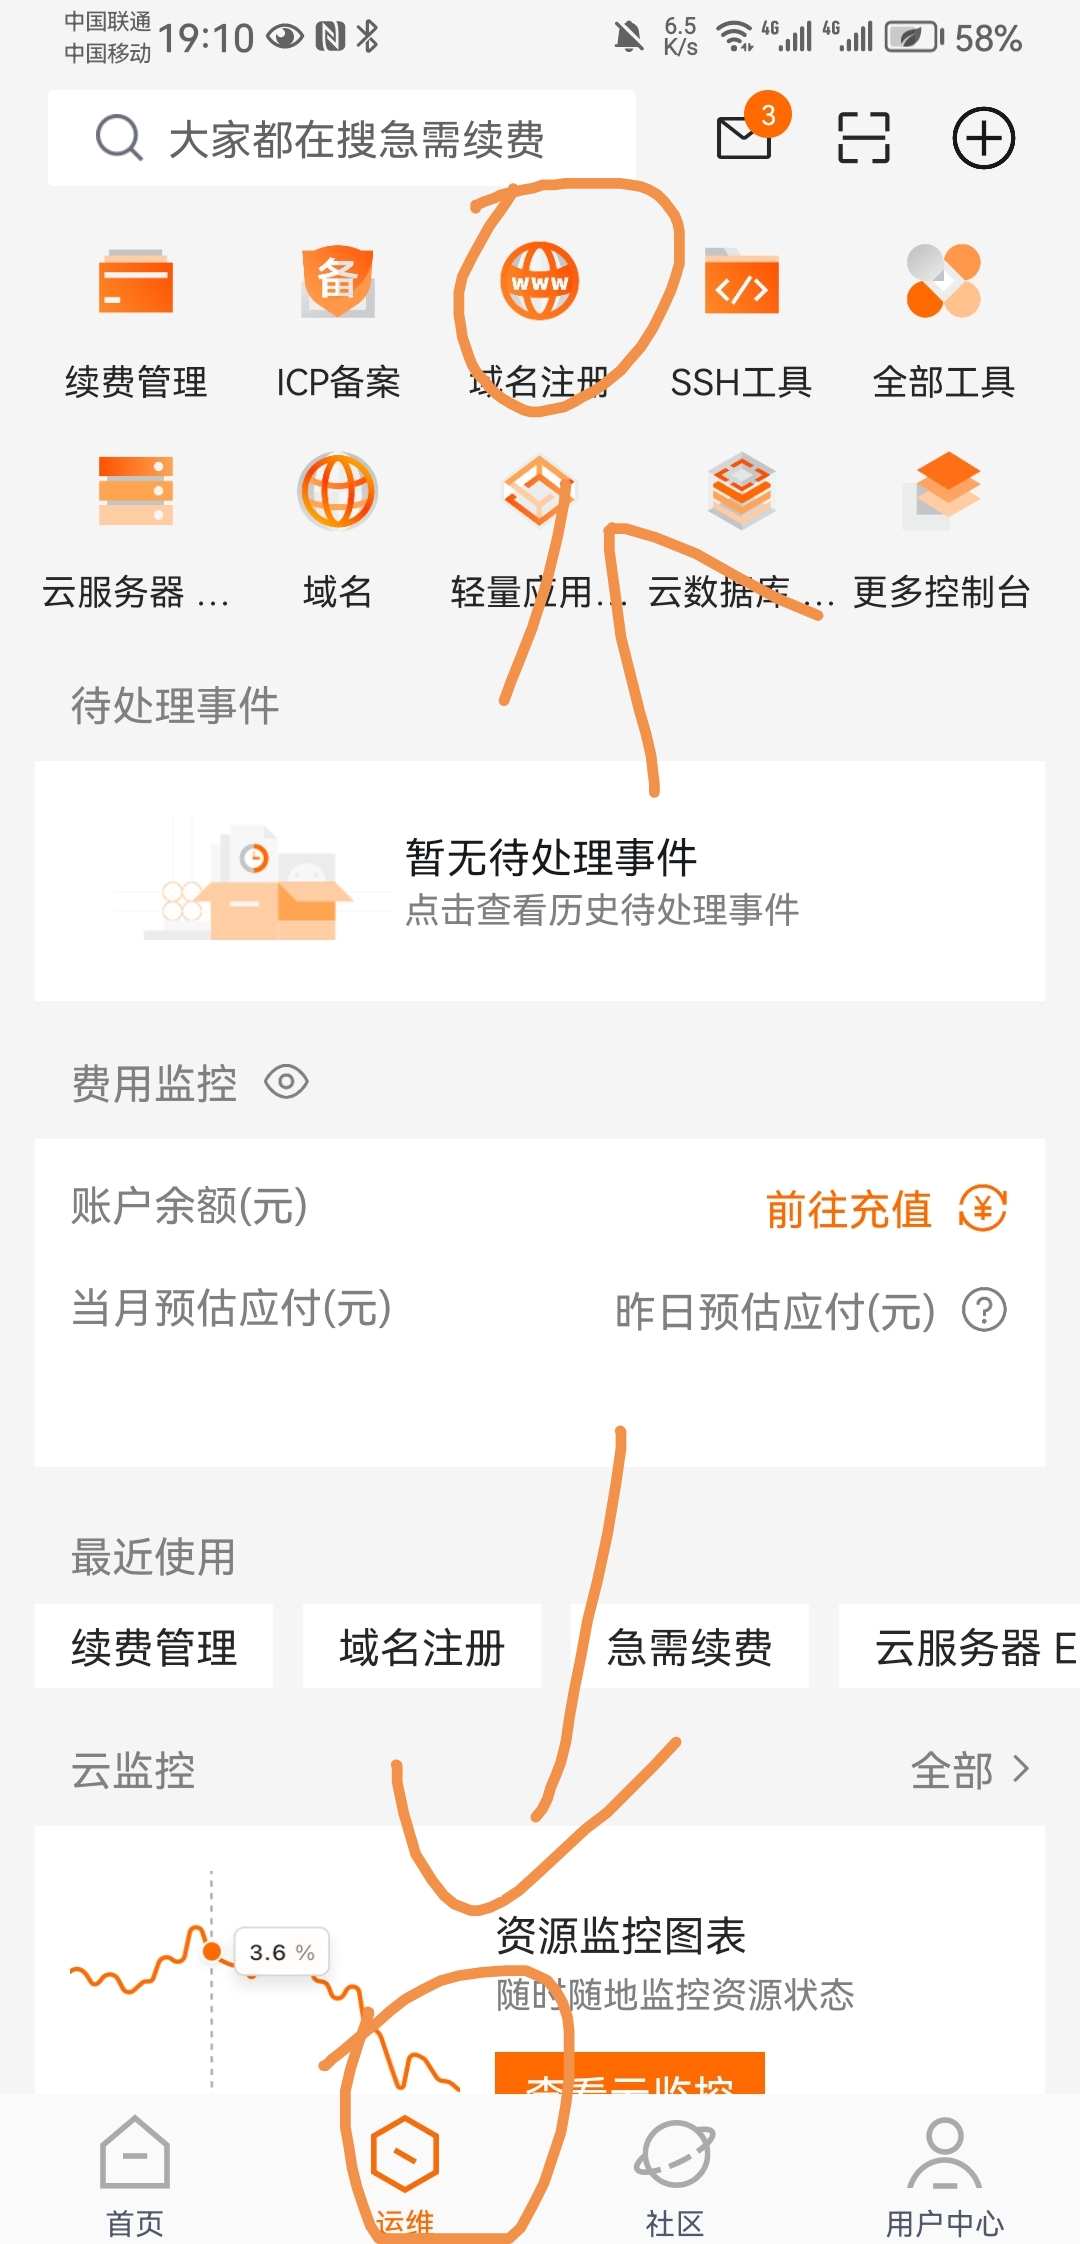
- 域名注册 页面,输入自己喜欢的域名按照流程注册即可
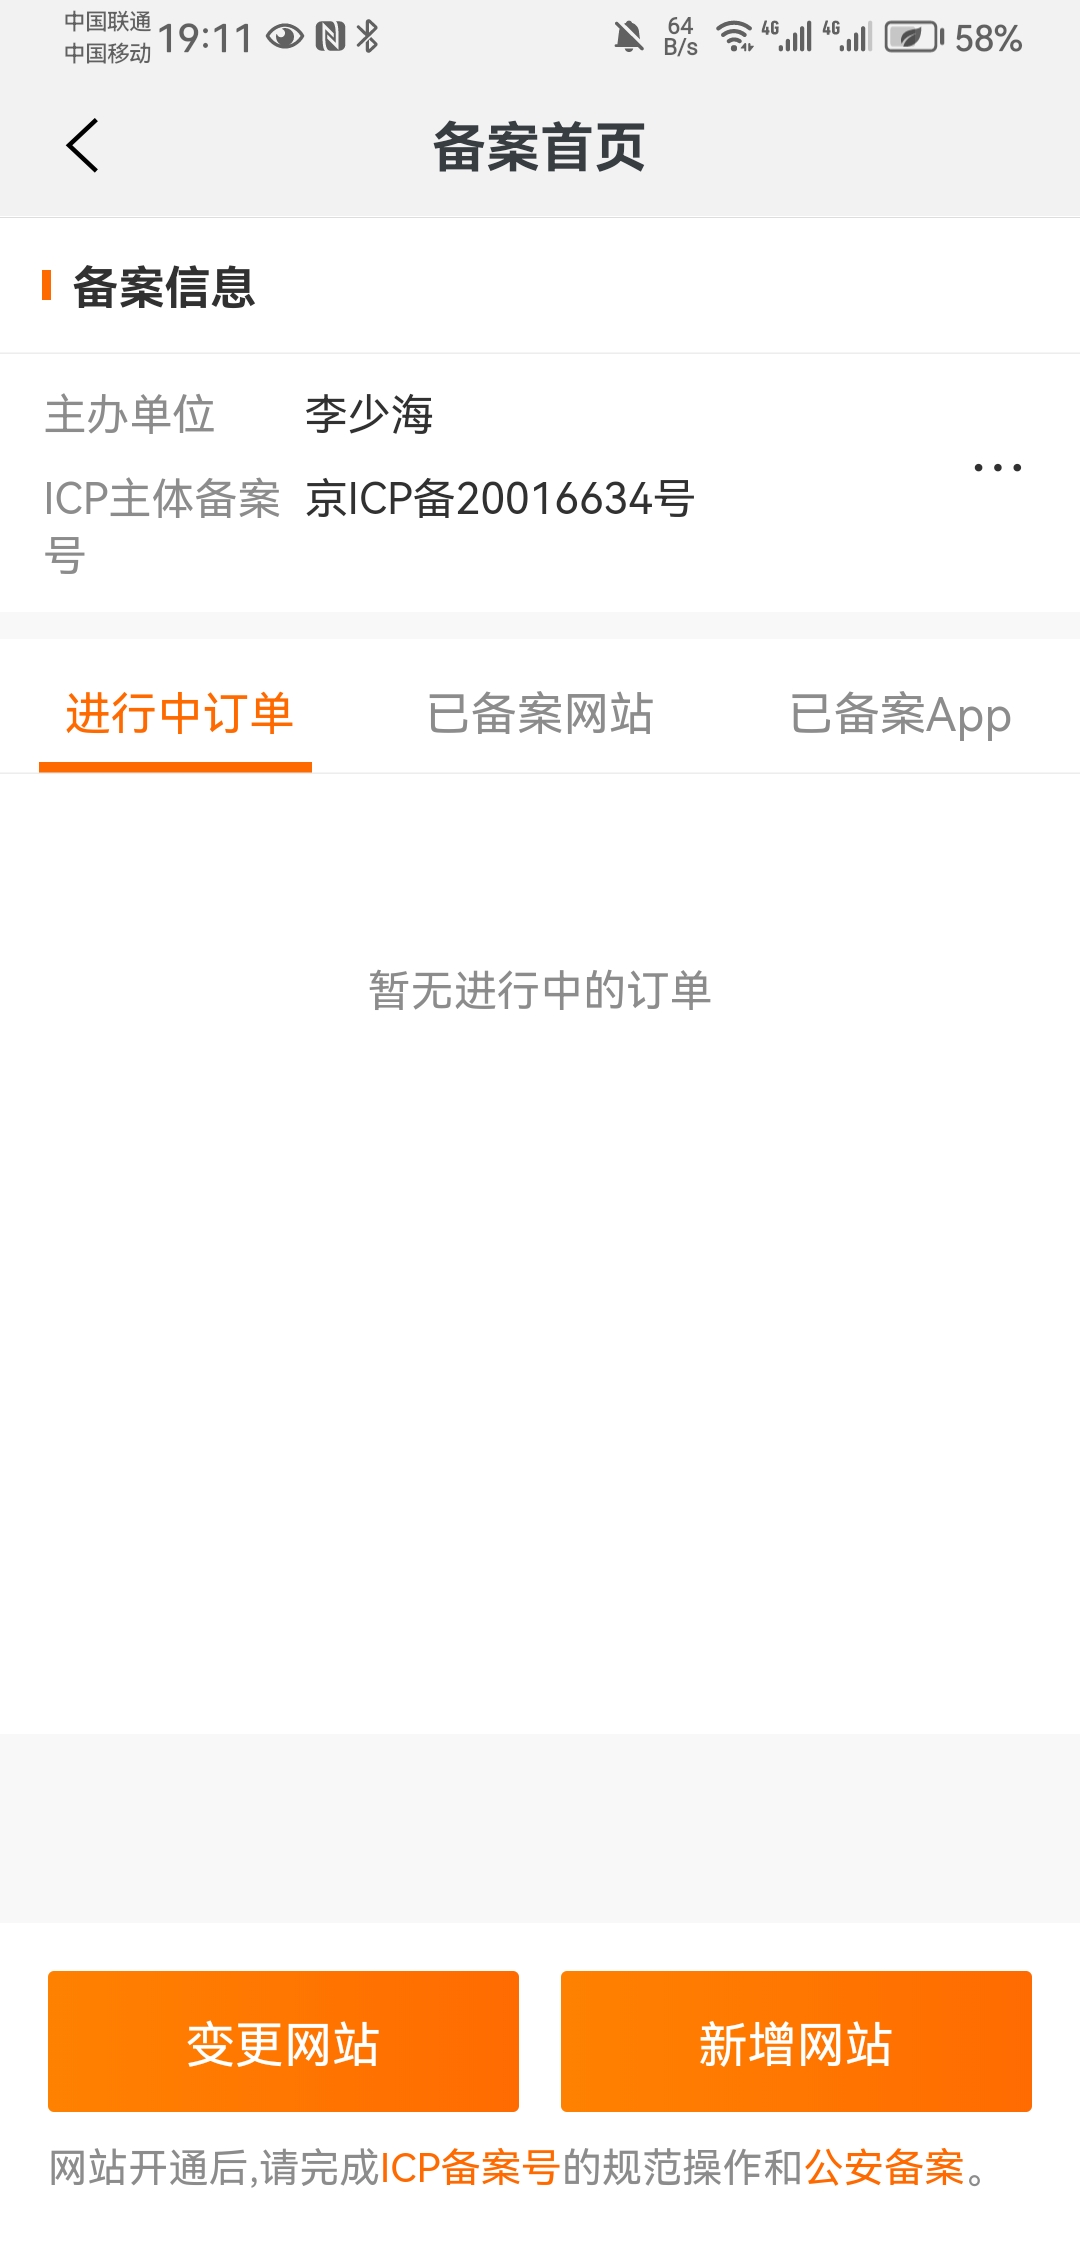
2. 域名 ICP 备案(自行 阿里云 APP - 运维 - ICP 备案)
- 底部点击
运维-ICP备案
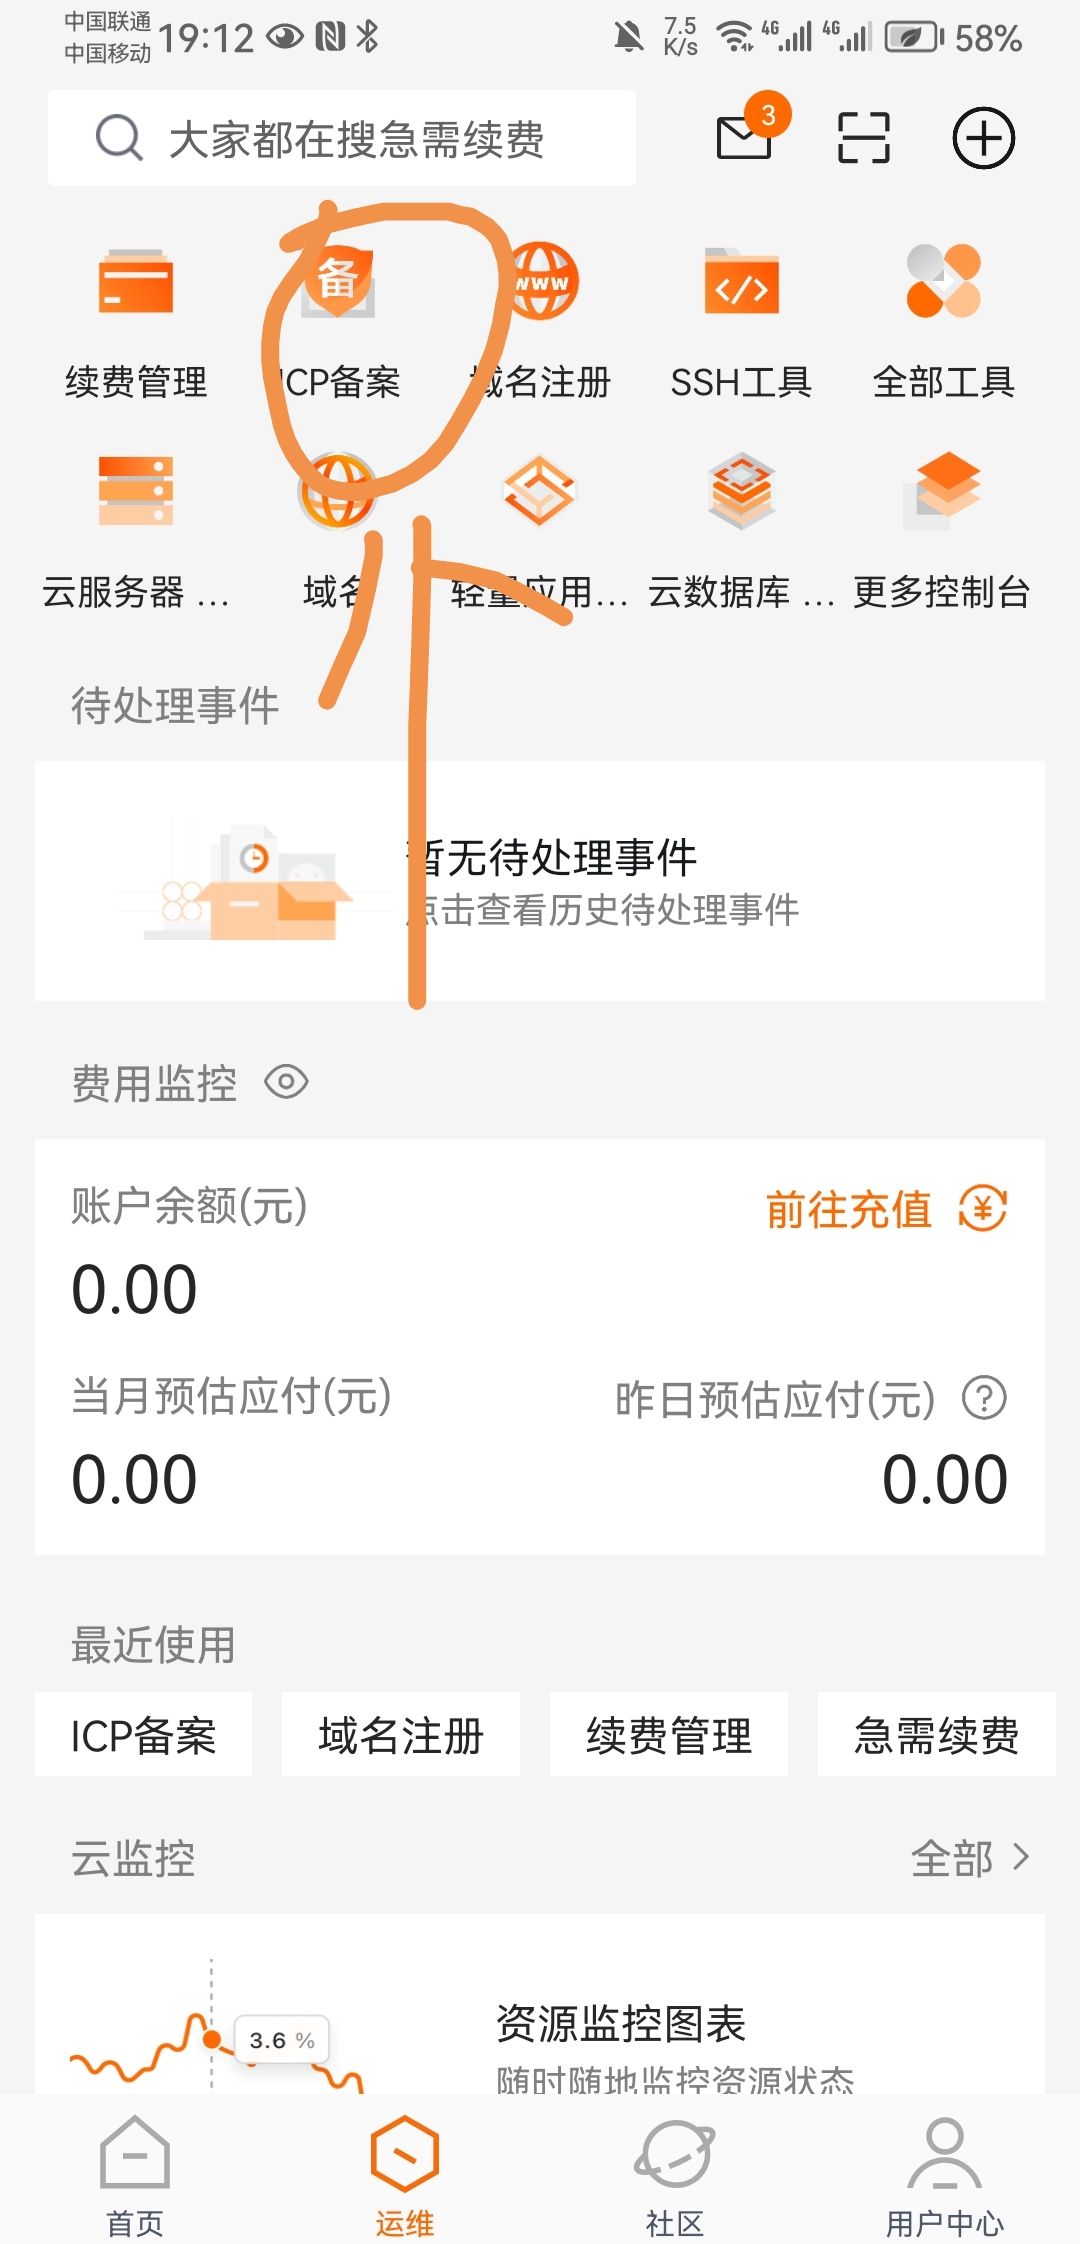
- ICP 备案 添加自己的网站信息 - 需要正确书写 网站情况,需要工信部审核通过才可以(一般需要 3~5 个工作日)
3. 阿里云域名解析(首次)
阿里云网站登录后
右上角 - 点击
控制台搜索
域名点击 控制台 -
域名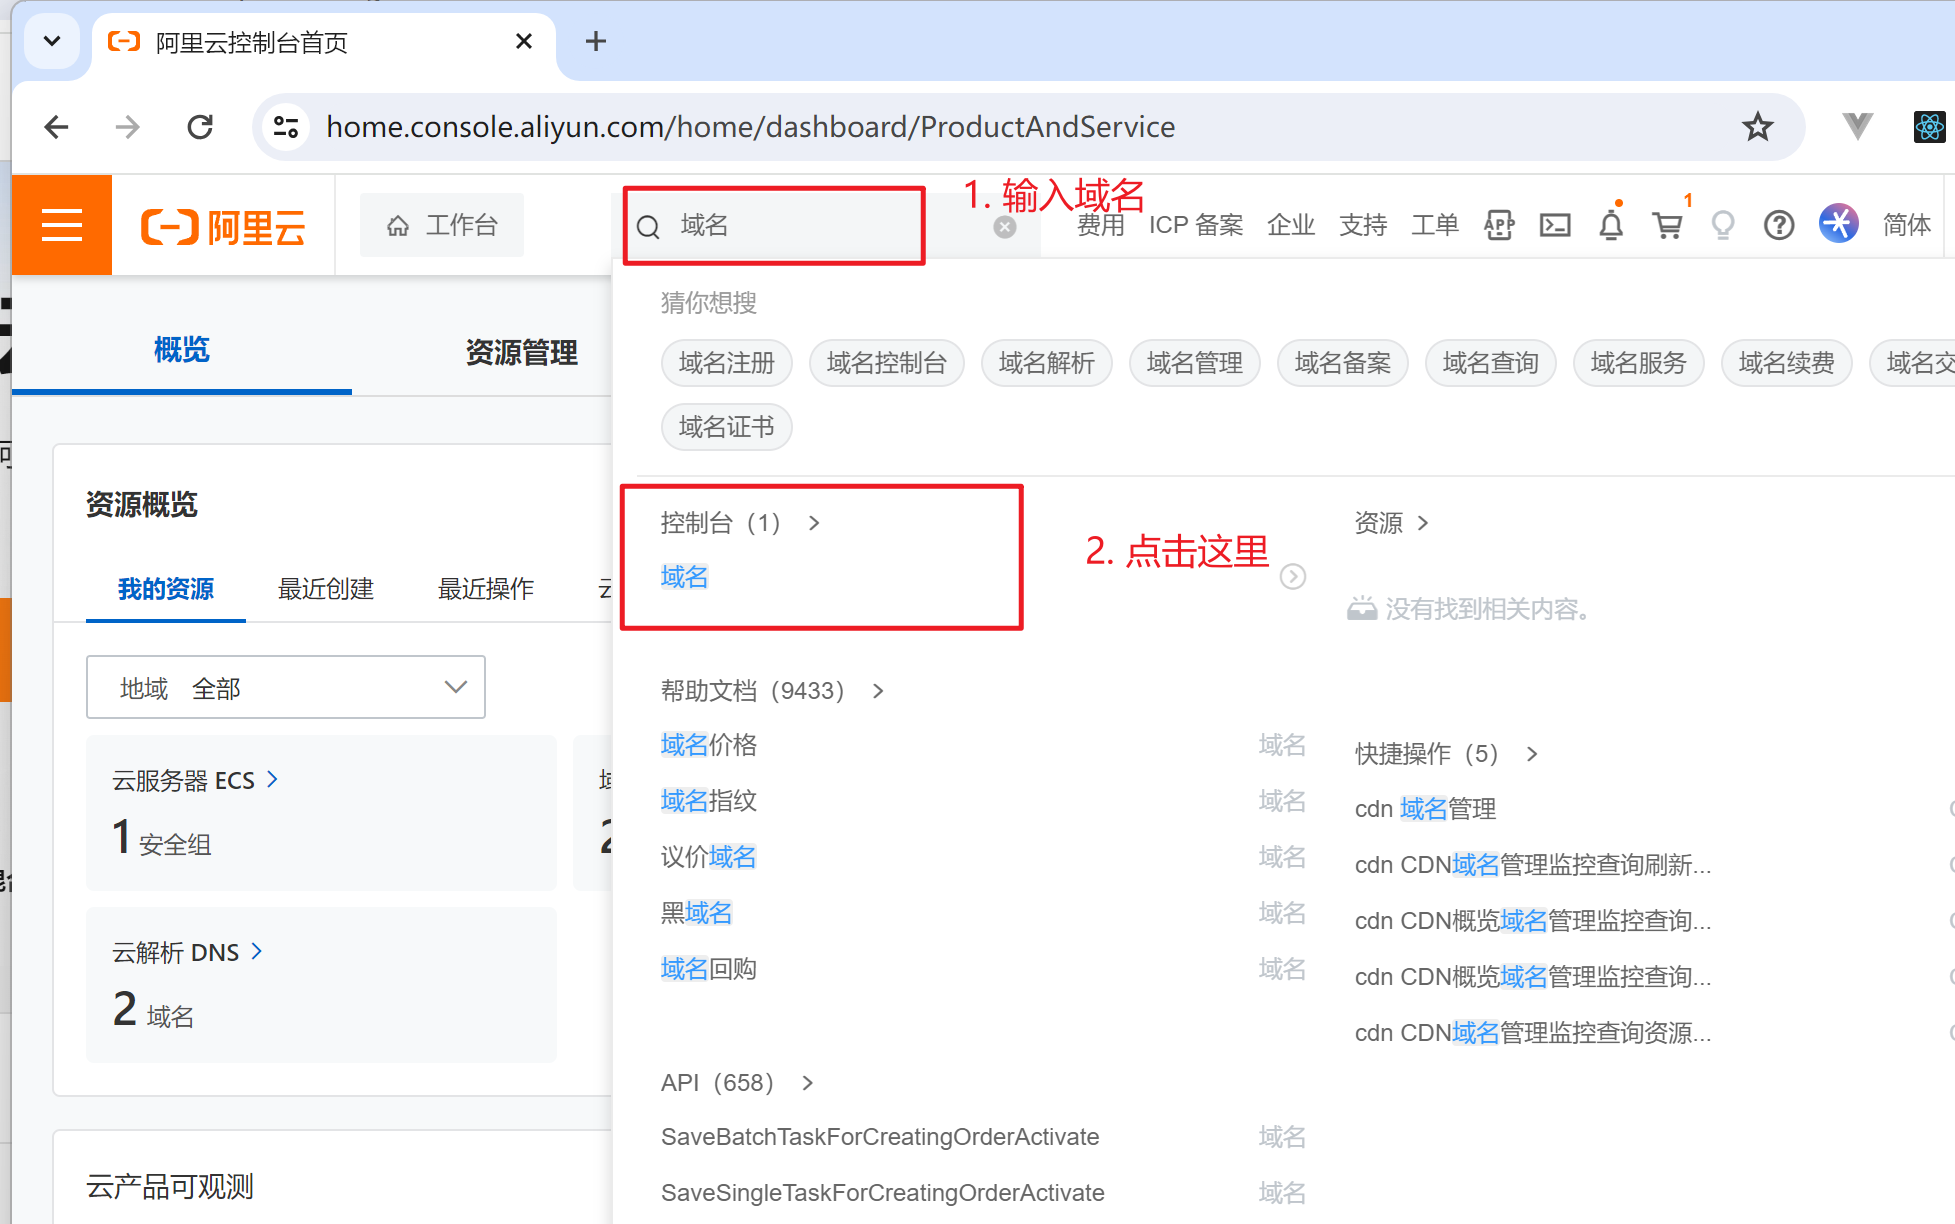
4. 阿里云 ssl 证书申请(免费)
阿里云网站登录后
右上角 - 点击
控制台搜索
ssl点击
数字证书管理服务(原SSL证书)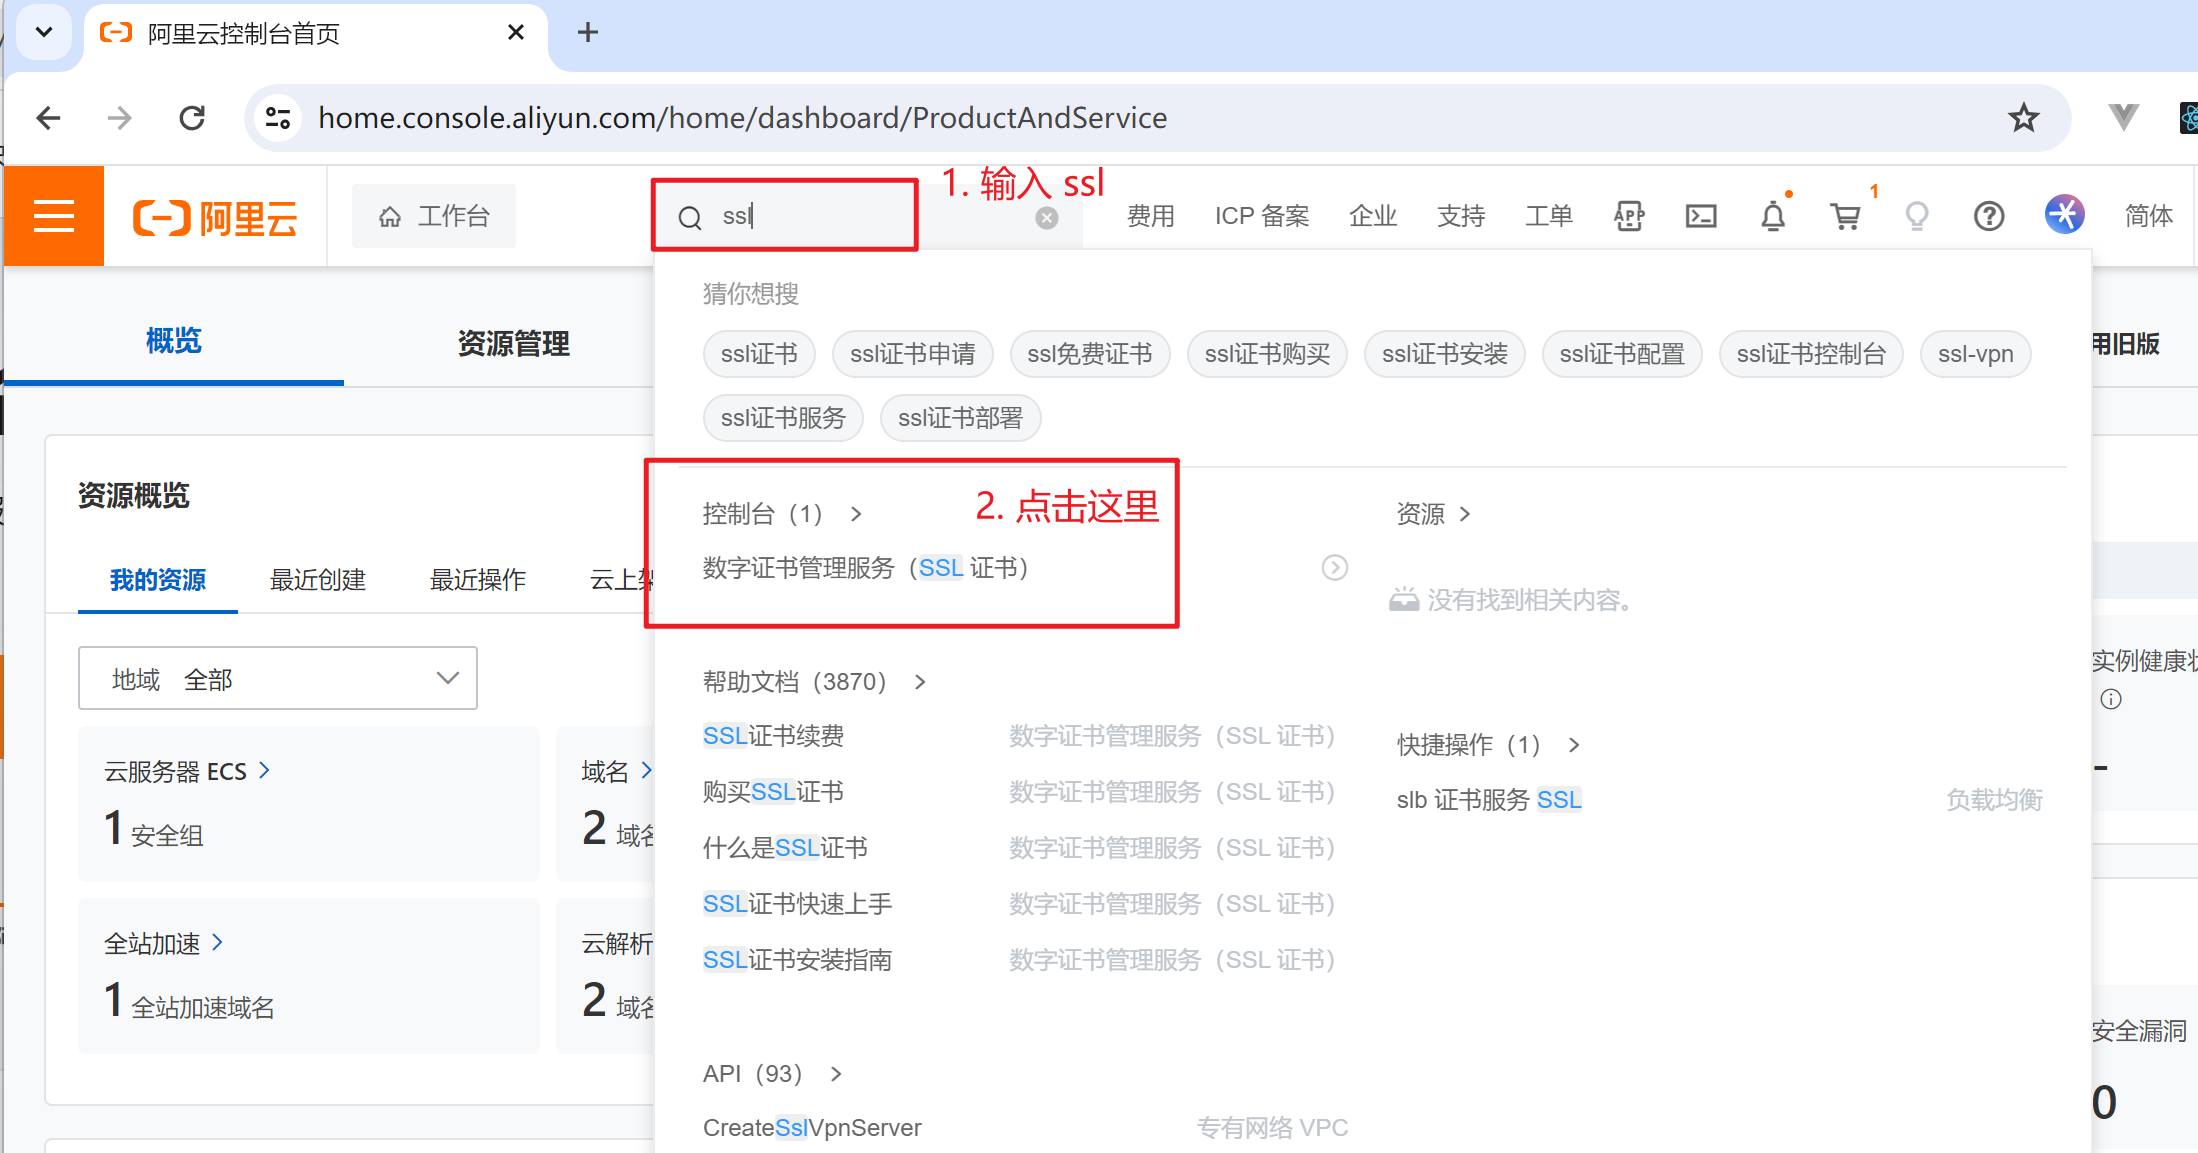
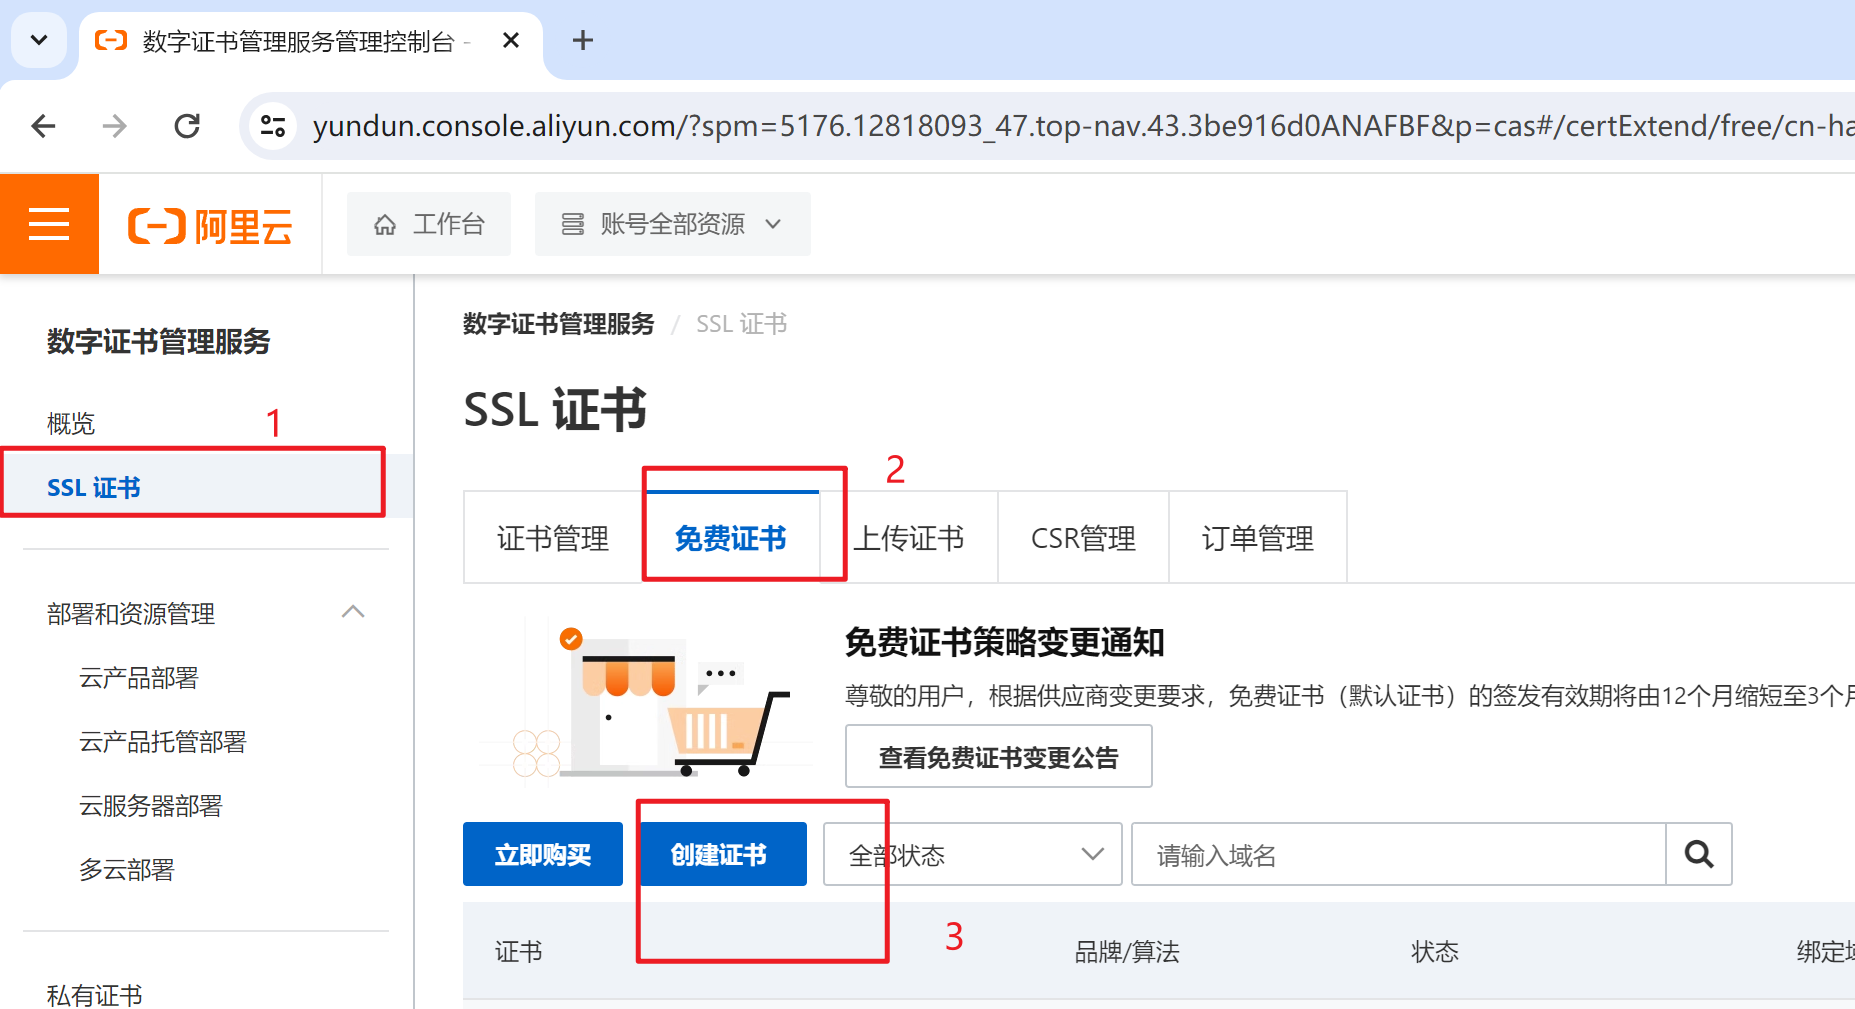
点击左边 ssl 证书
免费证书
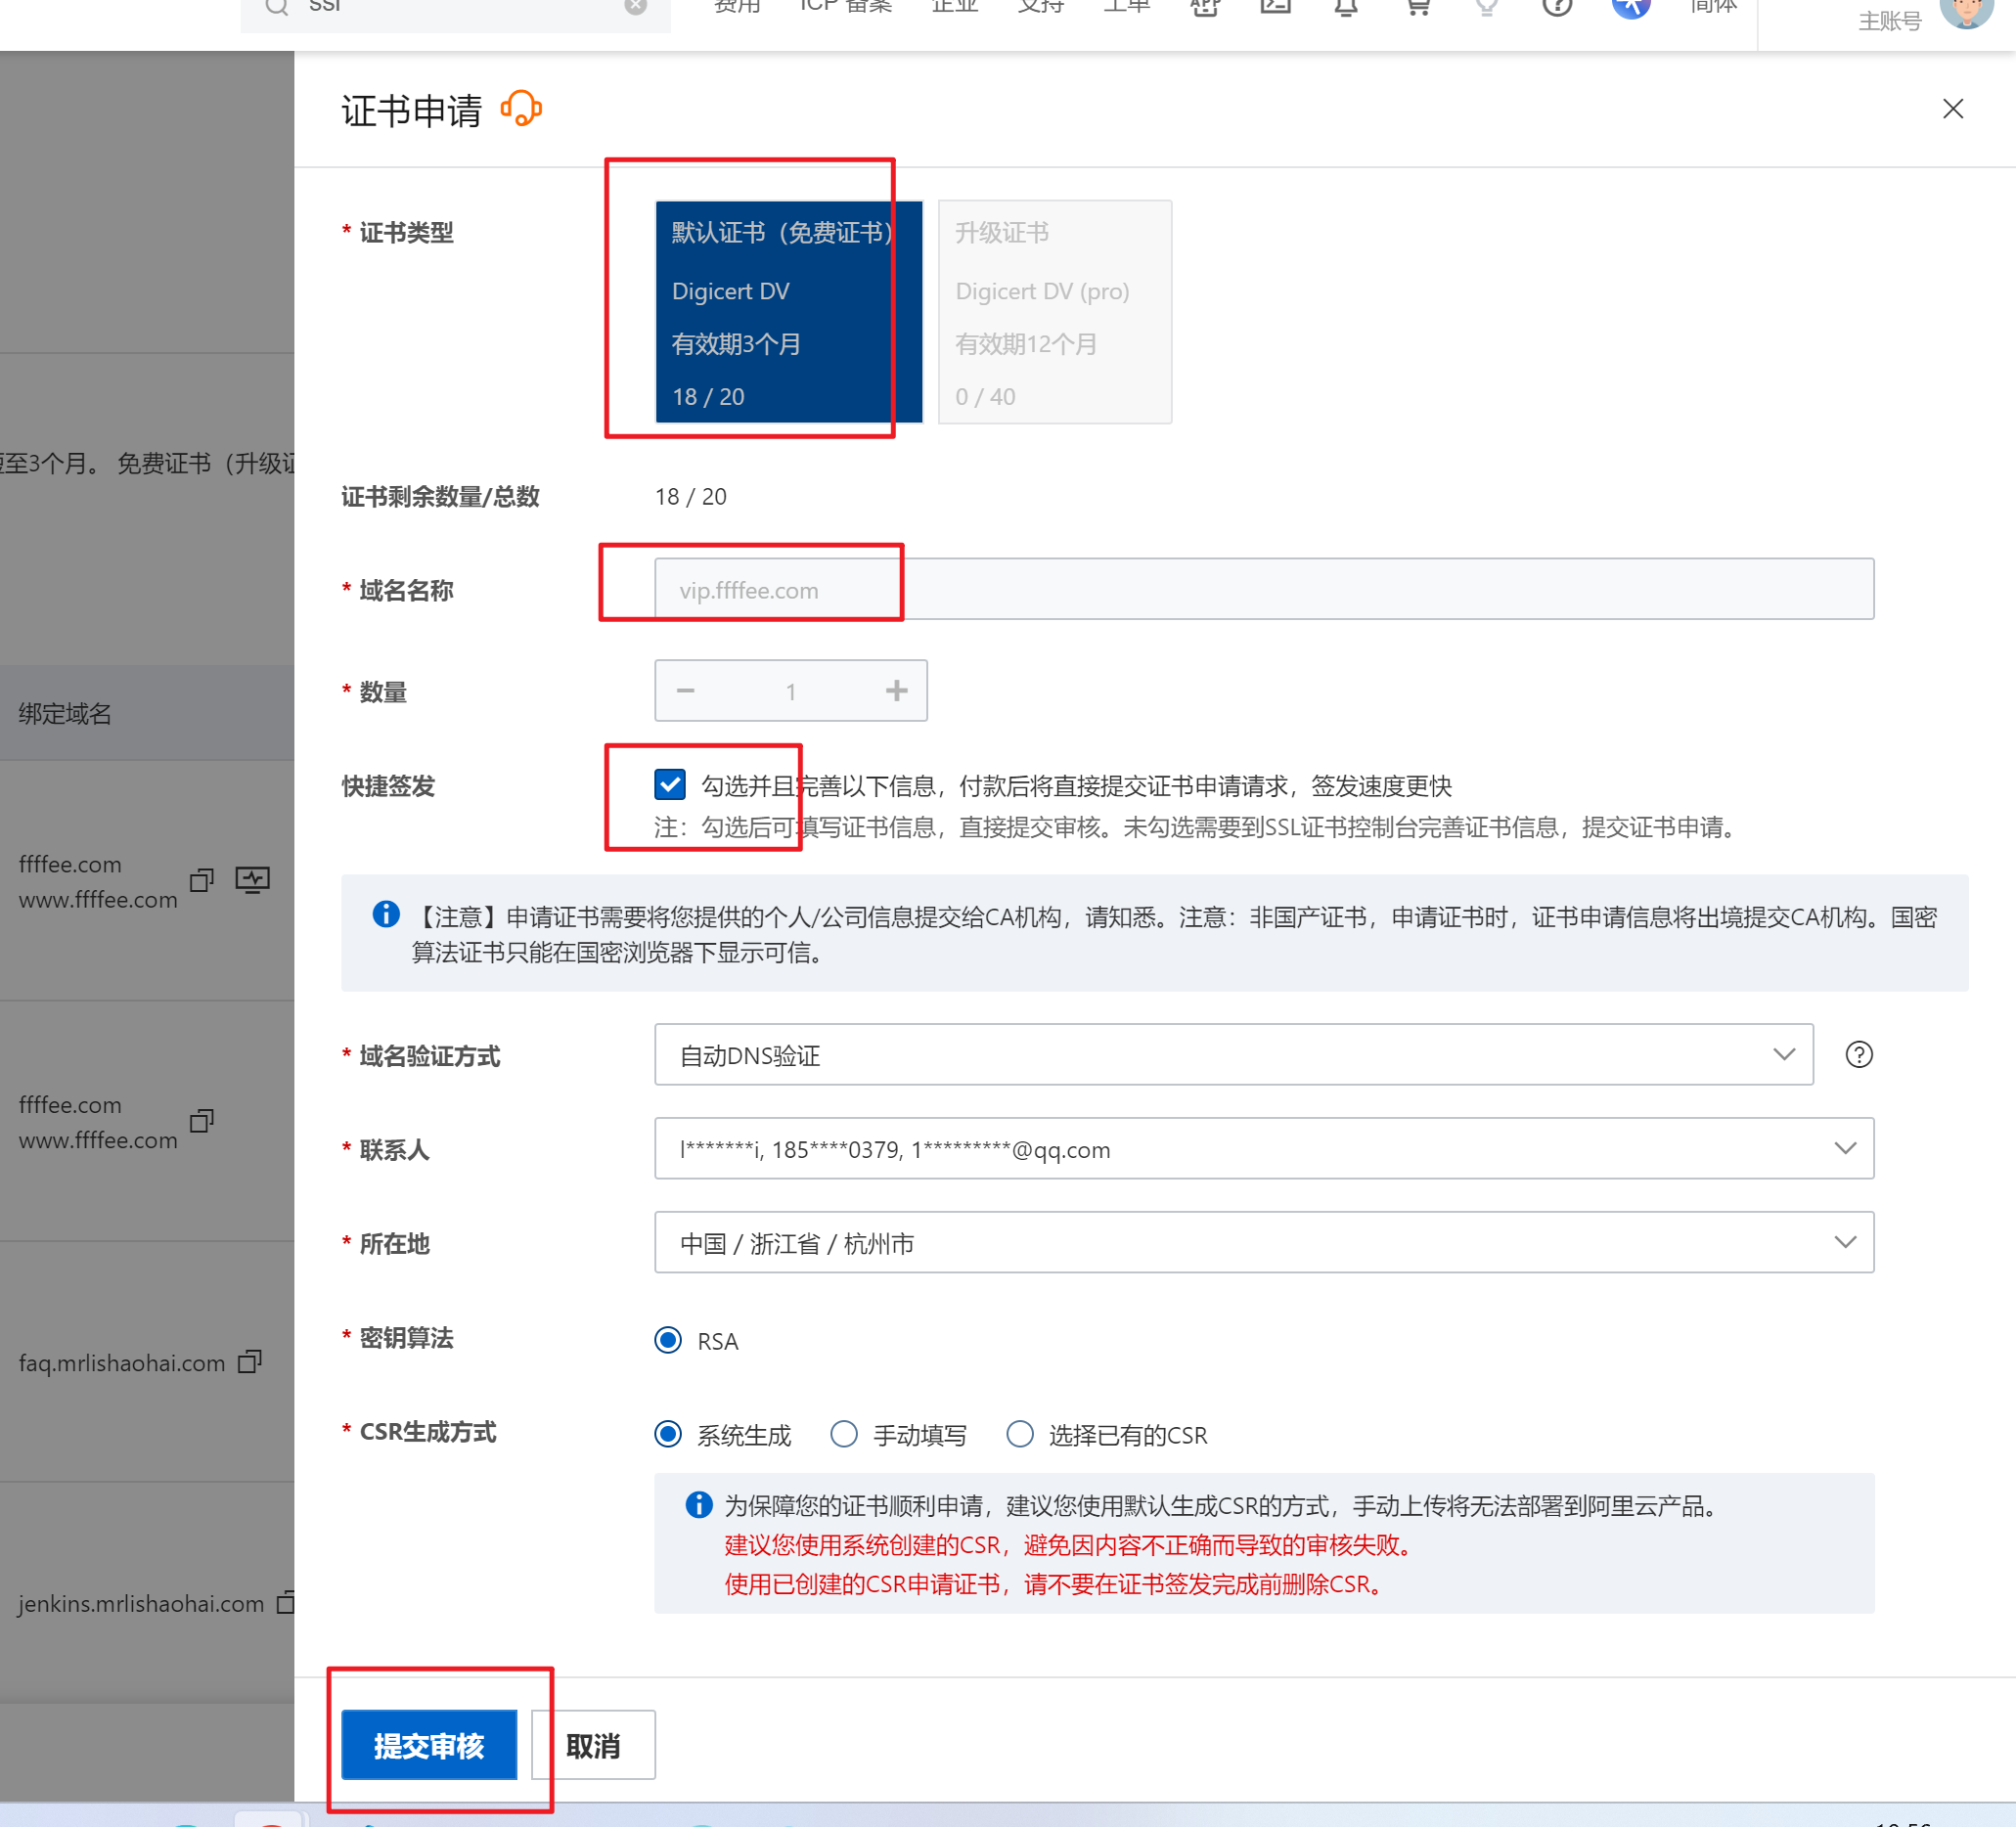
创建证书
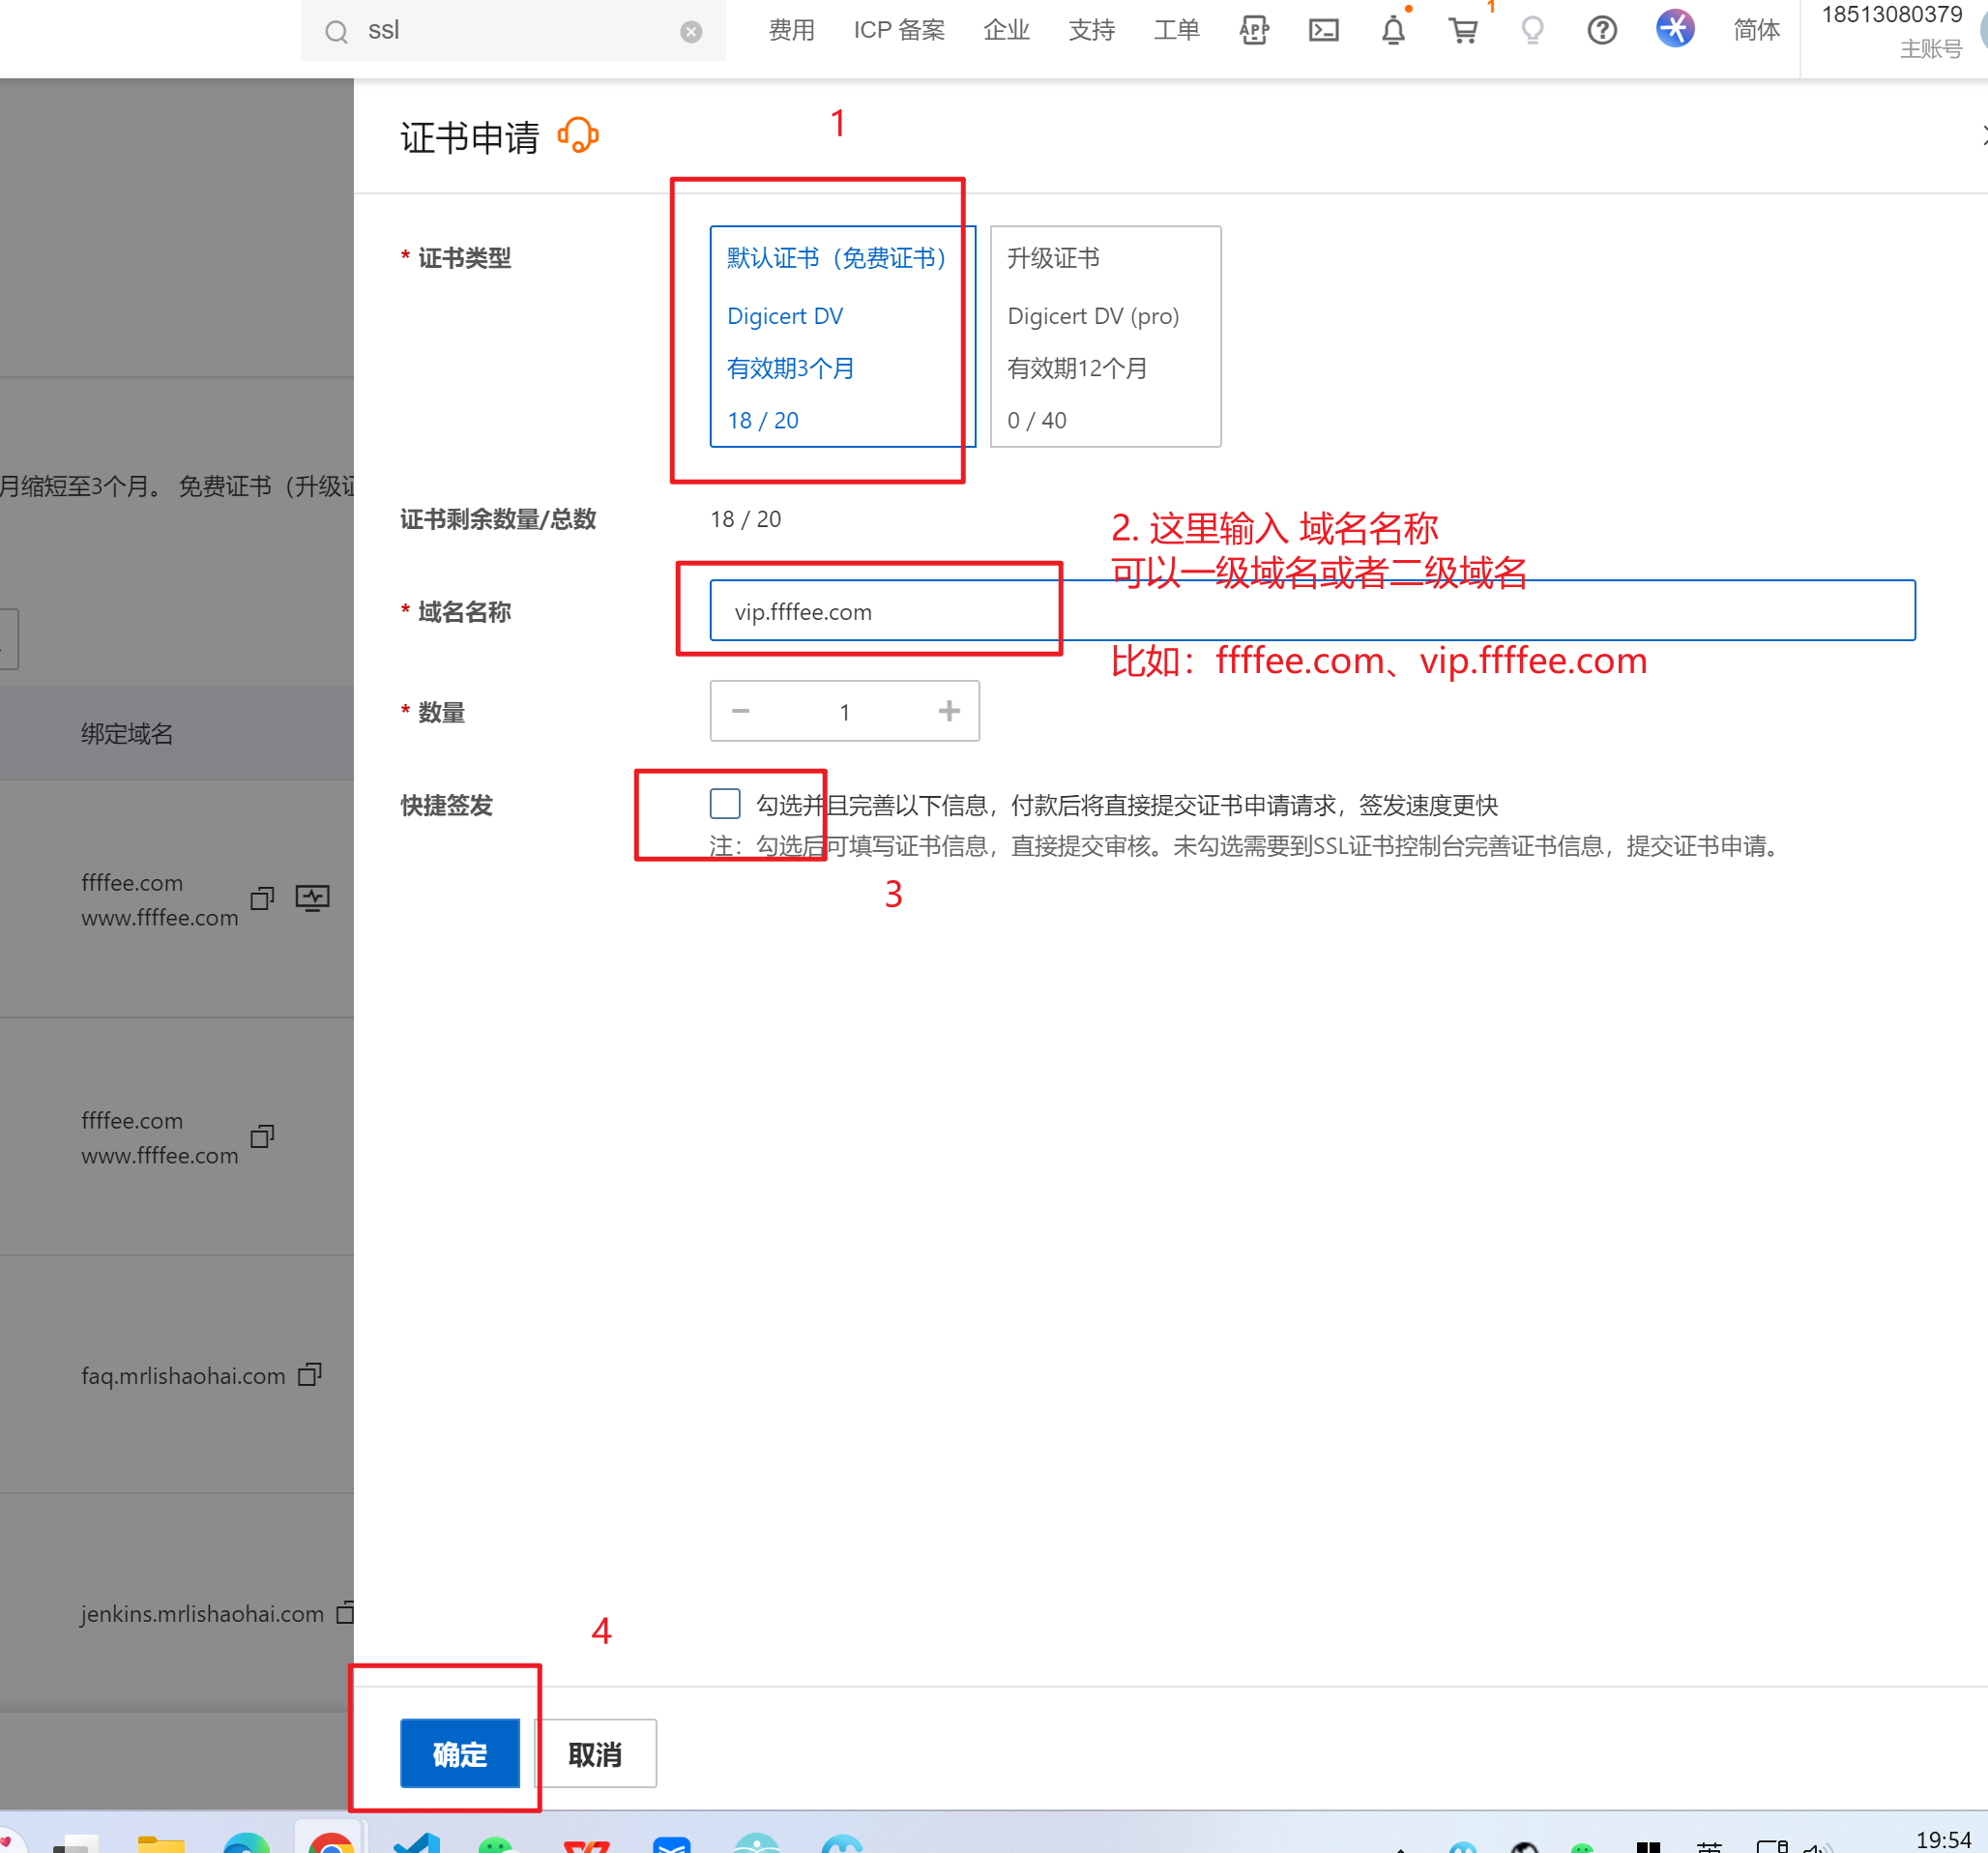
输入域名名称 - 勾选 快捷签发 - 提交审核
5. 下载 nginx ssl 证书
选择 nginx 相关证书下载
6. nginx 添加 ssl 证书
- 创建 nginx.conf 文件:
nginx
server {
    listen 443 ssl;  # 监听 443 端口并启用 SSL
    server_name yourdomain.com;  # 为特定域名设置服务器

    # 指定 SSL 证书和密钥文件的位置
    ssl_certificate /etc/nginx/ssl/yourdomain.com.crt;  # SSL 证书文件
    ssl_certificate_key /etc/nginx/ssl/yourdomain.com.key;  # SSL 密钥文件

    # 配置网站的根目录和首页文件
    location / {
        root /usr/share/nginx/html;  # 网站的根目录
        index index.html;  # 网站的默认首页文件
    }
}- 创建 Dockerfile
dockerfile
# 使用最新的官方 Nginx 镜像作为基础镜像
FROM nginx:latest

# 将本地的 Nginx 配置文件复制到镜像中的 Nginx 配置目录
COPY ./nginx.conf /etc/nginx/nginx.conf

# 将 SSL 证书和密钥文件复制到镜像中的指定位置
COPY ./yourdomain.com.crt /etc/nginx/ssl/yourdomain.com.crt
COPY ./yourdomain.com.key /etc/nginx/ssl/yourdomain.com.key

# 将容器的 443 端口暴露出来,供外部访问 HTTPS 服务
EXPOSE 443- 构建和运行 Docker 容器
bash
# 构建 Docker 镜像,镜像名为 my-nginx-https,基于当前目录下的 Dockerfile
docker build -t my-nginx-https .

# 在后台运行一个 Docker 容器,容器名为 my-nginx-https,将主机的 443 端口映射到容器的 443 端口
docker run -d -p 443:443 my-nginx-https- docker-compose.yml 文件
yml
version: "3.8" # 使用 Docker Compose 文件版本 3.8
services:
  nginx:
    image: my-nginx-https # 使用上面构建的 Docker 镜像
    ports:
      - "443:443" # 将容器的 443 端口映射到主机的 443 端口
    volumes:
      - ./ssl:/etc/nginx/ssl # 将主机的 ./ssl 目录映射到容器的 /etc/nginx/ssl 目录
      - ./site:/usr/share/nginx/html # 将主机的 ./site 目录映射到容器的网站根目录
    restart: always # 如果容器退出,总是尝试重启容器
这里的 volumes 配置允许你将 SSL 证书和网站内容从宿主机挂载到容器中,这样就可以不必每次证书或网站内容更新时重新构建镜像。这样做也方便了证书的更新和网站内容的管理。
请确保你的目录结构中包含了正确的 SSL 证书路径和网站内容的路径。此外,docker-compose.yml 文件应该放在包含 ssl 和 site 文件夹的同一目录下。这样,Docker Compose 就可以正确地映射这些卷到你的容器中。
7. 部署到云服务器
要使用 Docker Compose 运行定义在 docker-compose.yml 文件中的服务,你首先需要确保已经安装了 Docker Compose。接下来,你可以在包含 docker-compose.yml 文件的目录中运行以下命令:
启动服务
启动所有服务(在后台运行):
bashdocker-compose up -d这个命令会读取
docker-compose.yml文件,并启动里面定义的所有服务。-d标志意味着容器将在后台运行。启动特定服务(如果你的
docker-compose.yml文件中定义了多个服务):bashdocker-compose up -d <服务名>替换
<服务名>为你想要启动的服务名称。
查看服务状态
- 查看正在运行的服务状态:bash这个命令会列出所有在当前 Docker Compose 项目下运行的容器的状态。
docker-compose ps
停止服务
- 停止所有服务:bash这个命令会停止所有服务并删除所有相关容器。注意,这不会删除挂载的卷,除非你额外使用
docker-compose down-v参数。
查看日志
- 查看服务的日志:bash这个命令会显示所有服务的日志输出。如果你只想查看某个特定服务的日志,可以使用:
docker-compose logsbashdocker-compose logs <服务名>
这些基本命令应该可以帮助你管理使用 Docker Compose 定义的容器。 通过这些命令,你可以轻松控制容器的启动、停止、监控状态以及访问日志。
8. 云服务器端口放行
进入轻应用服务器实例 - 设置端口放行