electron mas 开发-打包-签名-公证-测试(testflight)文档
Mac 电脑苹果芯片(m2)环境下配置
一、electron builder 配置
1. 编写配置文件 electron-builder.config.js
package.json
json
{
  "scripts": {
    "build": "electron-builder -c electron-builder.config.js"
  }
}
.env
环境变量
VUE_APP_API_VERSION=1.16

# 自定义协议
VUE_APP_CUSTOM_FILE_PROTOCAL_WIN32=app
VUE_APP_CUSTOM_FILE_PROTOCAL_MAC=yourapp_app
# 加载本地图片资源
VUE_APP_LOCAL_RESOURCE=yourapp-local-resource

VUE_APP_MAC_TARGET=mas

VUE_APP_WIN32_ARCH=x64
js
const isMasDev = process.env.VUE_APP_MAC_TARGET === "mas-dev";
const isWin32 = process.platform === "win32";
const isDorwin = process.platform === "darwin";

module.exports = {
  cache: false,
  builderOptions: {
    afterSign:
      isDorwin && ["mas"].includes(process.env.VUE_APP_MAC_TARGET)
        ? path.join(__dirname, "build/notarize.js")
        : undefined,
    appId: isDorwin ? "你的苹果开发者id" : "你的Win开发者id",
    icon: isDorwin
      ? path.join(__dirname, "icons/mac/icon.icns")
      : path.join(__dirname, "./icons/win/icon.ico"),
    productName: "你的app名称",
    // eslint-disable-next-line no-template-curly-in-string
    artifactName: "你的app名称-${os}-${arch}-${version}.${ext}",
    copyright: "Copyright © 2023 your_company All rights reserved.",
    directories: { output: "dist_electron" },
    win: {
      icon: path.join(__dirname, "./icons/win/icon.ico"),
      target: [
        {
          target: "nsis",
          arch: [process.env.VUE_APP_WIN32_ARCH === "ia32" ? "ia32" : "x64"],
        },
      ],
    },
    nsis: {
      oneClick: false, // 设置为 false 以提供安装类型选择界面,允许用户选择是否创建桌面图标,允许用户选择安装路径
      perMachine: true, // 设置为 true 将使安装程序默认为所有用户安装应用,这需要管理员权限
      allowToChangeInstallationDirectory: true, // 如果设置为 true,安装程序将允许用户更改安装目录
      allowElevation: true, // 一般情况下,此字段不会被直接使用,权限提升主要依赖于 perMachine 的设定。当perMachine为true,安装程序会请求管理员权限
      deleteAppDataOnUninstall: true, // 如果设置为 true,卸载程序将删除AppData中的所有程序数据
      createDesktopShortcut: true, // 如果设置为 true,安装程序将在桌面上创建程序快捷方式
      createStartMenuShortcut: true, // 如果设置为 true,安装程序将在开始菜单中创建程序快捷方式
      shortcutName: "你的app名称", // 设置在桌面和开始菜单中创建的快捷方式的名称
      // license: path.join(__dirname, 'build/license_zh.rtf')
    },
    publish: [
      {
        provider: "generic",
        channel: "alpha",
        url: "",
      },
    ],
    asar: true,
    electronLanguages: isWin32
      ? ["en", "zh-TW", "zh-CN", "en-US", "en-GB"]
      : ["en", "zh_TW", "zh_CN", "en_US", "en_GB"],
    masDev: {
      type: "development",
      icon: "icons/mac/icon.icns",
      identity: process.env.IdentityNameMacDeveloper,
      hardenedRuntime: false,
      entitlements: "./entitlements.mas.plist",
      entitlementsInherit: "./entitlements.mas.inherit.plist",
      entitlementsLoginHelper: "./entitlements.mas.loginhelper.plist",
      provisioningProfile:
        "./provisionprofile/yourappMacDevelopment.provisionprofile",
    },
    mas: {
      type: "distribution",
      icon: "icons/mac/icon.icns",
      hardenedRuntime: false,
      identity: process.env.IdentityName3rdPartyMacDeveloperApplication,
      entitlements: "./entitlements.mas.plist",
      entitlementsInherit: "./entitlements.mas.inherit.plist",
      entitlementsLoginHelper: "./entitlements.mas.loginhelper.plist",
      provisioningProfile:
        "./provisionprofile/yourappMac_App_Store.provisionprofile",
    },
    mac: isWin32
      ? {}
      : {
          type: isMasDev ? "development" : "distribution",
          target: [
            { target: process.env.VUE_APP_MAC_TARGET, arch: "universal" },
          ],
          identity: process.env.IdentityNameDeveloperIDApplication,
          bundleVersion: process.env.VUE_APP_MAC_VERSION || undefined,
          icon: "icons/mac/icon.icns",
          mergeASARs: false,
          singleArchFiles: "*",
          x64ArchFiles: "*",
          category: "public.app-category.productivity",
          extendInfo: {
            ElectronTeamID: "你的TeamID",
            LSHasLocalizedDisplayName: true,
            ITSAppUsesNonExemptEncryption: "NO",
            NSApplicationDelegate: "YES",
            NSBluetoothAlwaysUsageDescription: null,
            NSBluetoothPeripheralUsageDescription: null,
            NSCameraUsageDescription: null,
            NSMicrophoneUsageDescription: null,
            CFBundleLocalizations: ["en", "zh_TW", "zh_CN"],
            CFBundleURLTypes: [
              {
                CFBundleTypeRole: "Editor",
                CFBundleURLName: "appURLHandler",
                CFBundleURLSchemes: [
                  process.env.VUE_APP_CUSTOM_FILE_PROTOCAL_MAC,
                ],
              },
              {
                CFBundleTypeRole: "Editor",
                CFBundleURLName: "localResourceHandler",
                CFBundleURLSchemes: [process.env.VUE_APP_LOCAL_RESOURCE],
              },
              {
                CFBundleTypeRole: "Editor",
                CFBundleURLName: "openURLHandler",
                CFBundleURLSchemes: ["hfc"],
              },
            ],
            "com.apple.security.app-sandbox": true,
            "com.apple.security.application-groups": ["你的TeamID.你的appid"],
            "com.apple.application-identifier": "你的TeamID.你的appid",
            "com.apple.security.cs.allow-jit": true,
            "com.apple.security.cs.allow-dyld-environment-variables": true,
            "com.apple.security.cs.disable-library-validation": true,
            "com.apple.security.network.client": true,
            "com.apple.security.network.server": true,
            "com.apple.security.files.user-selected.read-write": true,
            "com.apple.security.files.user-selected.read-only": true,
            "com.apple.security.files.bookmarks.document-scope": true,
            "com.apple.security.files.bookmarks.app-scope": true,
            // eslint-disable-next-line max-len
            // https://developer.apple.com/library/archive/documentation
            // /Miscellaneous/Reference/EntitlementKeyReference/Chapters/EnablingAppSandbox.html
            // #//apple_ref/doc/uid/TP40011195-CH4-SW6
            // Downloads Folder
            "com.apple.security.files.downloads.read-write": true,
            // Music Folder
            "com.apple.security.assets.music.read-only": true,
            "com.apple.security.assets.music.read-write": true,
            // Movies Folder
            "com.apple.security.assets.movies.read-only": true,
            "com.apple.security.assets.movies.read-write": true,
            // Pictures Folder
            "com.apple.security.assets.pictures.read-only": true,
            "com.apple.security.assets.pictures.read-write": true,
            // Allow USB Access
            "com.apple.security.device.usb": true,
            NSLocalNetworkUsageDescription:
              "此应用需要访问局域网来上传或者下载文件。",
            NSDesktopFolderUsageDescription:
              "此应用需要访问您的桌面文件夹,以便您可以浏览或上传或下载文件。",
            NSDocumentsFolderUsageDescription:
              "此应用需要访问您的文档文件夹,以便您可以浏览或上传或下载文件。",
            NSDownloadsFolderUsageDescription:
              "此应用需要访问您的下载文件夹,以便您可以浏览或上传或下载文件。",
            NSMusicFolderUsageDescription:
              "此应用需要访问您的音乐文件夹,以便您可以浏览或上传或下载文件。",
            NSPicturesFolderUsageDescription:
              "此应用需要访问您的图片文件夹,以便您可以浏览或上传或下载文件。。",
            NSMoviesFolderUsageDescription:
              "此应用需要访问您的电影文件夹,以便您可以浏览或上传或下载文件。",
          },
        },
    asarUnpack: ["**/sqlite3/**/*"],
    files:
      process.platform === "win32"
        ? [
            "**/*",
            "!**/node_modules/*/{CHANGELOG.md,README.md,README,readme.md,readme}",
            "!**/node_modules/*/{test,__tests__,tests,powered-test,example,examples}",
            "!**/node_modules/*.d.ts",
            "!**/node_modules/.bin",
            "!**/*.{iml,o,hprof,orig,pyc,pyo,rbc,swp,csproj,sln,xproj}",
            "!.editorconfig",
            "!**/._*",
            "!**/{.DS_Store,.git,.hg,.svn,CVS,RCS,SCCS,.gitignore,.gitattributes}",
            "!**/{__pycache__,thumbs.db,.flowconfig,.idea,.vs,.nyc_output}",
            "!**/{appveyor.yml,.travis.yml,circle.yml}",
            "!**/{npm-debug.log,yarn.lock,.yarn-integrity,.yarn-metadata.json}",
            "!node_modules/sqlite3/**/*",
            "!node_modules/sqlite3/node_modules/**/*",
            "node_modules/sqlite3/package.json",
            "node_modules/sqlite3/lib/**",
            "node_modules/sqlite3/deps/**",
            "!**/*/*.md",
          ]
        : [
            "**/*",
            "!**/node_modules/*/{CHANGELOG.md,README.md,README,readme.md,readme}",
            "!**/node_modules/*/{test,__tests__,tests,powered-test,example,examples}",
            "!**/node_modules/*.d.ts",
            "!**/node_modules/.bin",
            "!**/*.{iml,o,hprof,orig,pyc,pyo,rbc,swp,csproj,sln,xproj}",
            "!.editorconfig",
            "!**/._*",
            "!**/{.DS_Store,.git,.hg,.svn,CVS,RCS,SCCS,.gitignore,.gitattributes}",
            "!**/{__pycache__,thumbs.db,.flowconfig,.idea,.vs,.nyc_output}",
            "!**/{appveyor.yml,.travis.yml,circle.yml}",
            "!**/{npm-debug.log,yarn.lock,.yarn-integrity,.yarn-metadata.json}",
            "!node_modules/sqlite3/**",
            "!node_modules/sqlite3/node_modules/**/*",
            "node_modules/sqlite3/package.json",
            "node_modules/sqlite3/lib/**",
            "node_modules/sqlite3/deps/**",
            "!**/*/*.md",
          ],
  },
};
2. 代码公证 build/notarize.js
js
// build/notarize.js
const { notarize } = require("@electron/notarize");
const path = require("path");

exports.default = async function notarizing(context) {
  require("dotenv").config({ path: path.join(__dirname, "..", ".env.build") });
  try {
    const appName = context.packager.appInfo.productFilename;
    const { electronPlatformName, appOutDir } = context;
    console.log("[notarizing electronPlatformName]", electronPlatformName);
    console.log("[notarizing appOutDir]", appOutDir);
    if (process.platform !== "darwin") {
      return;
    }

    const appPath = `${appOutDir}/${appName}.app`;
    const appleId = process.env.NotarizeAppleId;
    const appleIdPassword = process.env.NotarizeAppleIdPassword;
    const teamId = process.env.NotarizeTeamId;
    const appBundleId = process.env.NotarizeAppBundleId;

    console.log("[notarizing appPath]", appPath);

    // https://juejin.cn/post/7009179524520738824?searchId=20231129211331F94C9E5ED49AEF27EF65#heading-8
    console.log("[notarizing 公证信息中...]", {
      appBundleId, // appid
      appPath, // 应用的路径 xxx.app 结尾的
      appleId, // 苹果开发者 id
      appleIdPassword: "****-****-****-****", // 应用专用密码
      teamId,
    });

    if (!appleIdPassword) {
      return;
    }

    await notarize({
      appPath,
      appBundleId,
      appleId,
      appleIdPassword,
      teamId,
    });
    console.log("[notarizing 公证成功]");
  } catch (err) {
    console.error("[notarizing 公证失败]", err);
  }
};
plish 文件
需要修改 entitlements.mas.plist 部分内容:
xml
<?xml version="1.0" encoding="UTF-8"?>
<!DOCTYPE plist PUBLIC "-//Apple//DTD PLIST 1.0//EN" "http://www.apple.com/DTDs/PropertyList-1.0.dtd">
<plist version="1.0">
  <dict>
    <key>com.apple.security.app-sandbox</key>
    <true/>
    <key>com.apple.security.application-groups</key>
    <array>
      <string>TeamId.AppId</string>
    </array>
    <key>com.apple.application-identifier</key>
    <string>TeamId.AppId</string>
    <key>com.apple.developer.team-identifier</key>
		<string>TeamId</string>
  </dict>
</plist>
TeamId、AppId 部分要改成你自己的,比如 AppId 为 com.hello.yourapp,TeamId 为 xxxxxxx,那么内容为:
xml
<?xml version="1.0" encoding="UTF-8"?>
<!DOCTYPE plist PUBLIC "-//Apple//DTD PLIST 1.0//EN" "http://www.apple.com/DTDs/PropertyList-1.0.dtd">
<plist version="1.0">
  <dict>
    <key>com.apple.security.app-sandbox</key>
    <true/>
    <key>com.apple.security.application-groups</key>
    <array>
      <string>xxxxxxx.com.hello.yourapp</string>
    </array>
    <key>com.apple.application-identifier</key>
    <string>xxxxxxx.com.hello.yourapp</string>
    <key>com.apple.developer.team-identifier</key>
		<string>xxxxxxx</string>
  </dict>
</plist>
二、运行项目
1. 环境安装(Mac)
安装开发工具 VScode https://code.visualstudio.com/download
安装 node.js https://nodejs.org/dist/v18.17.0/node-v18.17.0.pkg
bash
node -v
v18.17.0
bash
npm -v
9.6.7
2. 全局安装 node-gyp
bash
sudo npm install node-gyp -gbash
node-gyp -v
v9.4.0
3. 下载 phantomjs-2.0.0-macosx.zip
https://bitbucket.org/ariya/phantomjs/downloads/phantomjs-2.1.1-macosx.zip
解压后放到指定目录 phantomjs-2.1.1-macosx.zip
bash
mkdir -p ~/project/phantomjs-2.1.1-macosx解压到 ~/project/phantomjs-2.1.1-macosx 目录
bash
unzip ~/Downloads/phantomjs-2.1.1-macosx.zip -d ~/project/phantomjs-2.1.1-macosx4. 修改环境变量,配置
bash
vim ~/.zshrc增加下面配置
export NODE_GYP_FORCE_PYTHON="/usr/bin/python3"
export PATH=$PATH:~/project/phantomjs-2.1.1-macosx/bin
修改后记得执行下面命令,使得配置文件生效
bash
source ~/.zshrc验证 phantomjs 是否安装成功
bash
phantomjs --version如果输出版本信息,那么就是成功安装了
成功的情况 2.1.1
bash
phantomjs --version
2.1.1
失败的情况,输出 zsh: bad CPU type in executable: ./phantomjs
bash
phantomjs --version
zsh: bad CPU type in executable: ./phantomjs解决zsh: bad CPU type in executable错误
参考 https://apple.stackexchange.com/questions/408375/zsh-bad-cpu-type-in-executable
- 安装 rosetta
bash
softwareupdate --install-rosetta- 命令行兼容 x64 架构的应用
bash
arch -x86_64 zsh- 重新验证 phantomjs
bash
phantomjs --version
2.1.1
5. 安装模块依赖
bash
npm install -f6. 运行重新构建原生模块
json
{
  "scripts": {
    "electron:build": "npm run build:prod && npm run electron:rebuild && electron-builder build --publish=never",
    "electron:rebuild": "npm run rebuild:mac:x64 && npm run rebuild:mac:arm64",
    "rebuild:mac:x64": "electron-rebuild -f --arch=x64",
    "rebuild:mac:arm64": "electron-rebuild -f --arch=arm64"
  }
}
如果不正确执行下面命令,会导致开发环境调用动态库失败,故需要根据电脑芯片执行不同的命令
如果是 x64 电脑运行这个命令
bash
npm run rebuild:mac:x64如果是 arm64 (苹果芯片 m1、m2、m3 等)电脑运行下面命令
bash
npm run rebuild:mac:arm647. 开发环境启动项目
bash
npm start三、打包-签名-公证
苹果开发者官网地址:https://developer.apple.com/account/
1. 苹果开发者中间证书
需要安装 Apple PKI 公共密钥基础设施 https://www.apple.com/certificateauthority/
安装下面图片红色方块内的
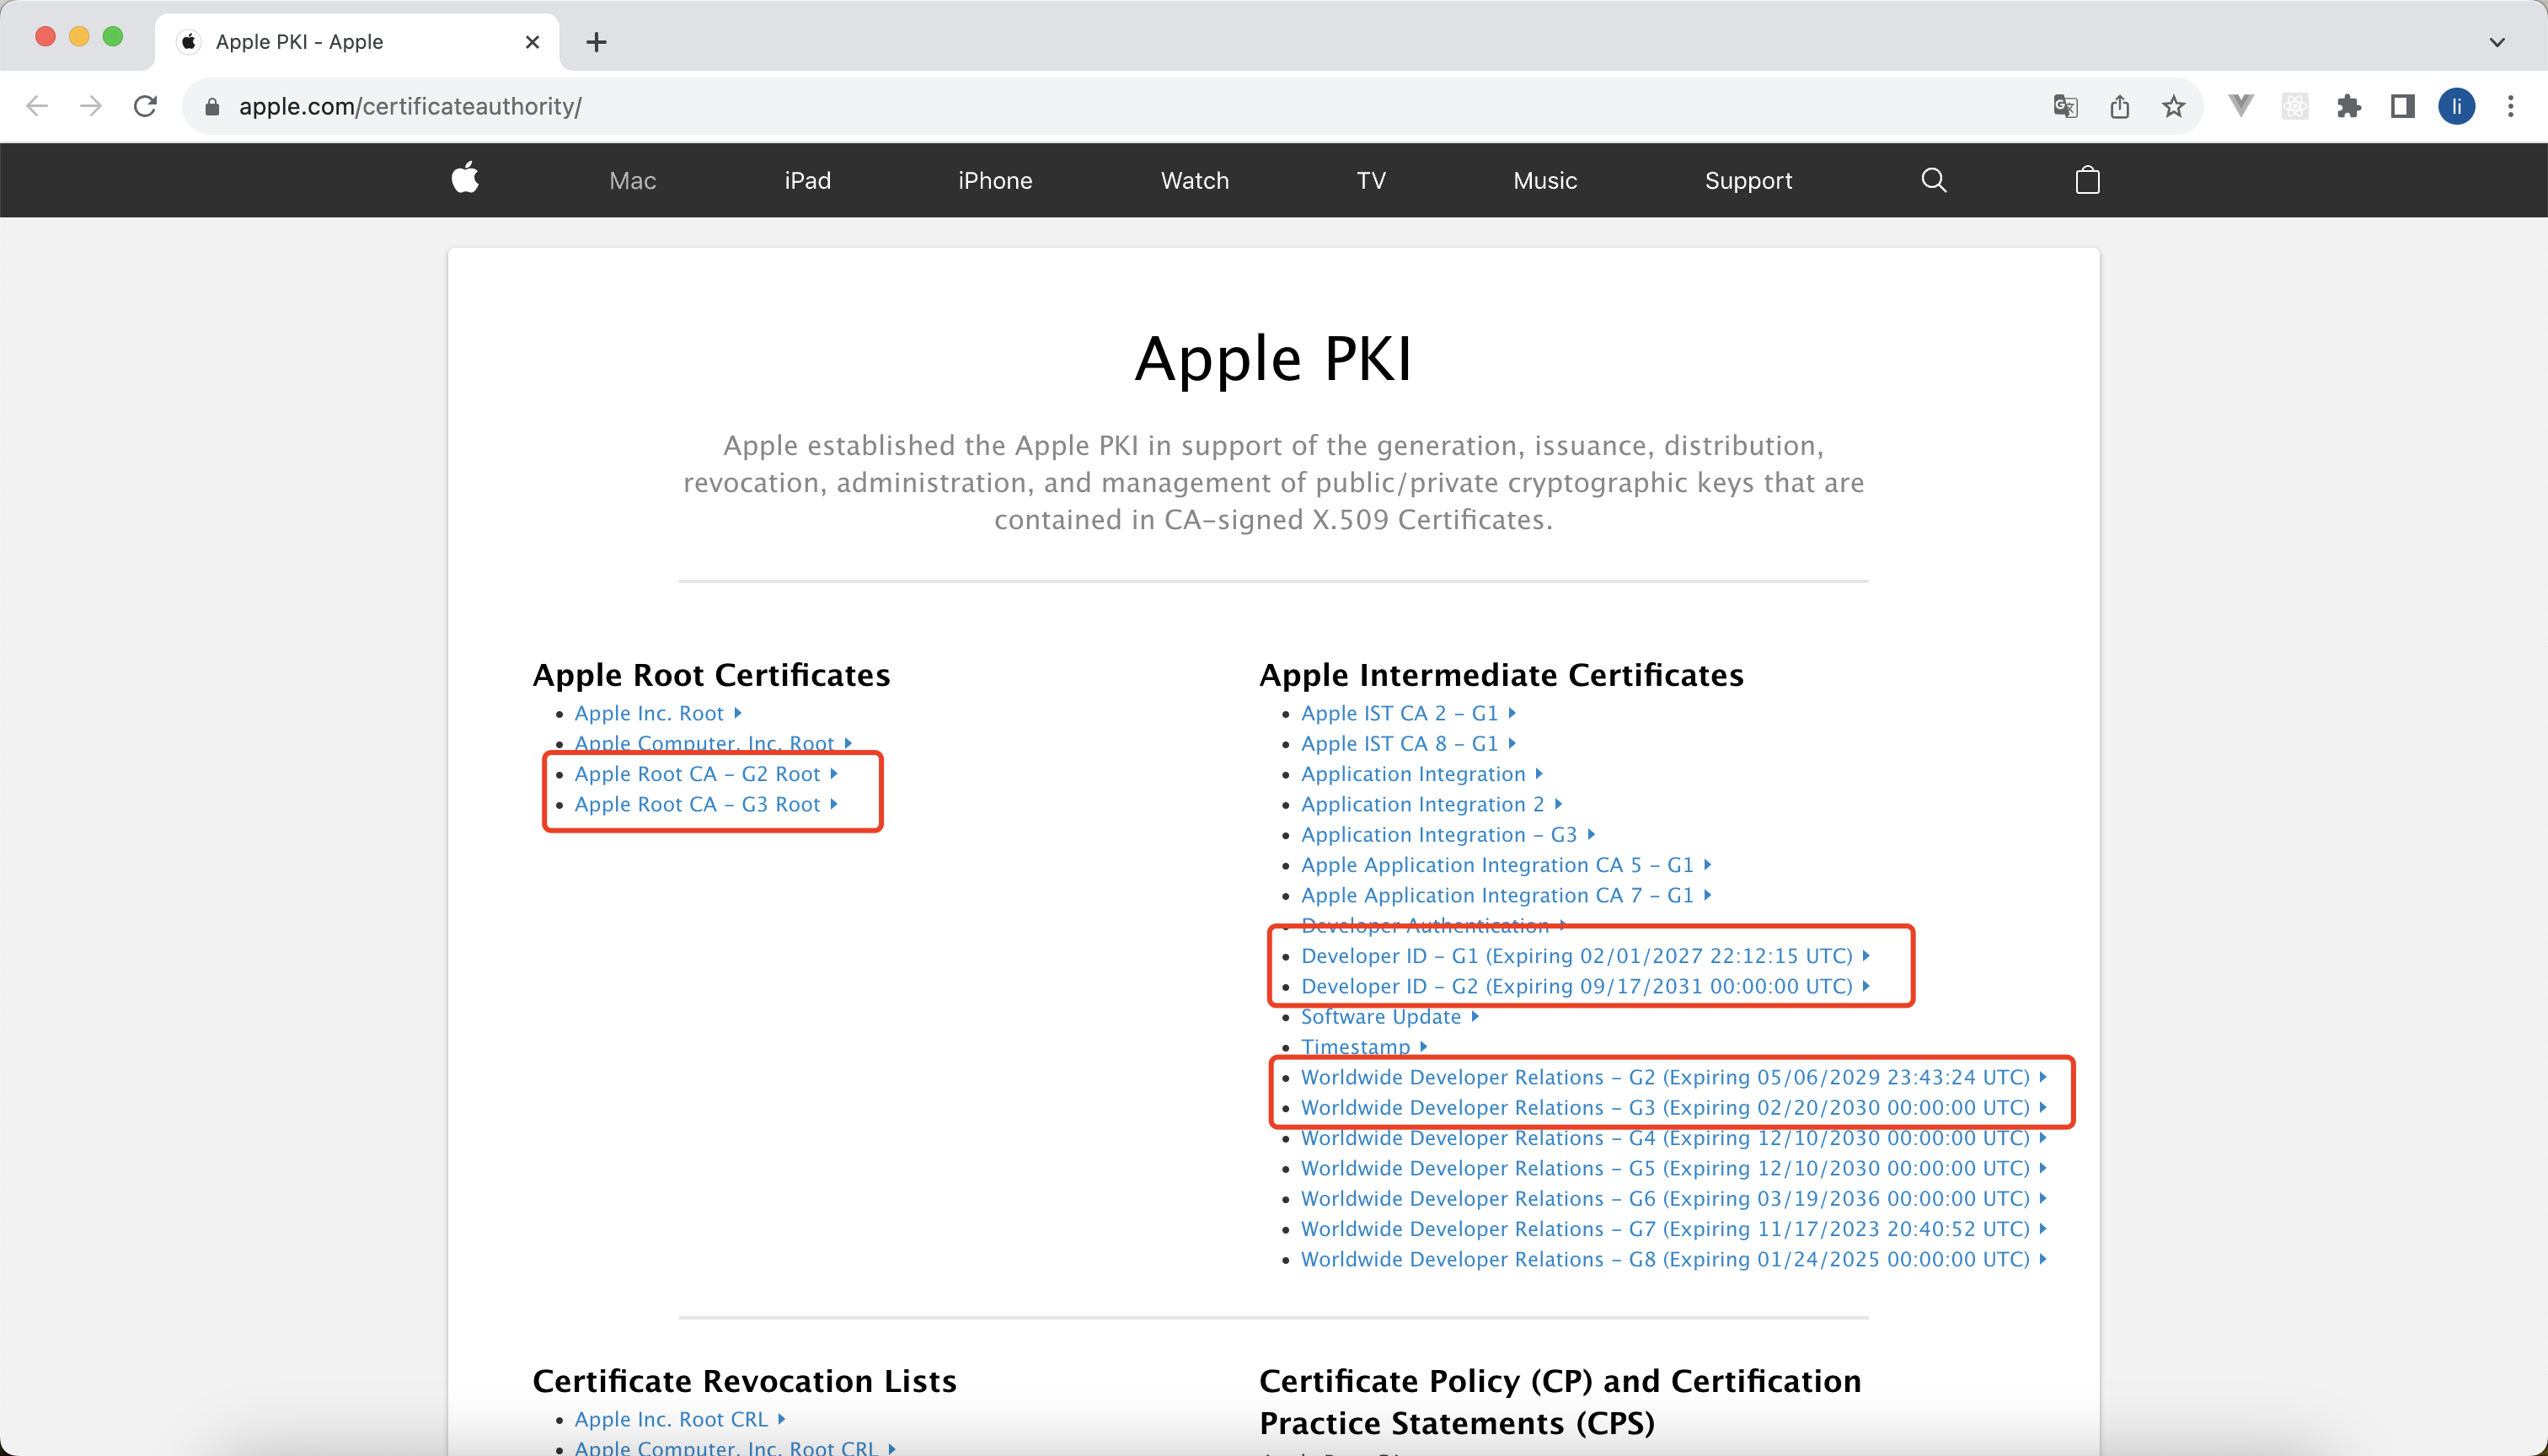
- Apple Root CA - G2 Root
- Apple Root CA - G3 Root
- Developer ID - G1 (Expiring 02/01/2027 22:12:15 UTC)
- Developer ID - G2 (Expiring 09/17/2031 00:00:00 UTC)
- Worldwide Developer Relations - G2 (Expiring 05/06/2029 23:43:24 UTC)
- Worldwide Developer Relations - G3 (Expiring 02/20/2030 00:00:00 UTC)
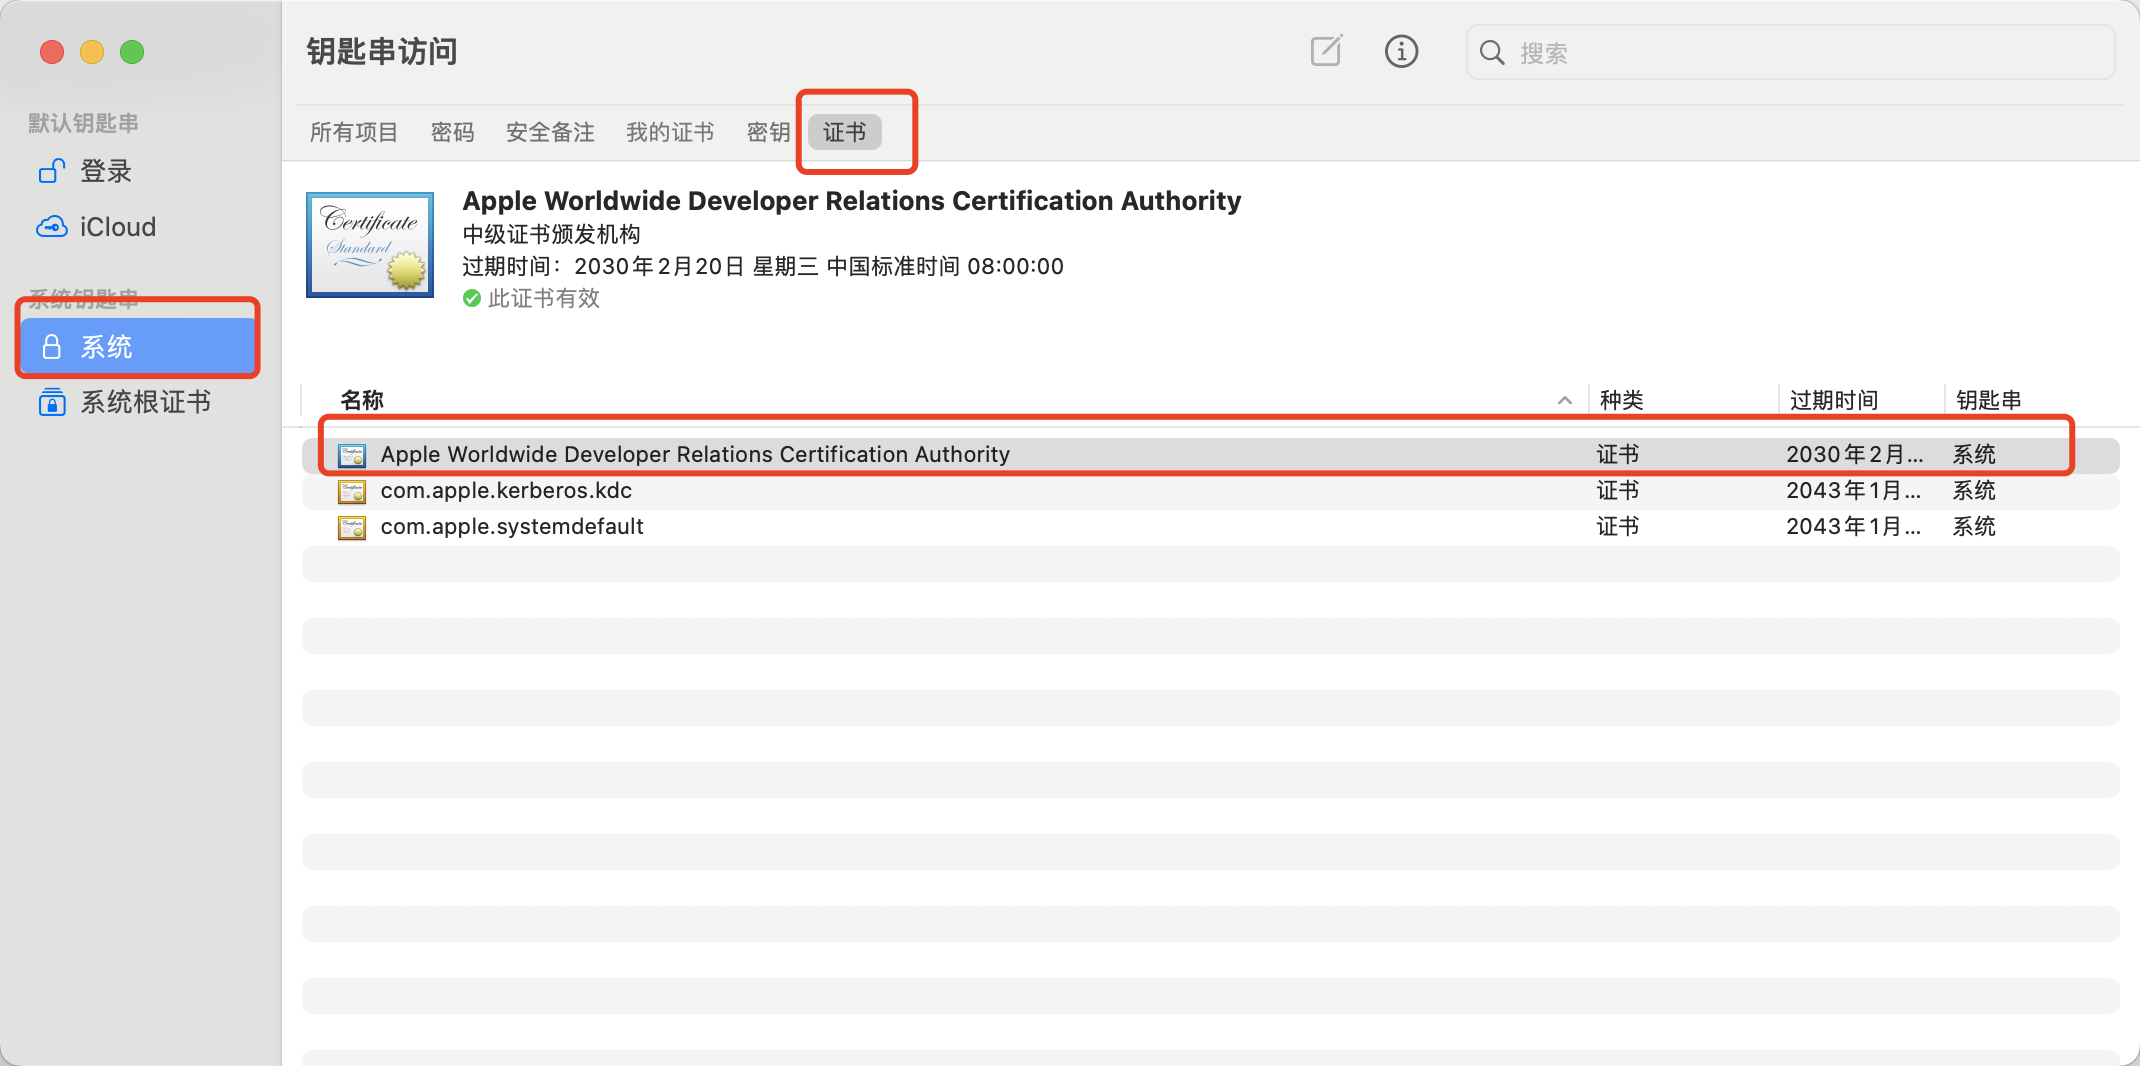
注意(大坑):Apple Worldwide Developer Relations Certification Authority 证书要放在“系统”里面,不然会导致打包 mas-dev 失败或者 mas-dev 的免安装程序(yourname.app) 打不开
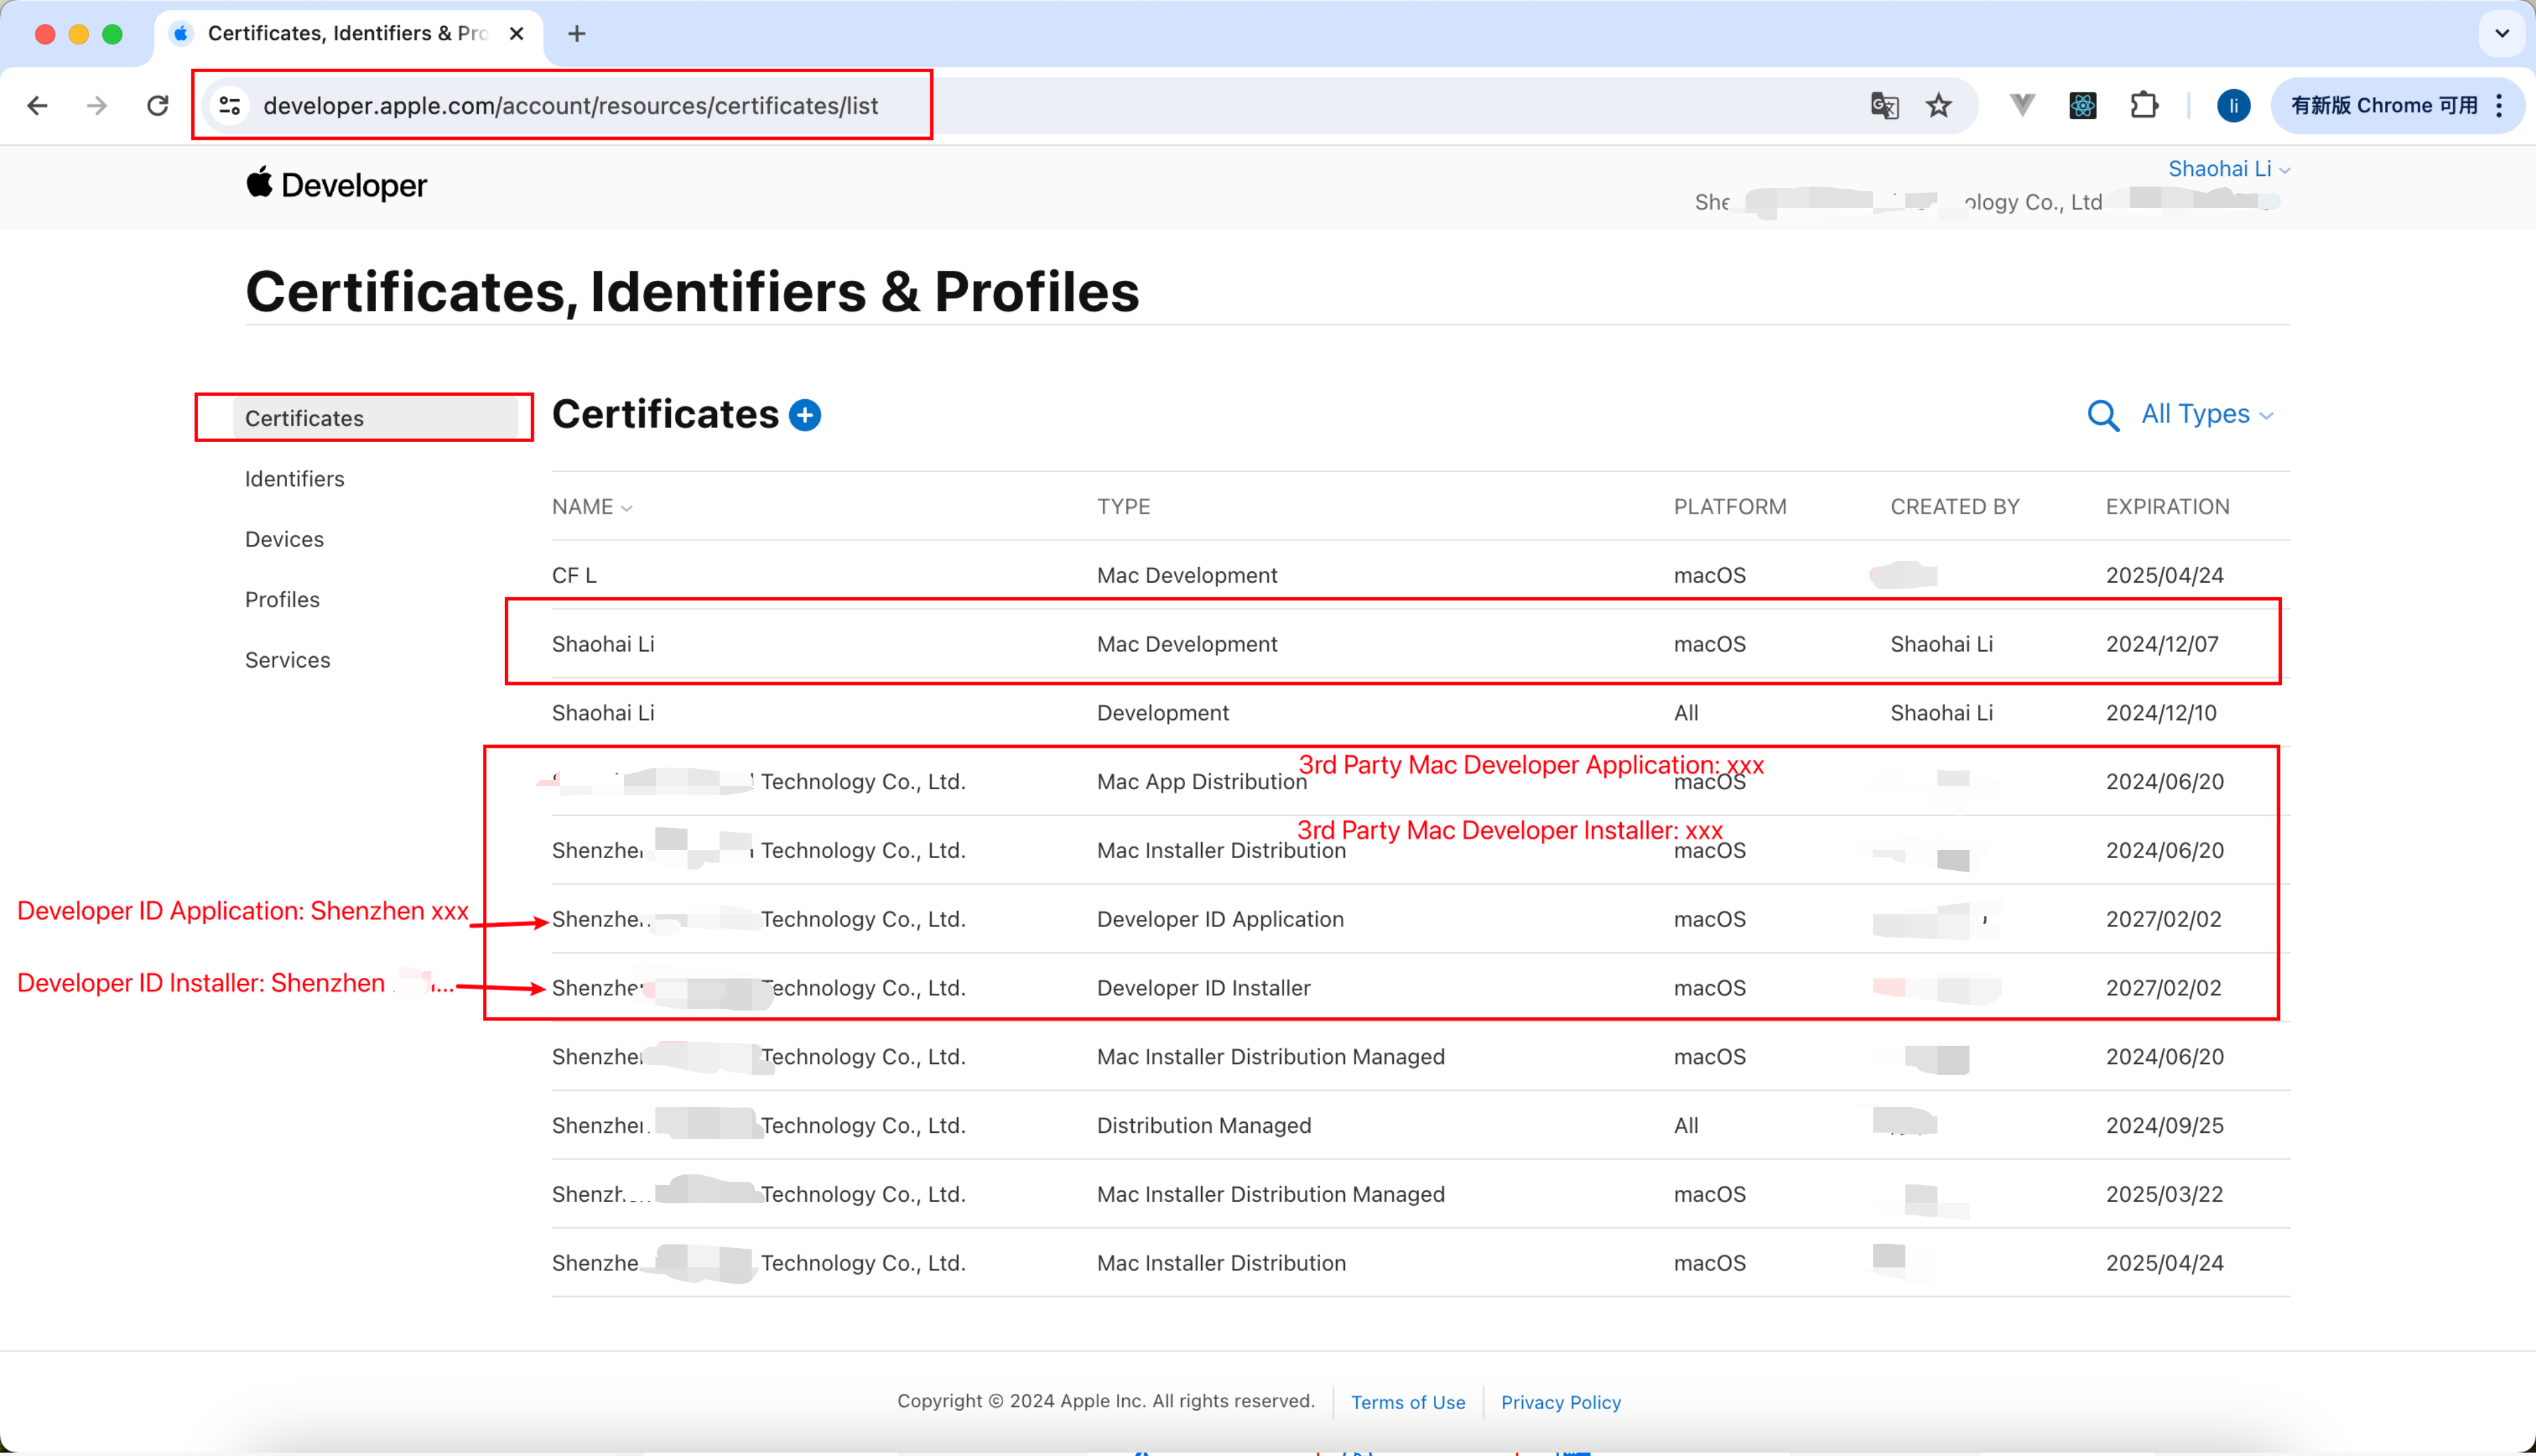
2. 安装相关证书和可描述文件
需要准备下面 5 个证书
Mac Developer: Zhongyi Li (6CXXXXXXXX)Developer ID Application: Shenzhen your_company Technology Co., Ltd. (U2XXXXXXXX)Developer ID Installer: Shenzhen your_company Technology Co., Ltd. (U2XXXXXXXX)3rd Party Mac Developer Application: Shenzhen your_company Technology Co., Ltd. (U2XXXXXXXX)即(Mac Application Distribution)3rd Party Mac Developer Installer: Shenzhen your_company Technology Co., Ltd. (U2XXXXXXXX)即(Mac Installer Distribution)
1. Mac Developer: Zhongyi Li (6CXXXXXXXX) 证书
如何获取 Mac Developer 证书
创建证书请求文件:
- 在您的 Mac 上打开“钥匙串访问”。
- 选择“钥匙串访问”>“证书助理”>“从证书颁发机构请求证书”。
- 输入您的电子邮件地址,选择“保存到磁盘”,然后继续以生成证书签名请求(CSR)文件。
在苹果开发者账户中申请证书:
- 登录您的苹果开发者账户。
- 导航到“Certificates, Identifiers & Profiles (
证书、标识符和描述文件)”。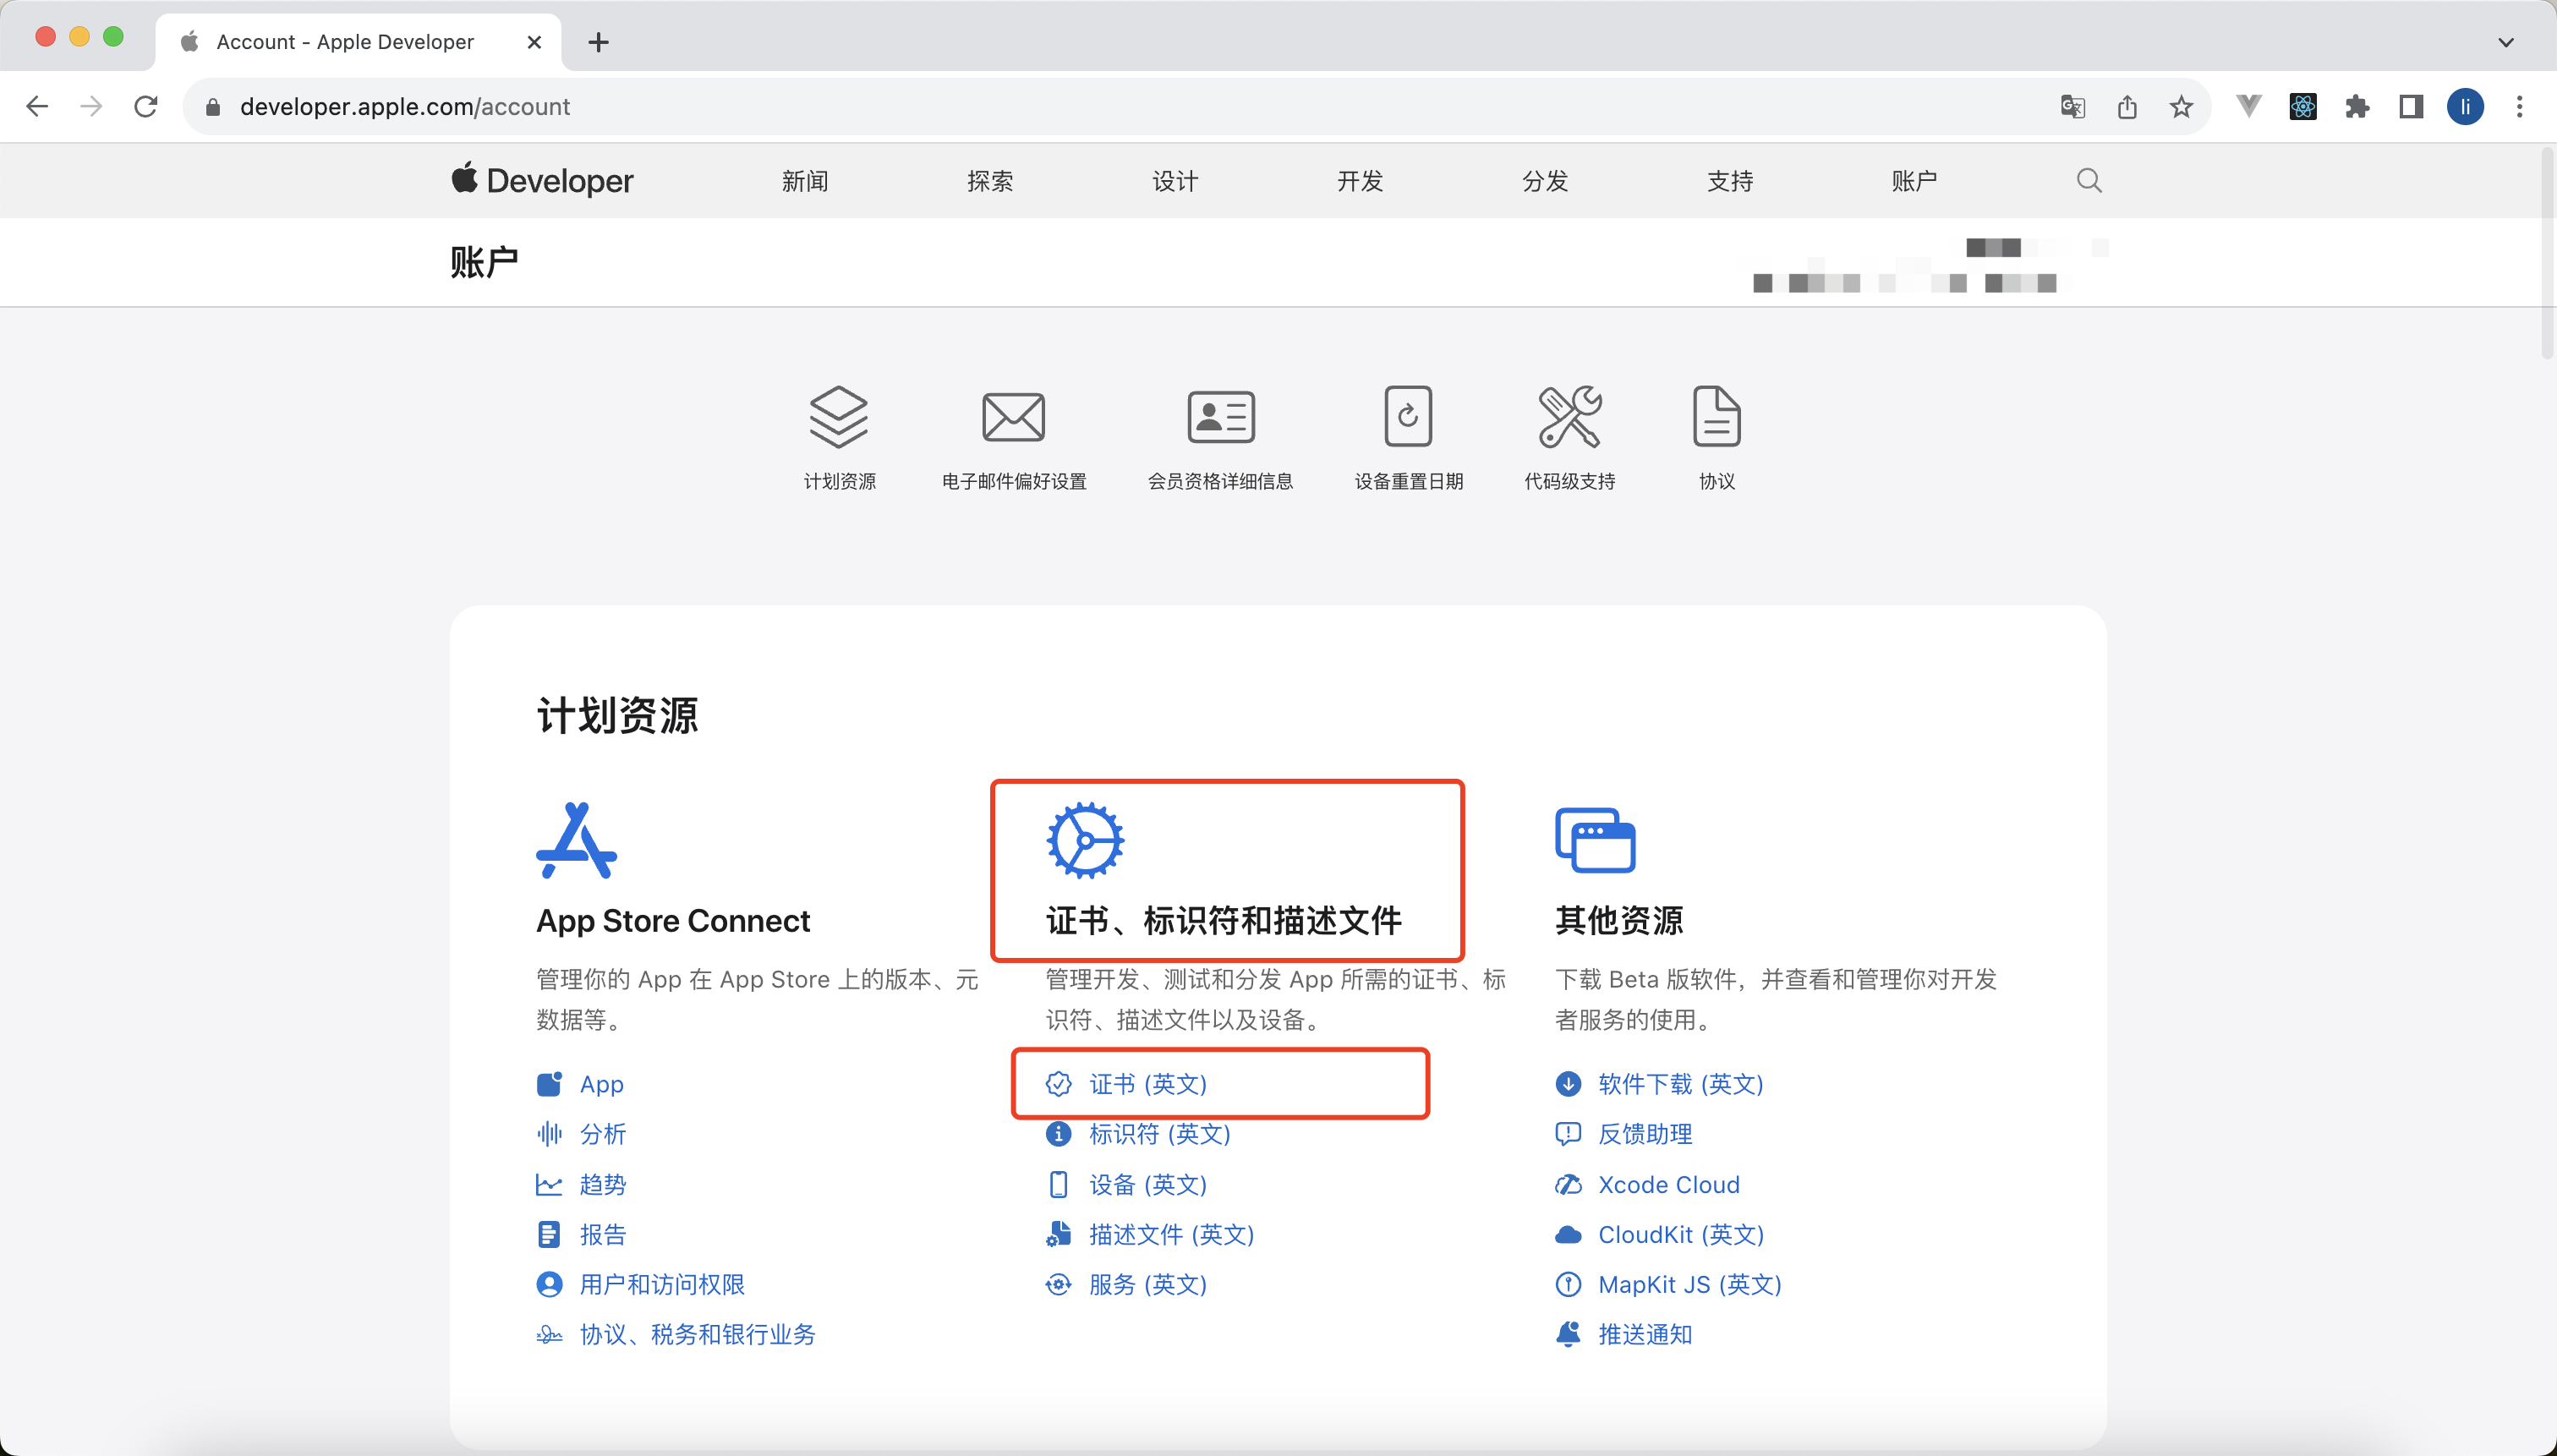
- 选择“Certificates(
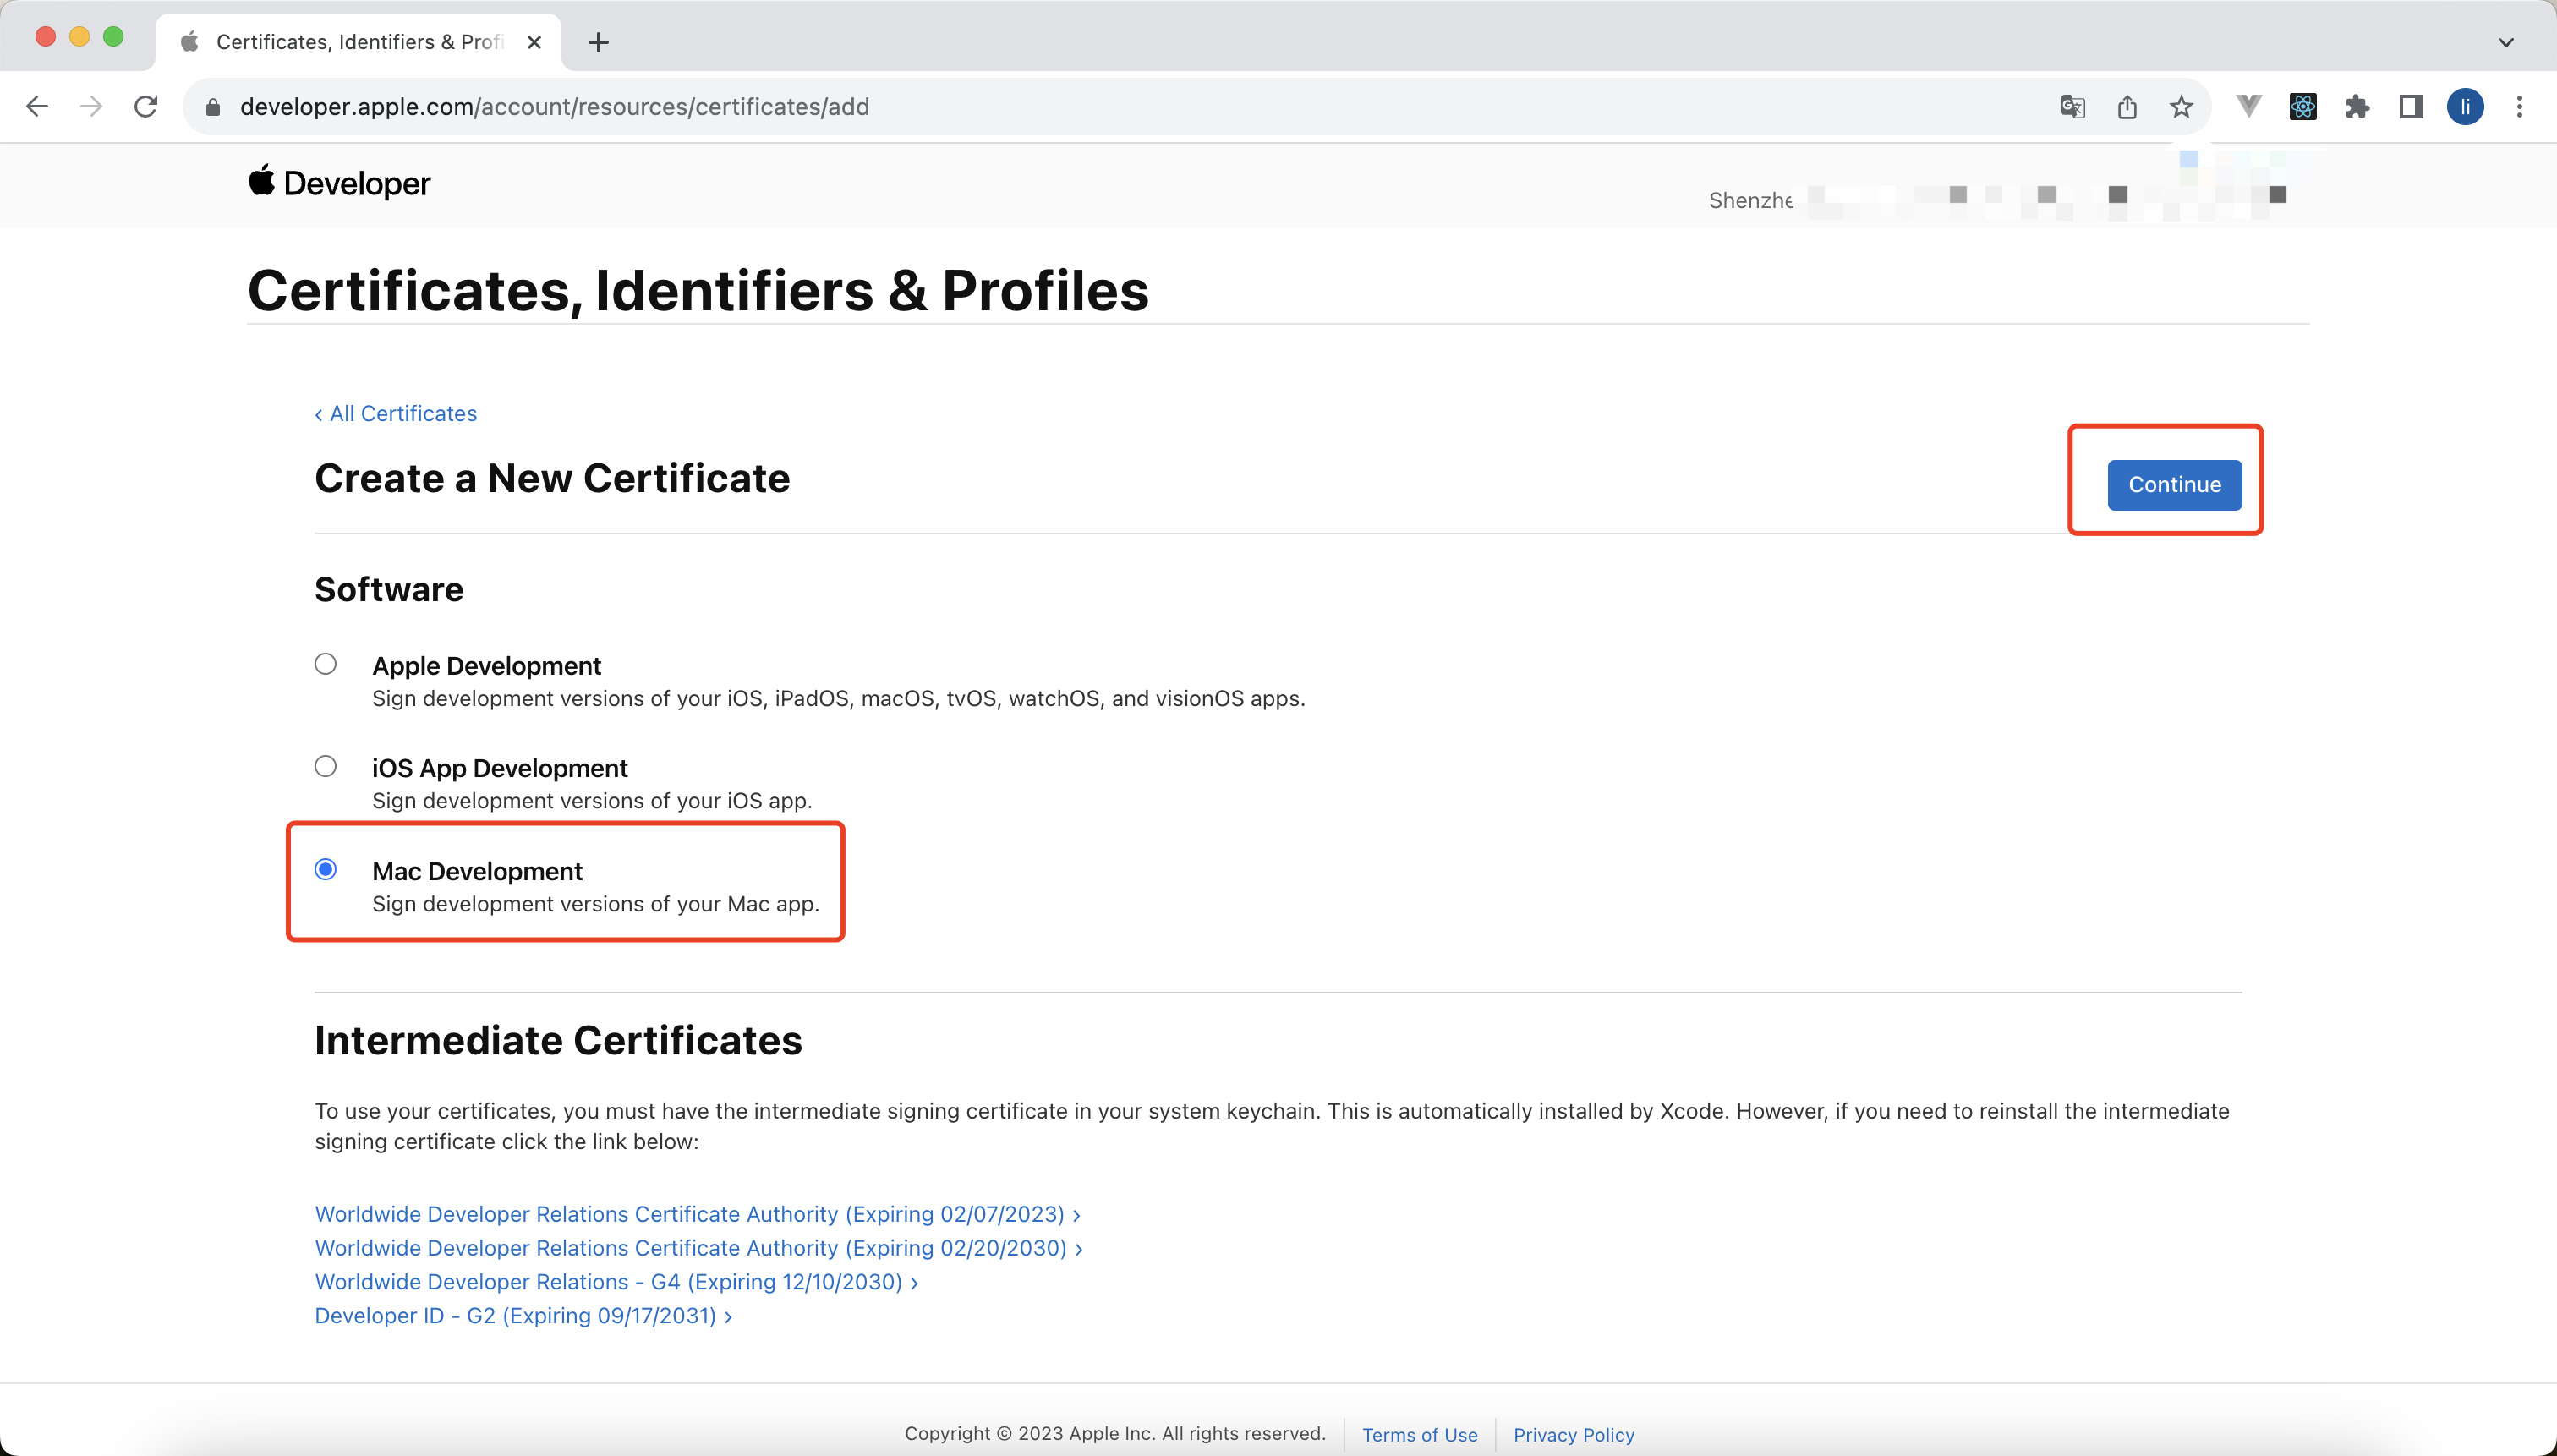
证书(英文))”并点击“+”来创建新证书。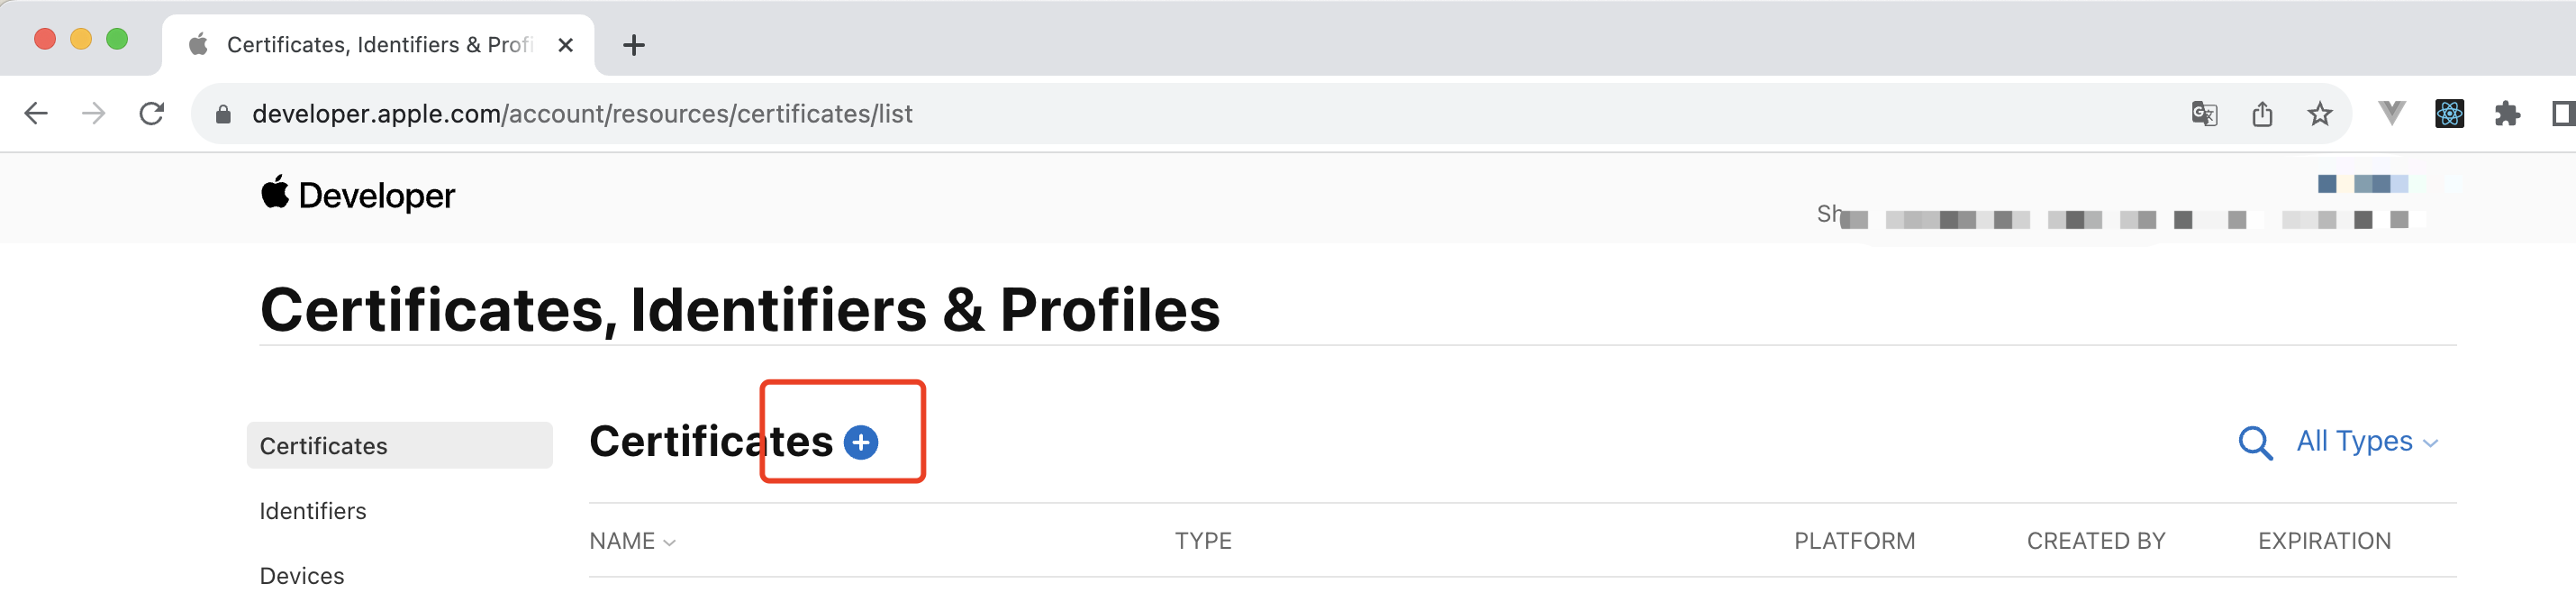
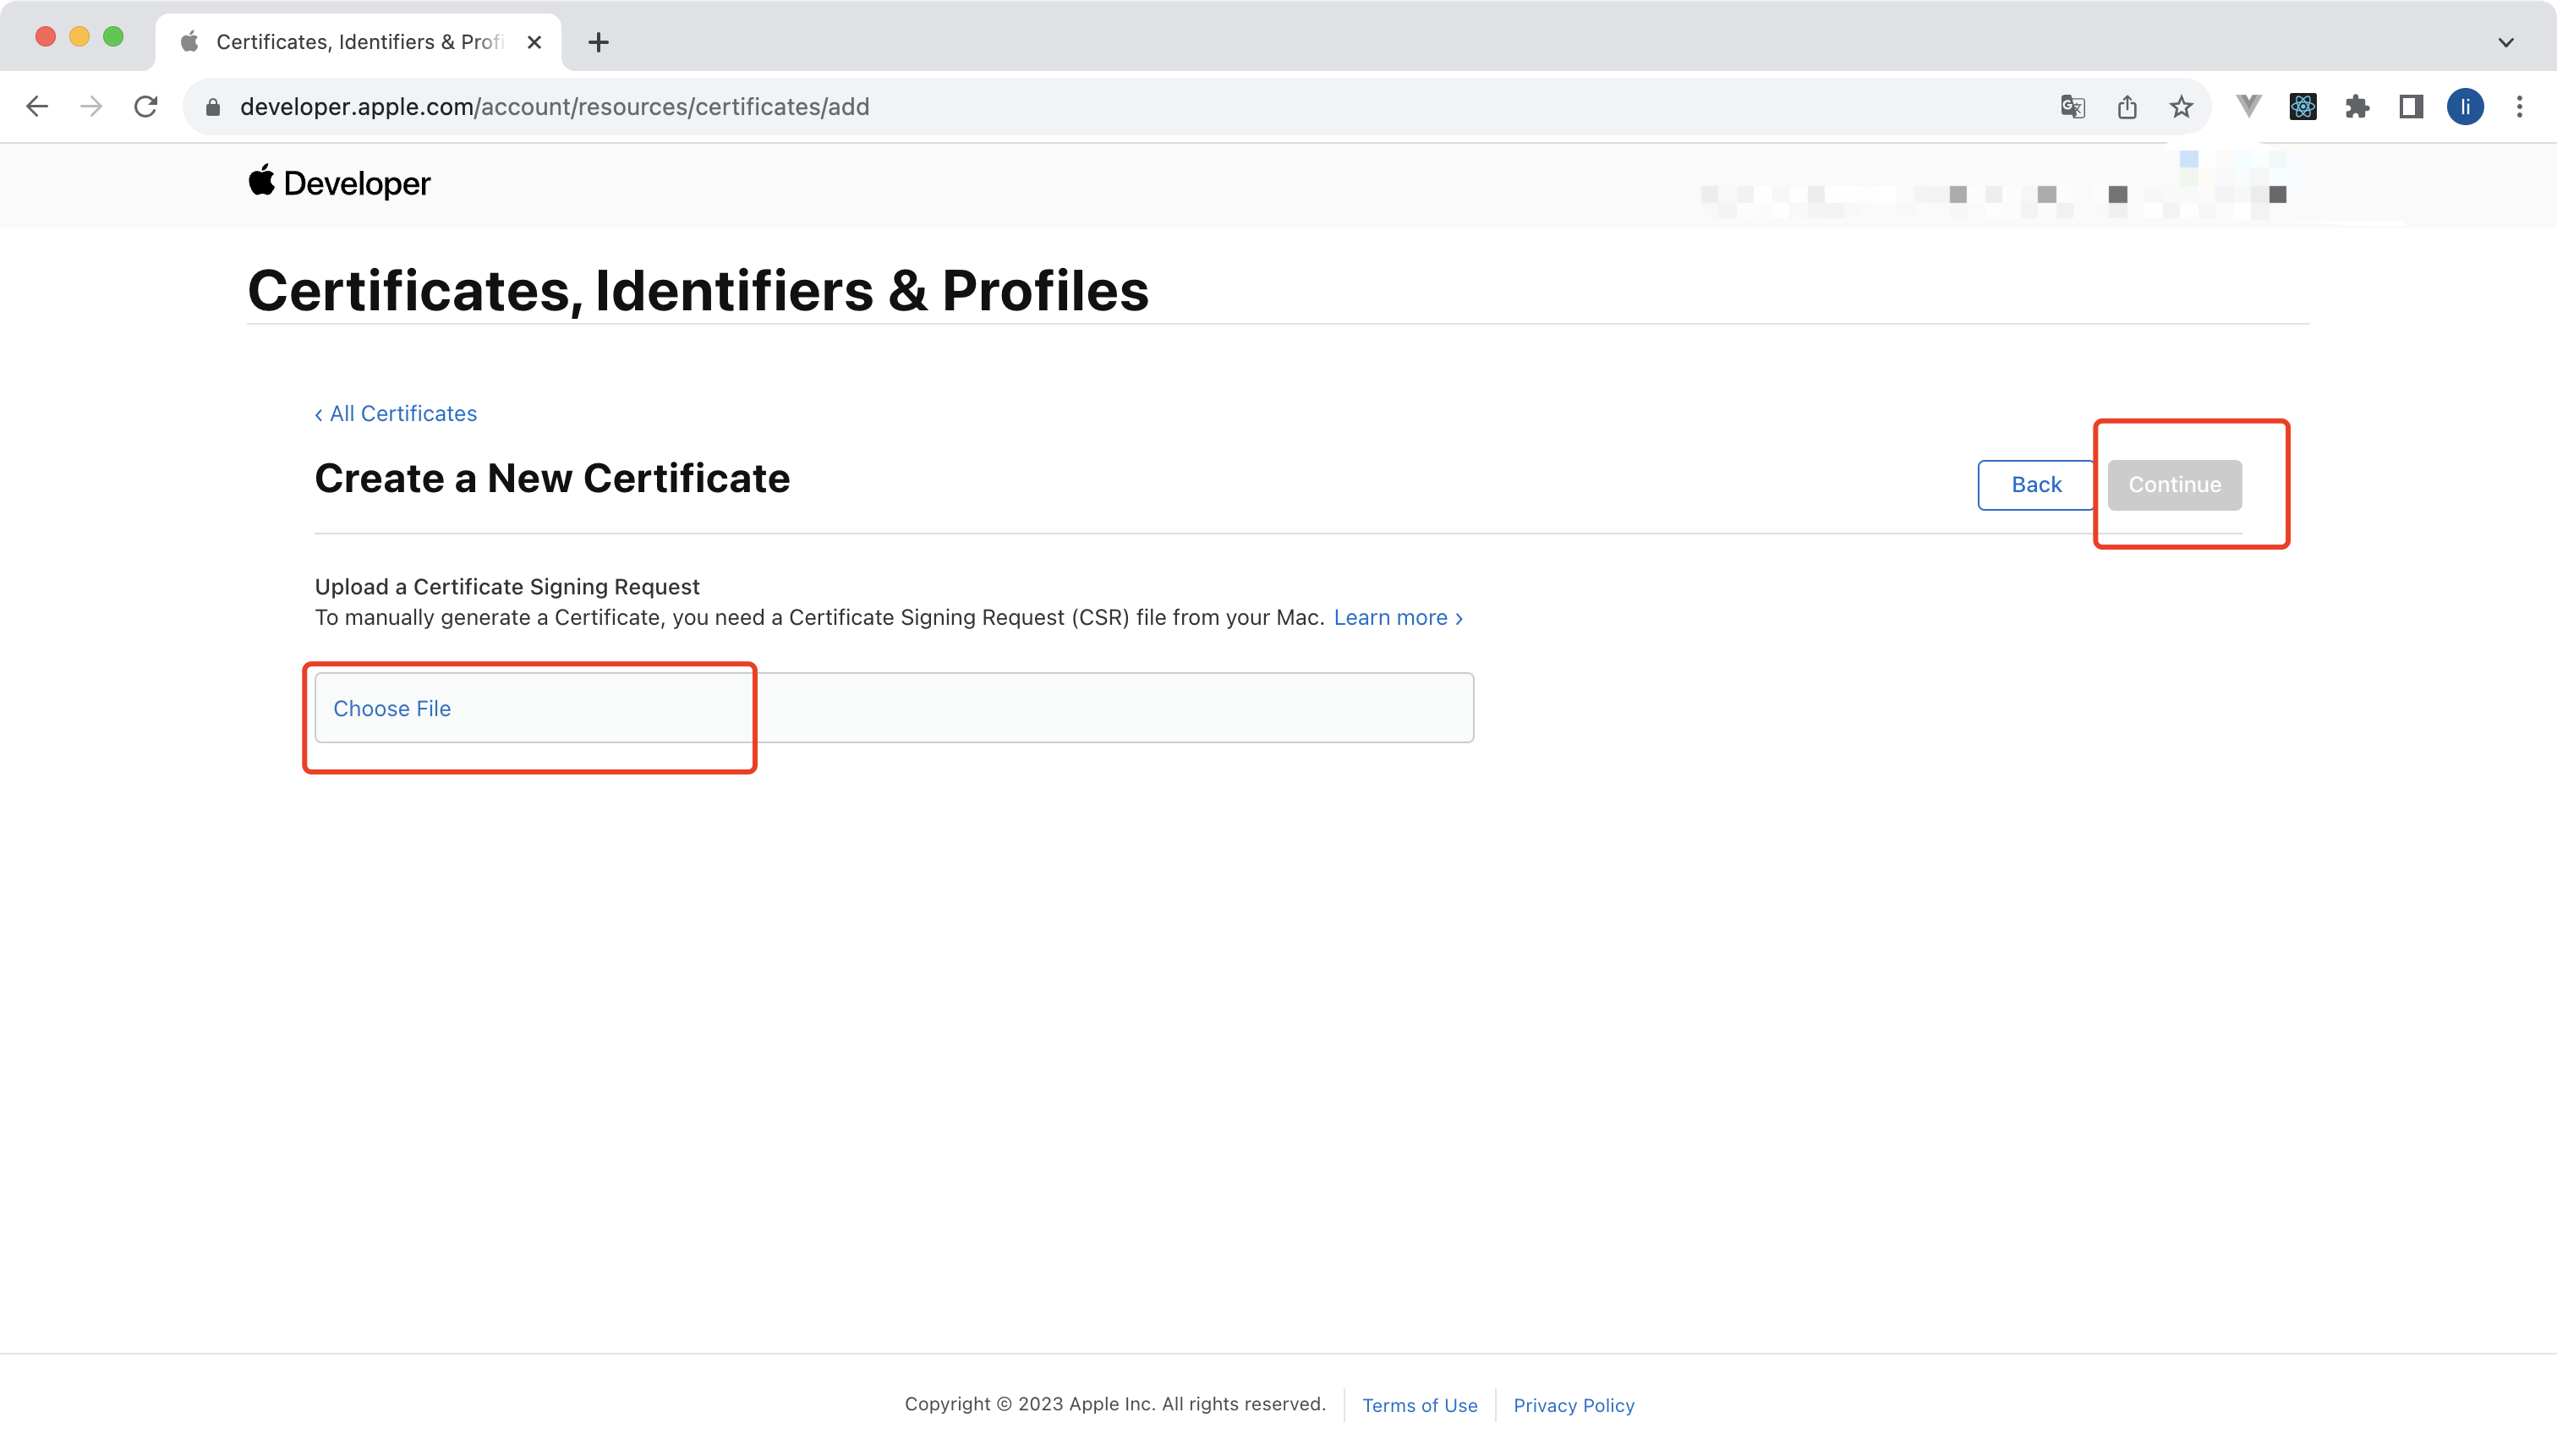
- 选择适合您需求的证书类型(例如,iOS 开发、Mac 开发等),并上传之前创建的 CSR 文件。
下载并安装证书:
- 审核通过后,您可以下载证书。
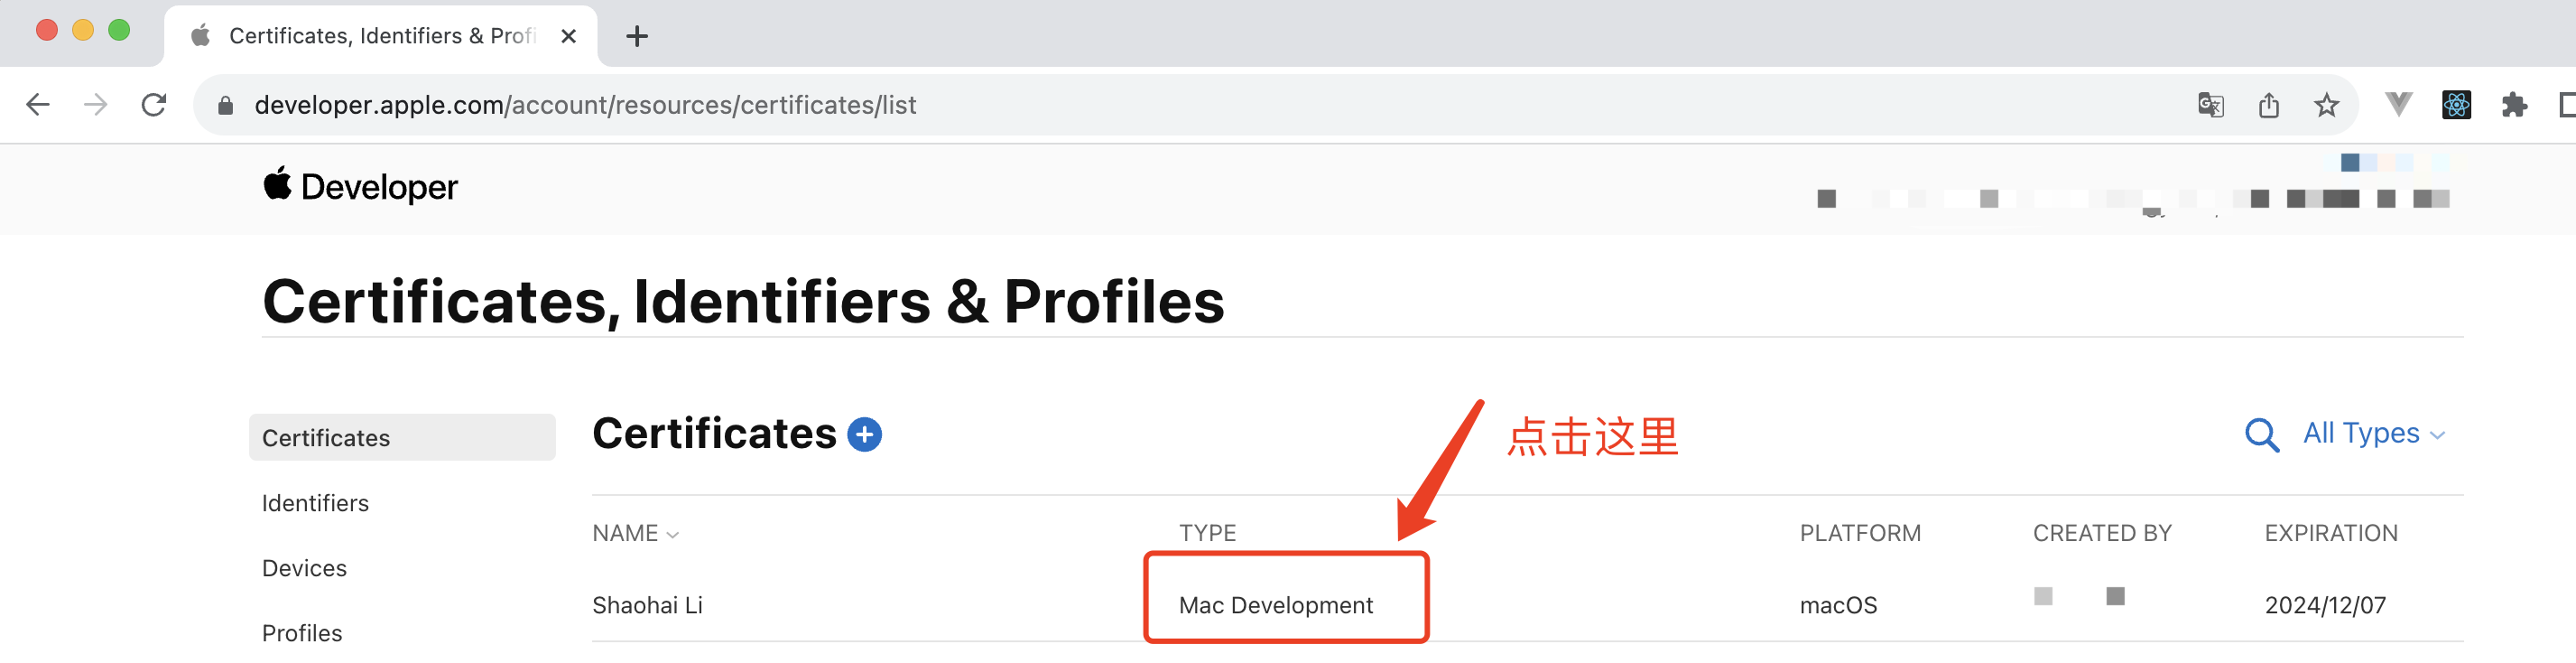
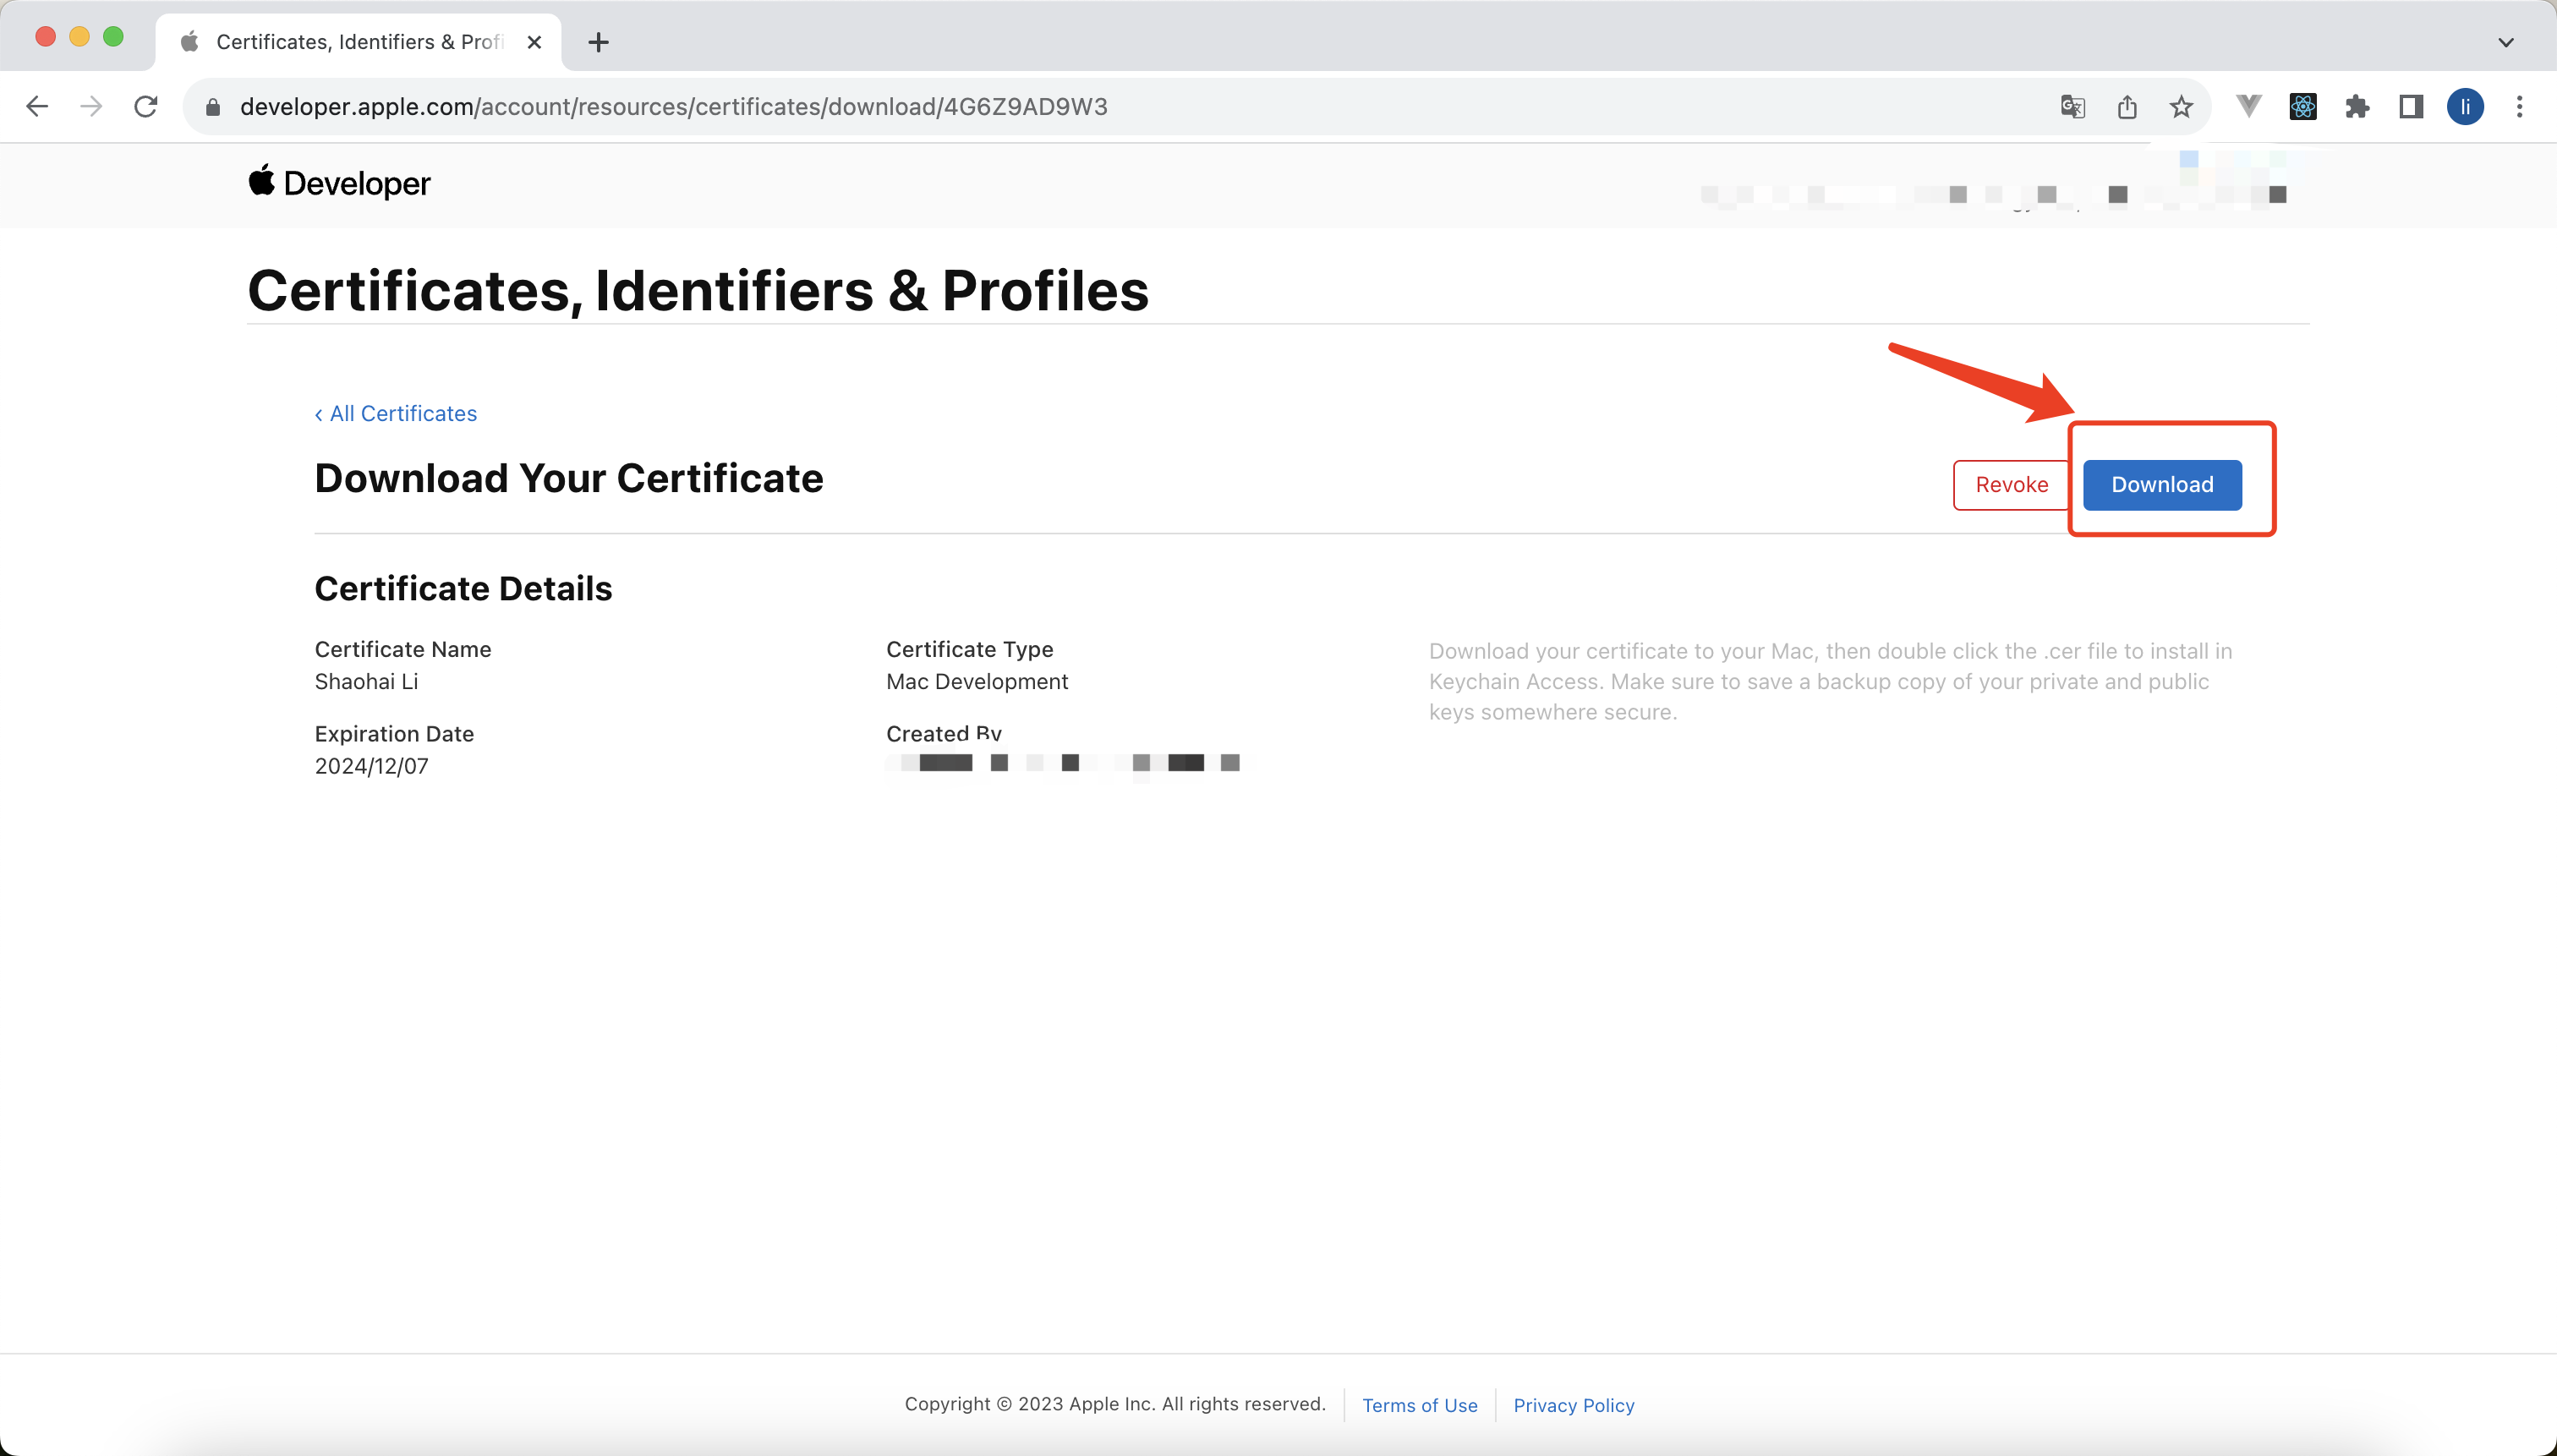
- 双击下载的证书文件将其安装到您的 Mac 上。

- 打开钥匙串访问
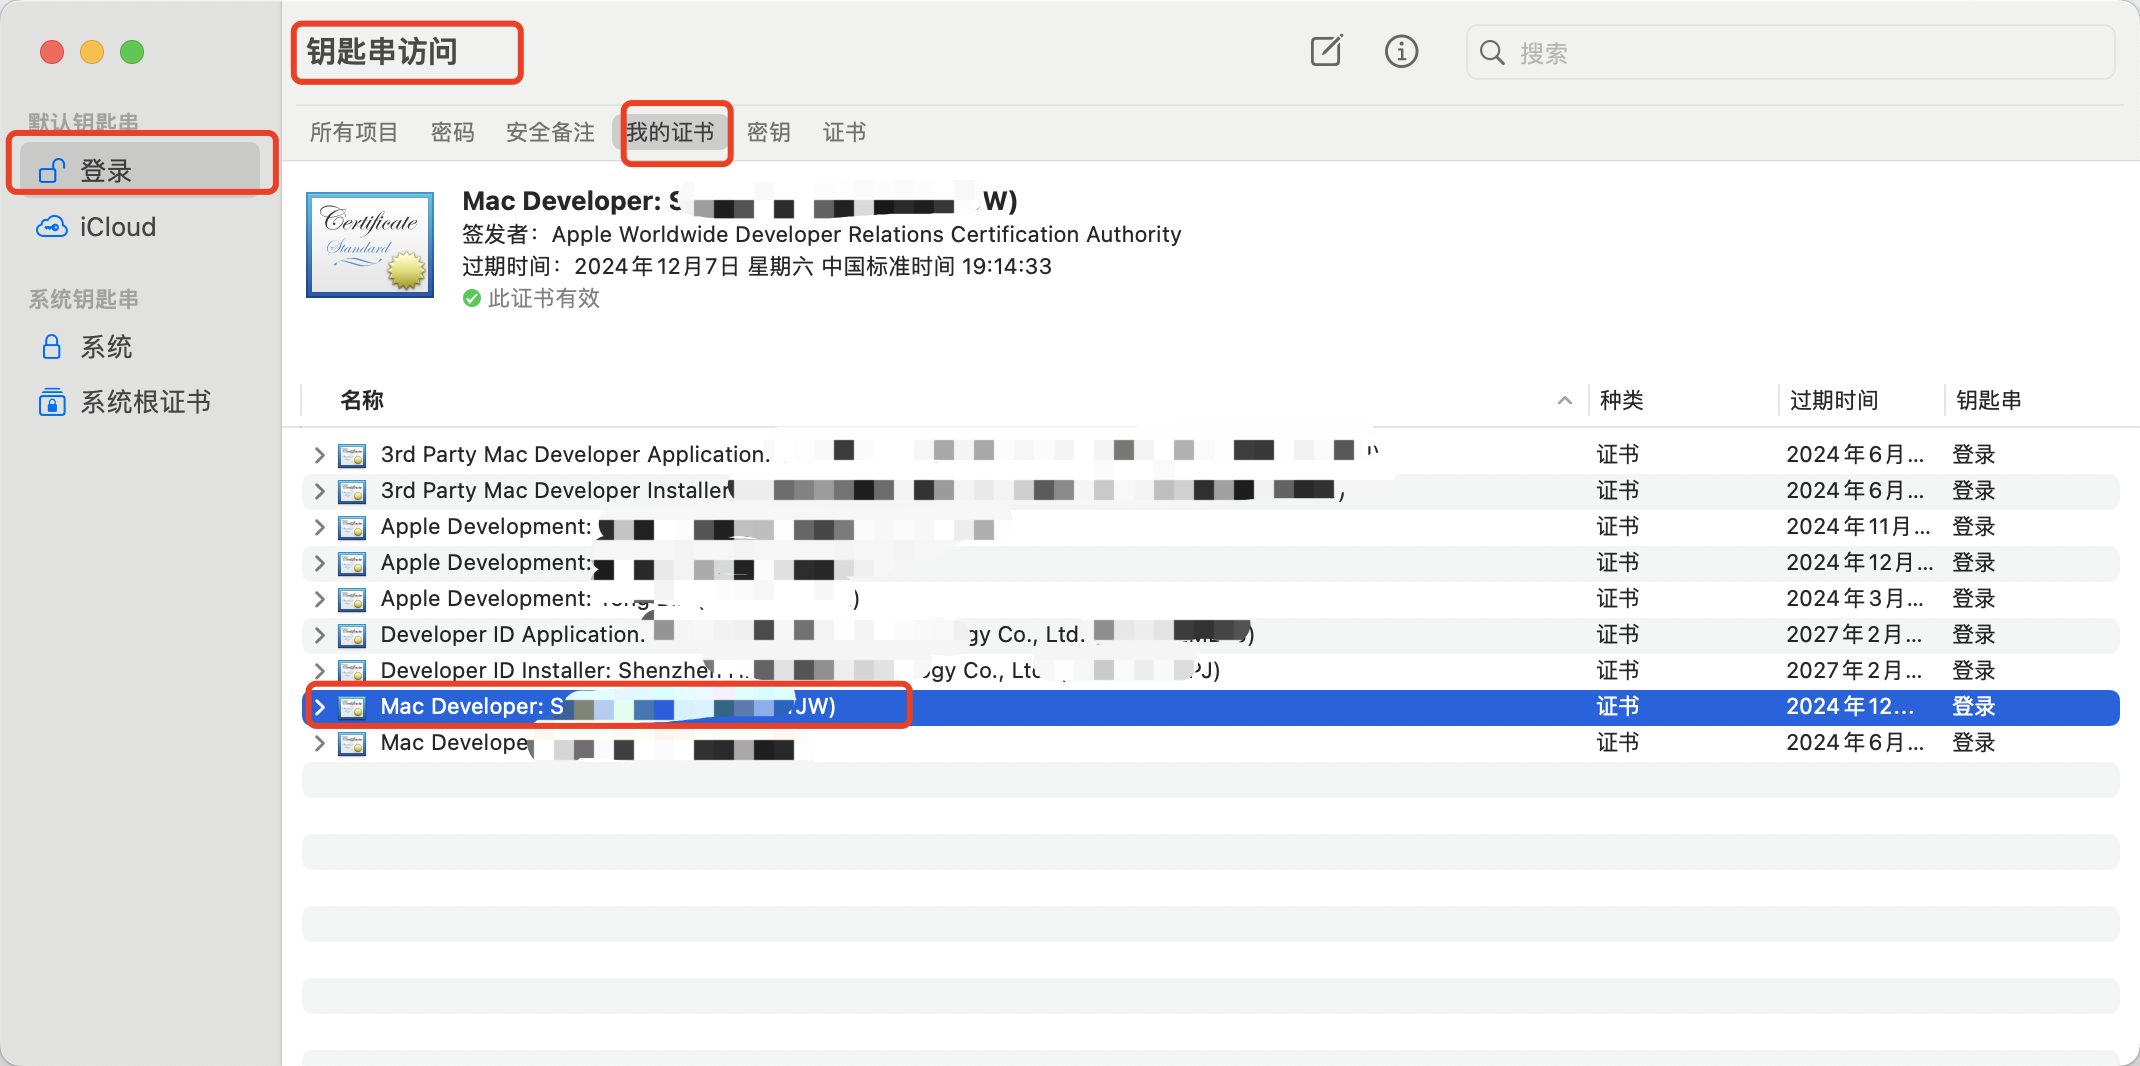
- 审核通过后,您可以下载证书。
Mac Developer 证书的作用
这个证书在打包成 mas-dev 包的时候,需要指定这个证书
2. 获取 Developer ID Application: Shenzhen YourCompany Technology Co., Ltd. (U2XXXXXXXX) 证书
如何获取 Developer ID Application 证书
与获取 Mac Developer 流程一样
Developer ID Application 证书的作用
对代码进行签名,mas 和 mas-dev 的时候 mac 配置项都需要指定该证书进行签名
3. Developer ID Installer: Shenzhen YourCompany Technology Co., Ltd. (U2XXXXXXXX) 证书
如何获取 Developer ID Installer 证书
与获取 Mac Developer 流程一样
Developer ID Installer 证书的作用
如果你的应用计划仅通过苹果应用商店(mas-dev、mas)进行安装,那么可以不需要此证书,如果通过苹果应用商店以外的,那么需要指定该证书对安装包(dmg、pkg)进行签名
4. 3rd Party Mac Developer Application: Shenzhen YourCompany Technology Co., Ltd. (U2XXXXXXXX) 证书
如何获取 3rd Party Mac Developer Application 证书
与获取 Mac Developer 流程一样
3rd Party Mac Developer Application 证书的作用
electorn builder 打包并且使用 Developer ID Application 签名、公证之后,将会使用这个证书进行签名,然后生成 mas 的 pkg 包,只有 mas 的包需要使用这个证书签名,mas-dev 不需要
5. 3rd Party Mac Developer Installer: Shenzhen YourCompany Technology Co., Ltd. (U2XXXXXXXX) 证书
如何获取 3rd Party Mac Developer Installer 证书
与获取 Mac Developer 流程一样
3rd Party Mac Developer Installer 证书的作用
当使用 electron builder 打包 mas 的 pkg 包的时候,需要对 pkg 的包使用该证书进行签名,如果不通过此证书签名,将会无法使用 transporter.app 上传到 testflight
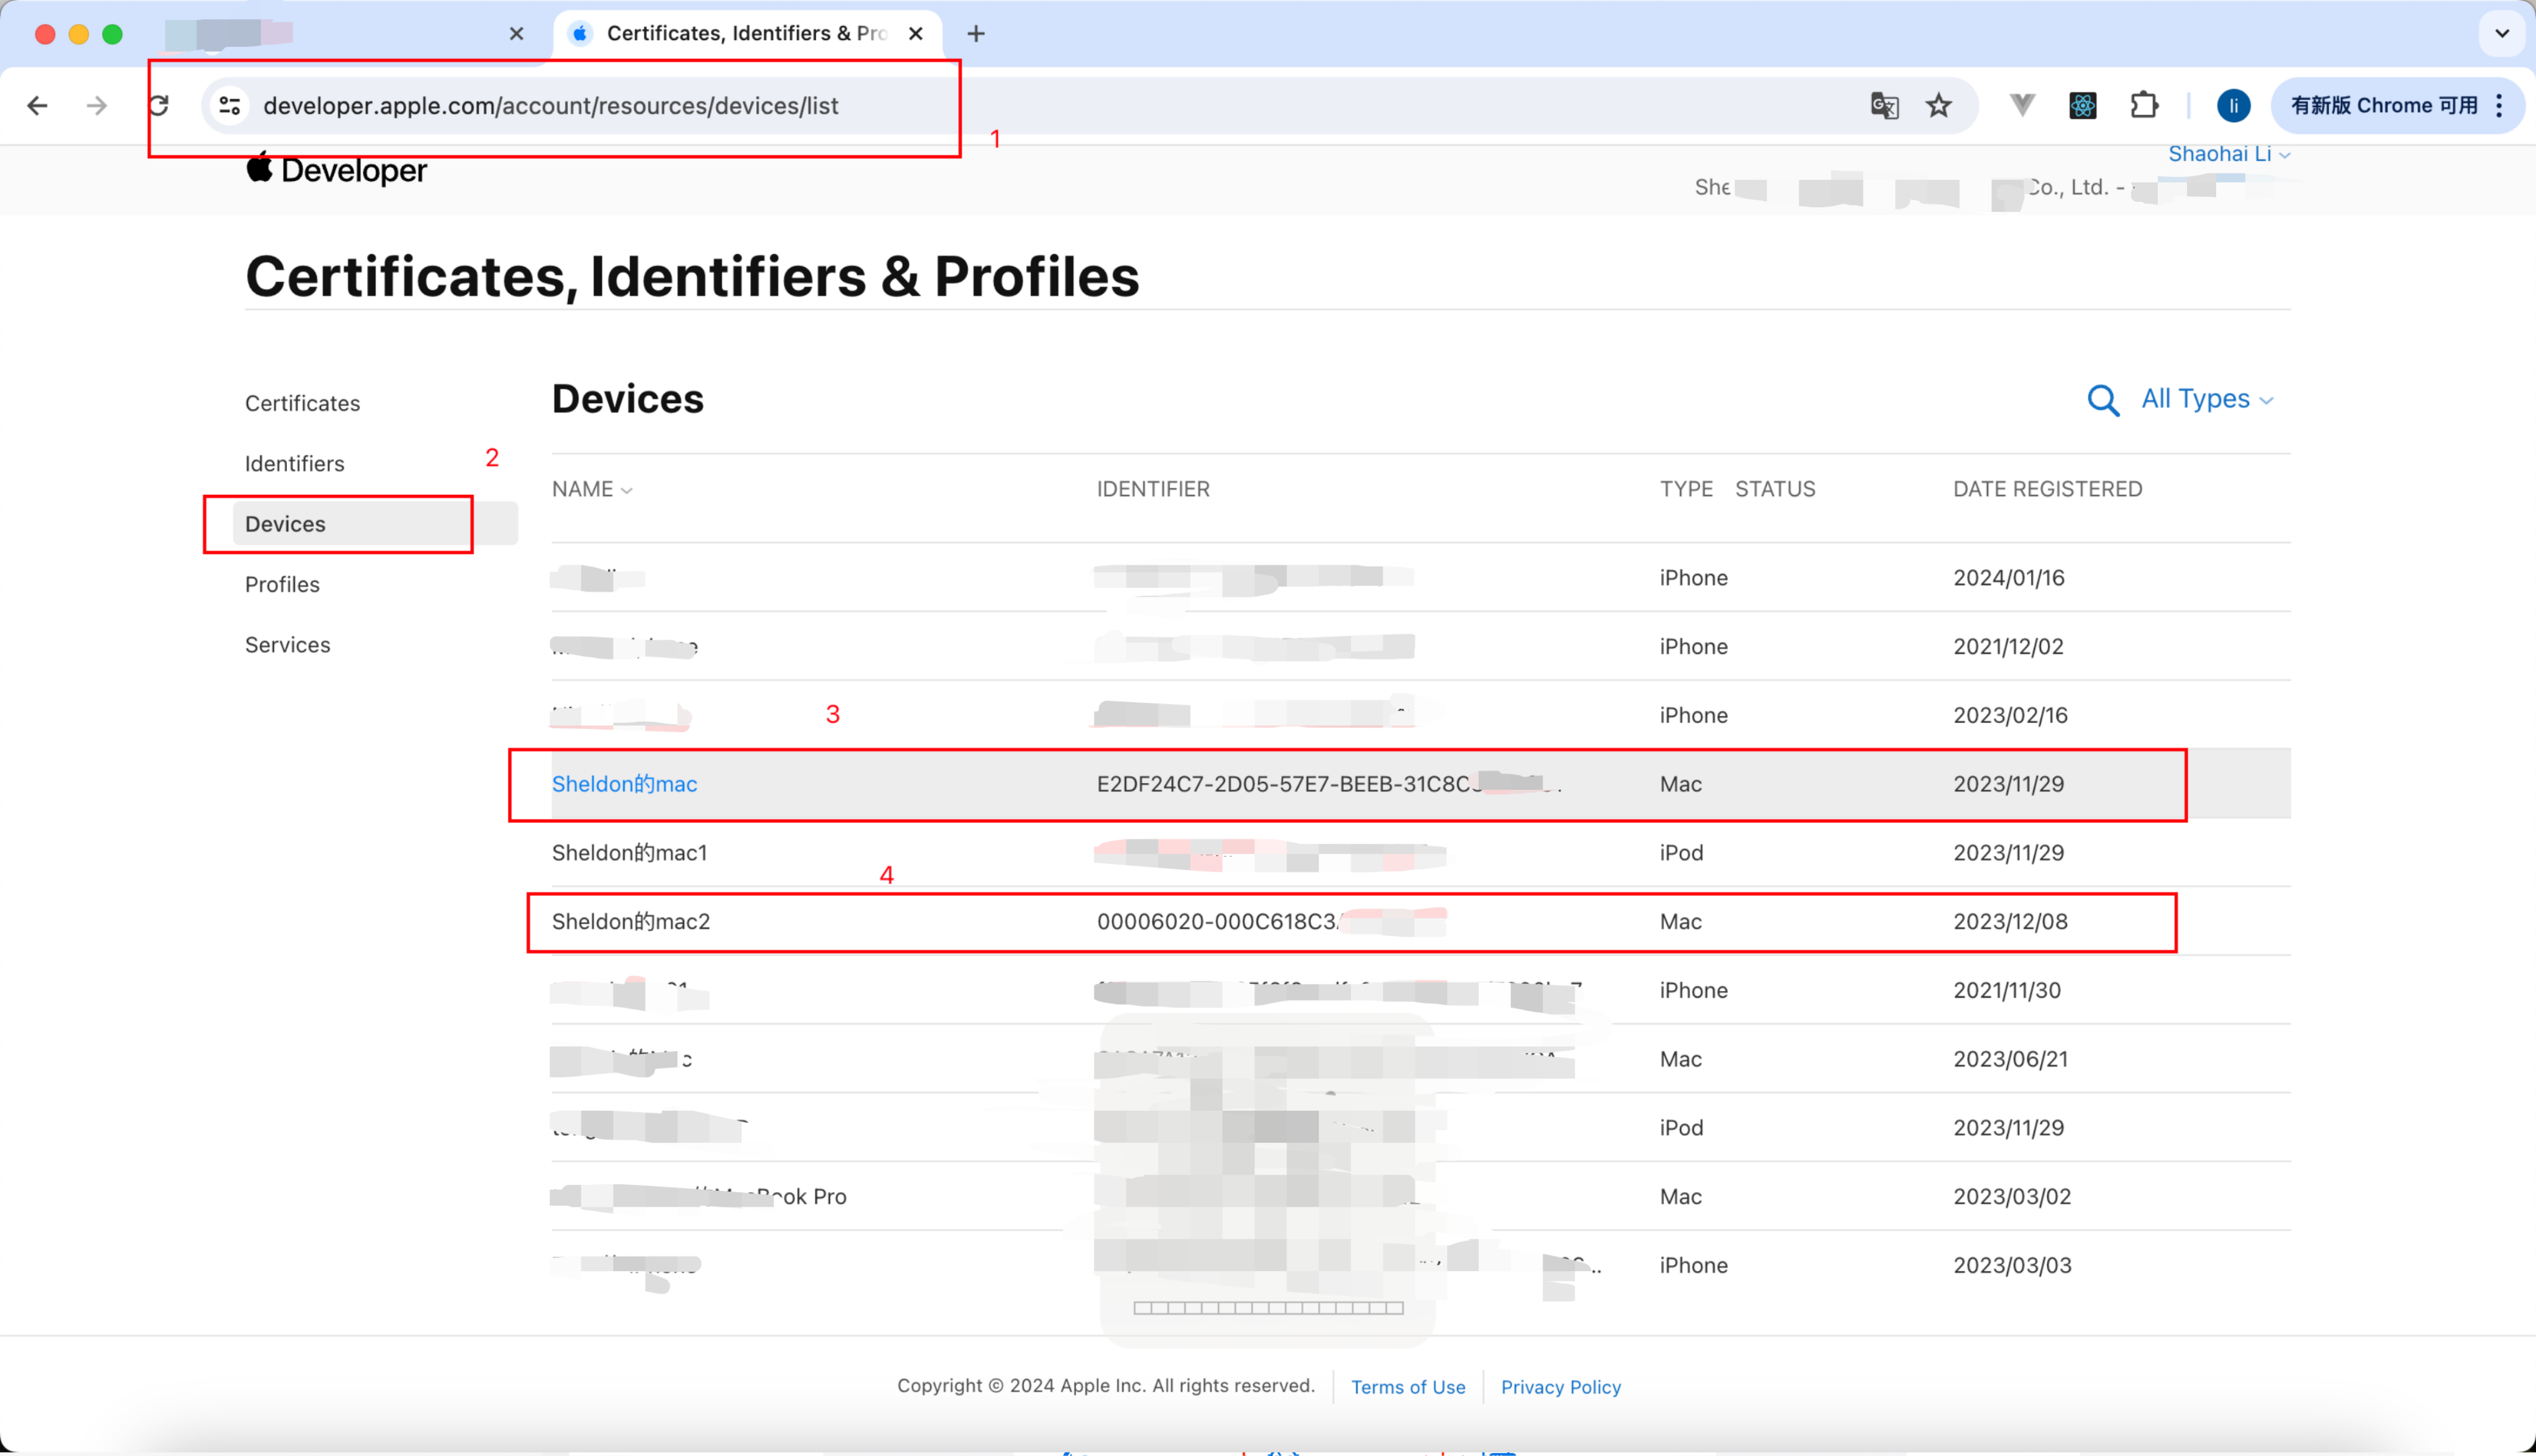
可描述文件安装
获取 mac 的 uuid 和 udid command + 空格键,输入 系统信息 然后回车就出现这个页面了

打开 开发者 设备列表添加 uuid 和 udid,一定要添加两个 https://developer.apple.com/account/resources/devices/list
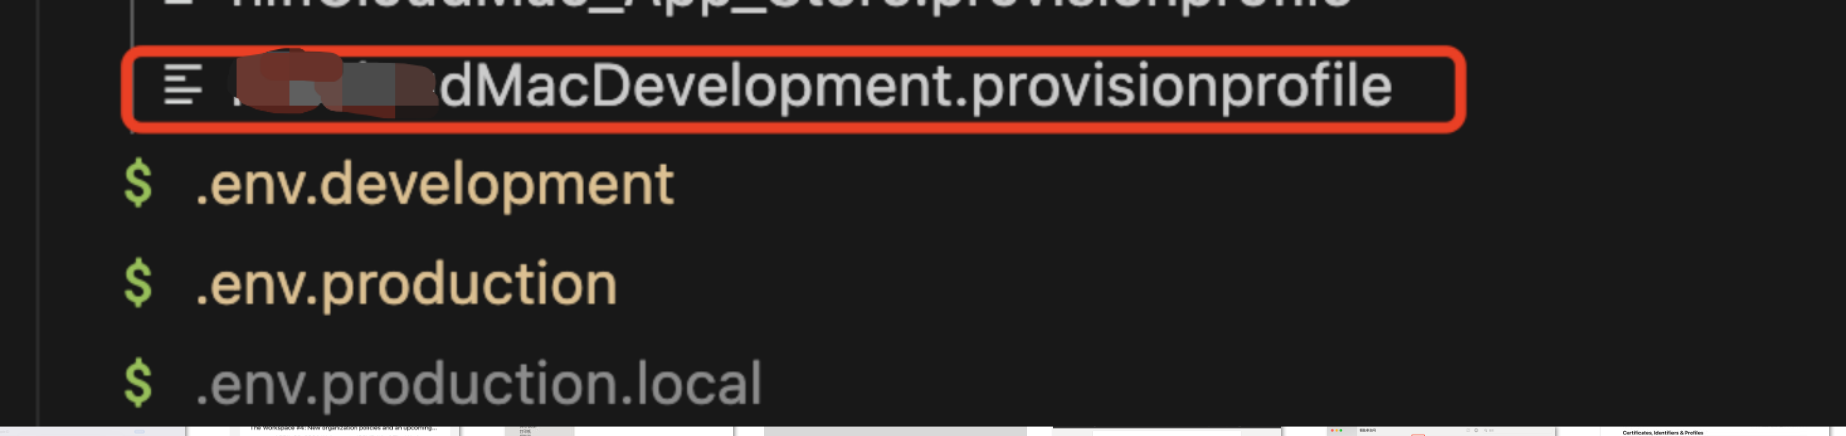
profiles 下载 YourCompanyMac.Development 描述文件
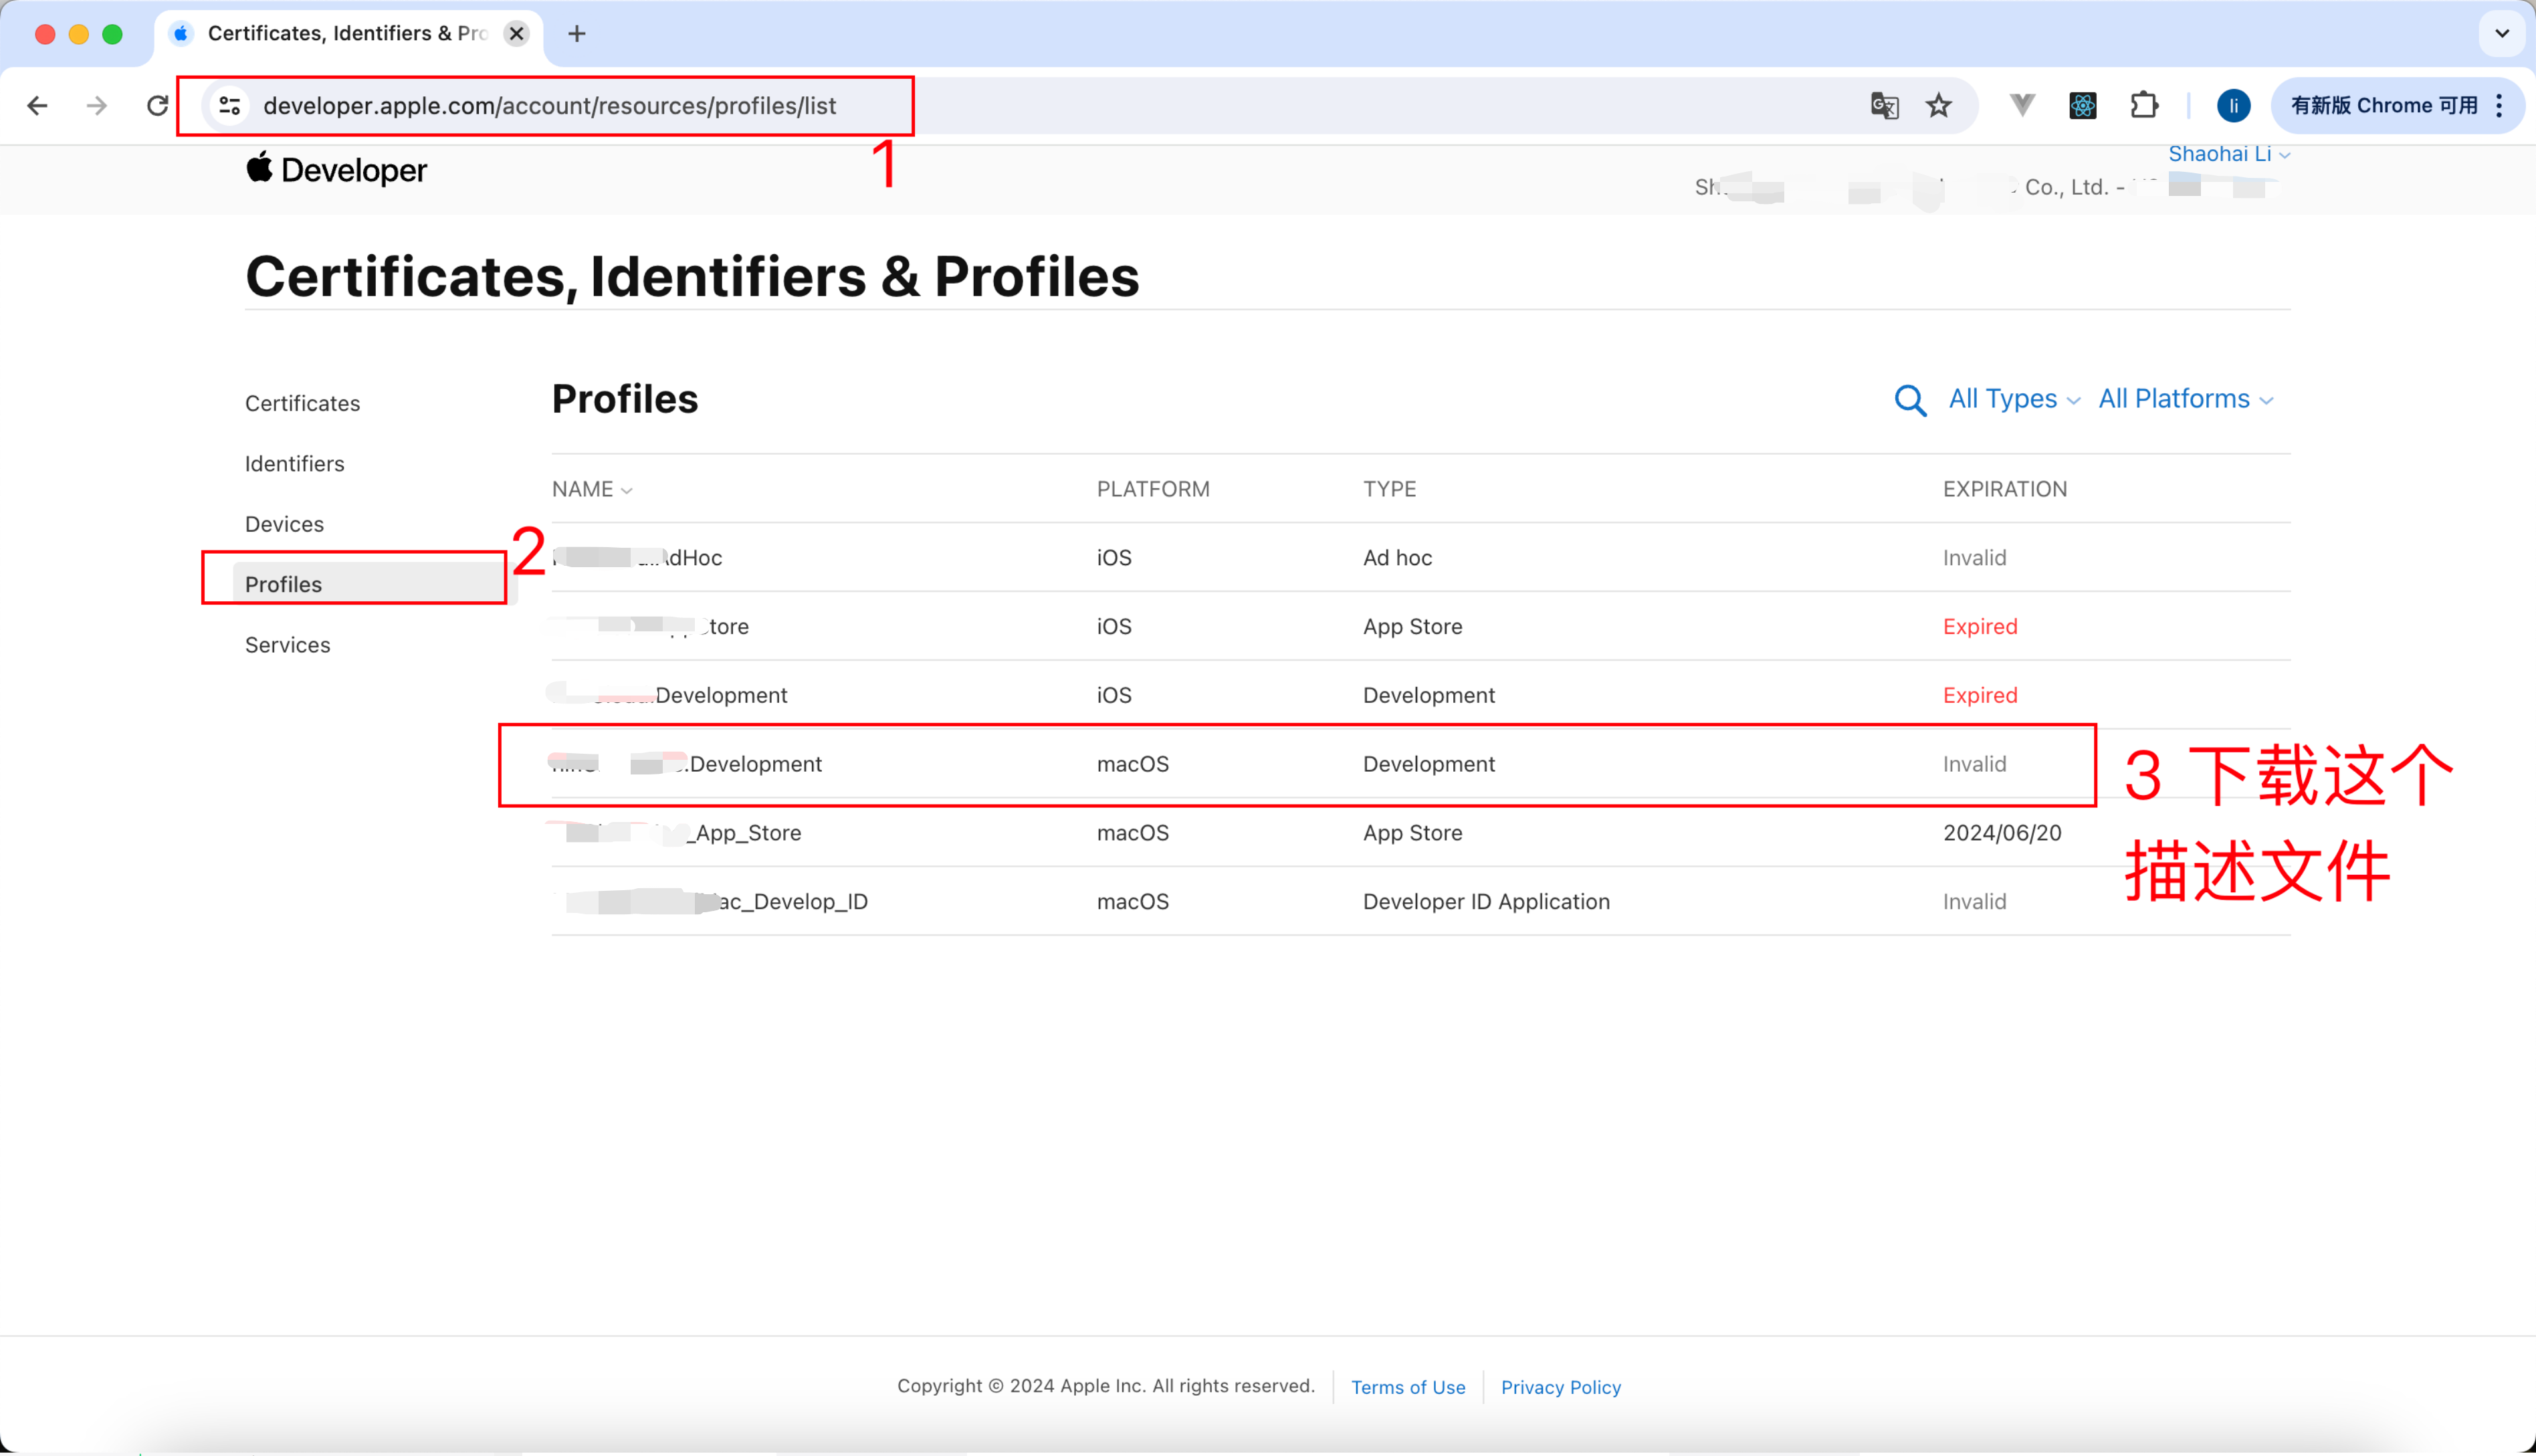
下载到本地后双击安装
3. 获取应用程序专用密码-用于公证代码
需要 应用程序专用密码和 appleId ,用于公证 .app 文件的
- 访问苹果 id 官网-生成-应用程序专属密码 https://appleid.apple.com
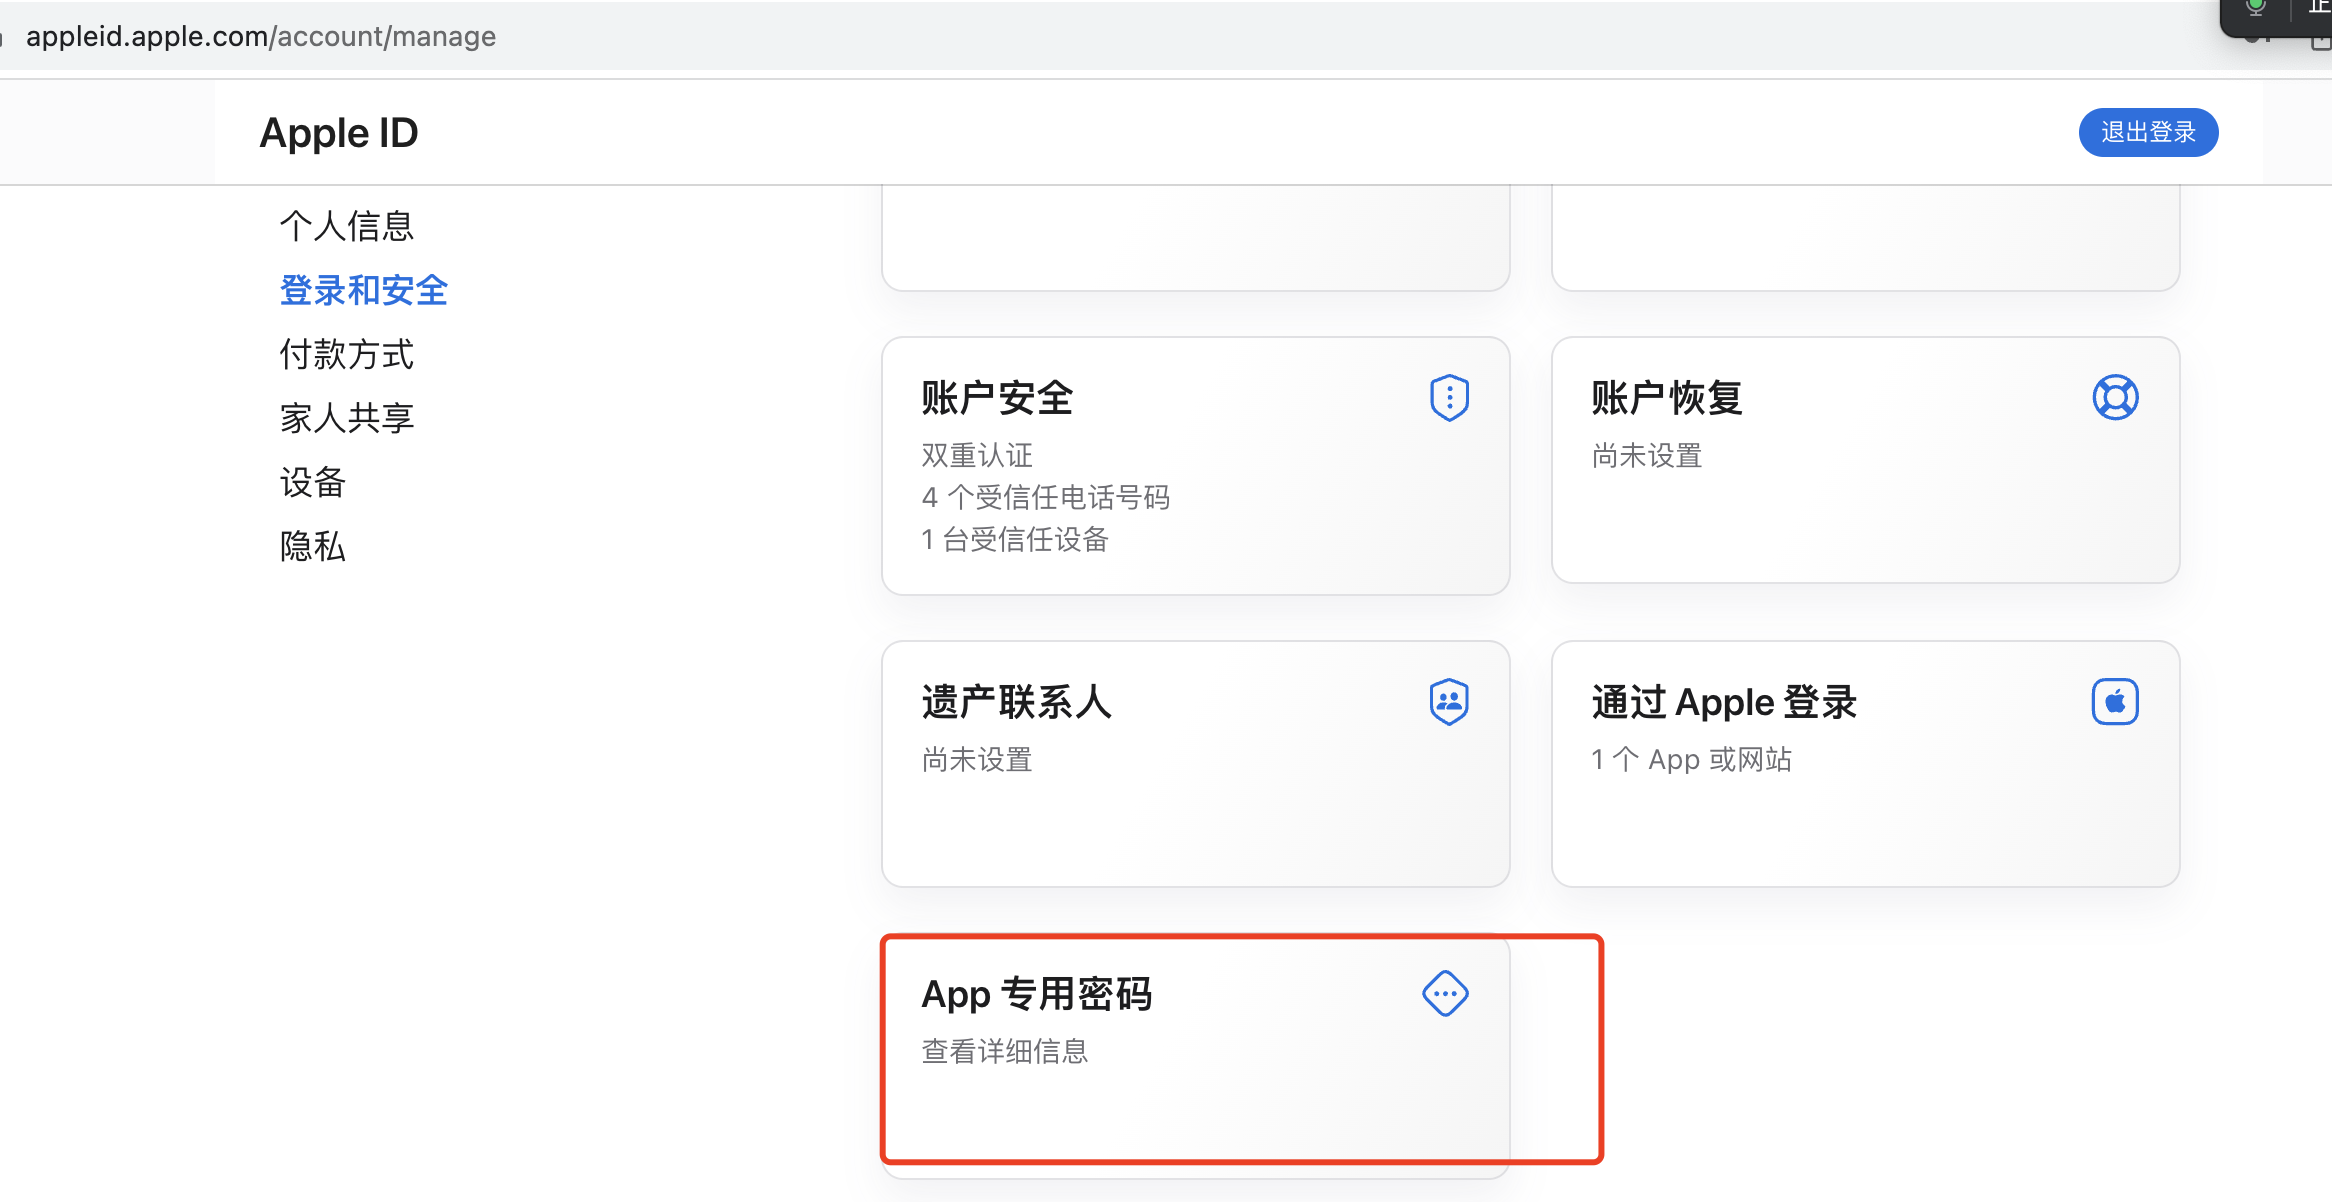
- 输入一个备注
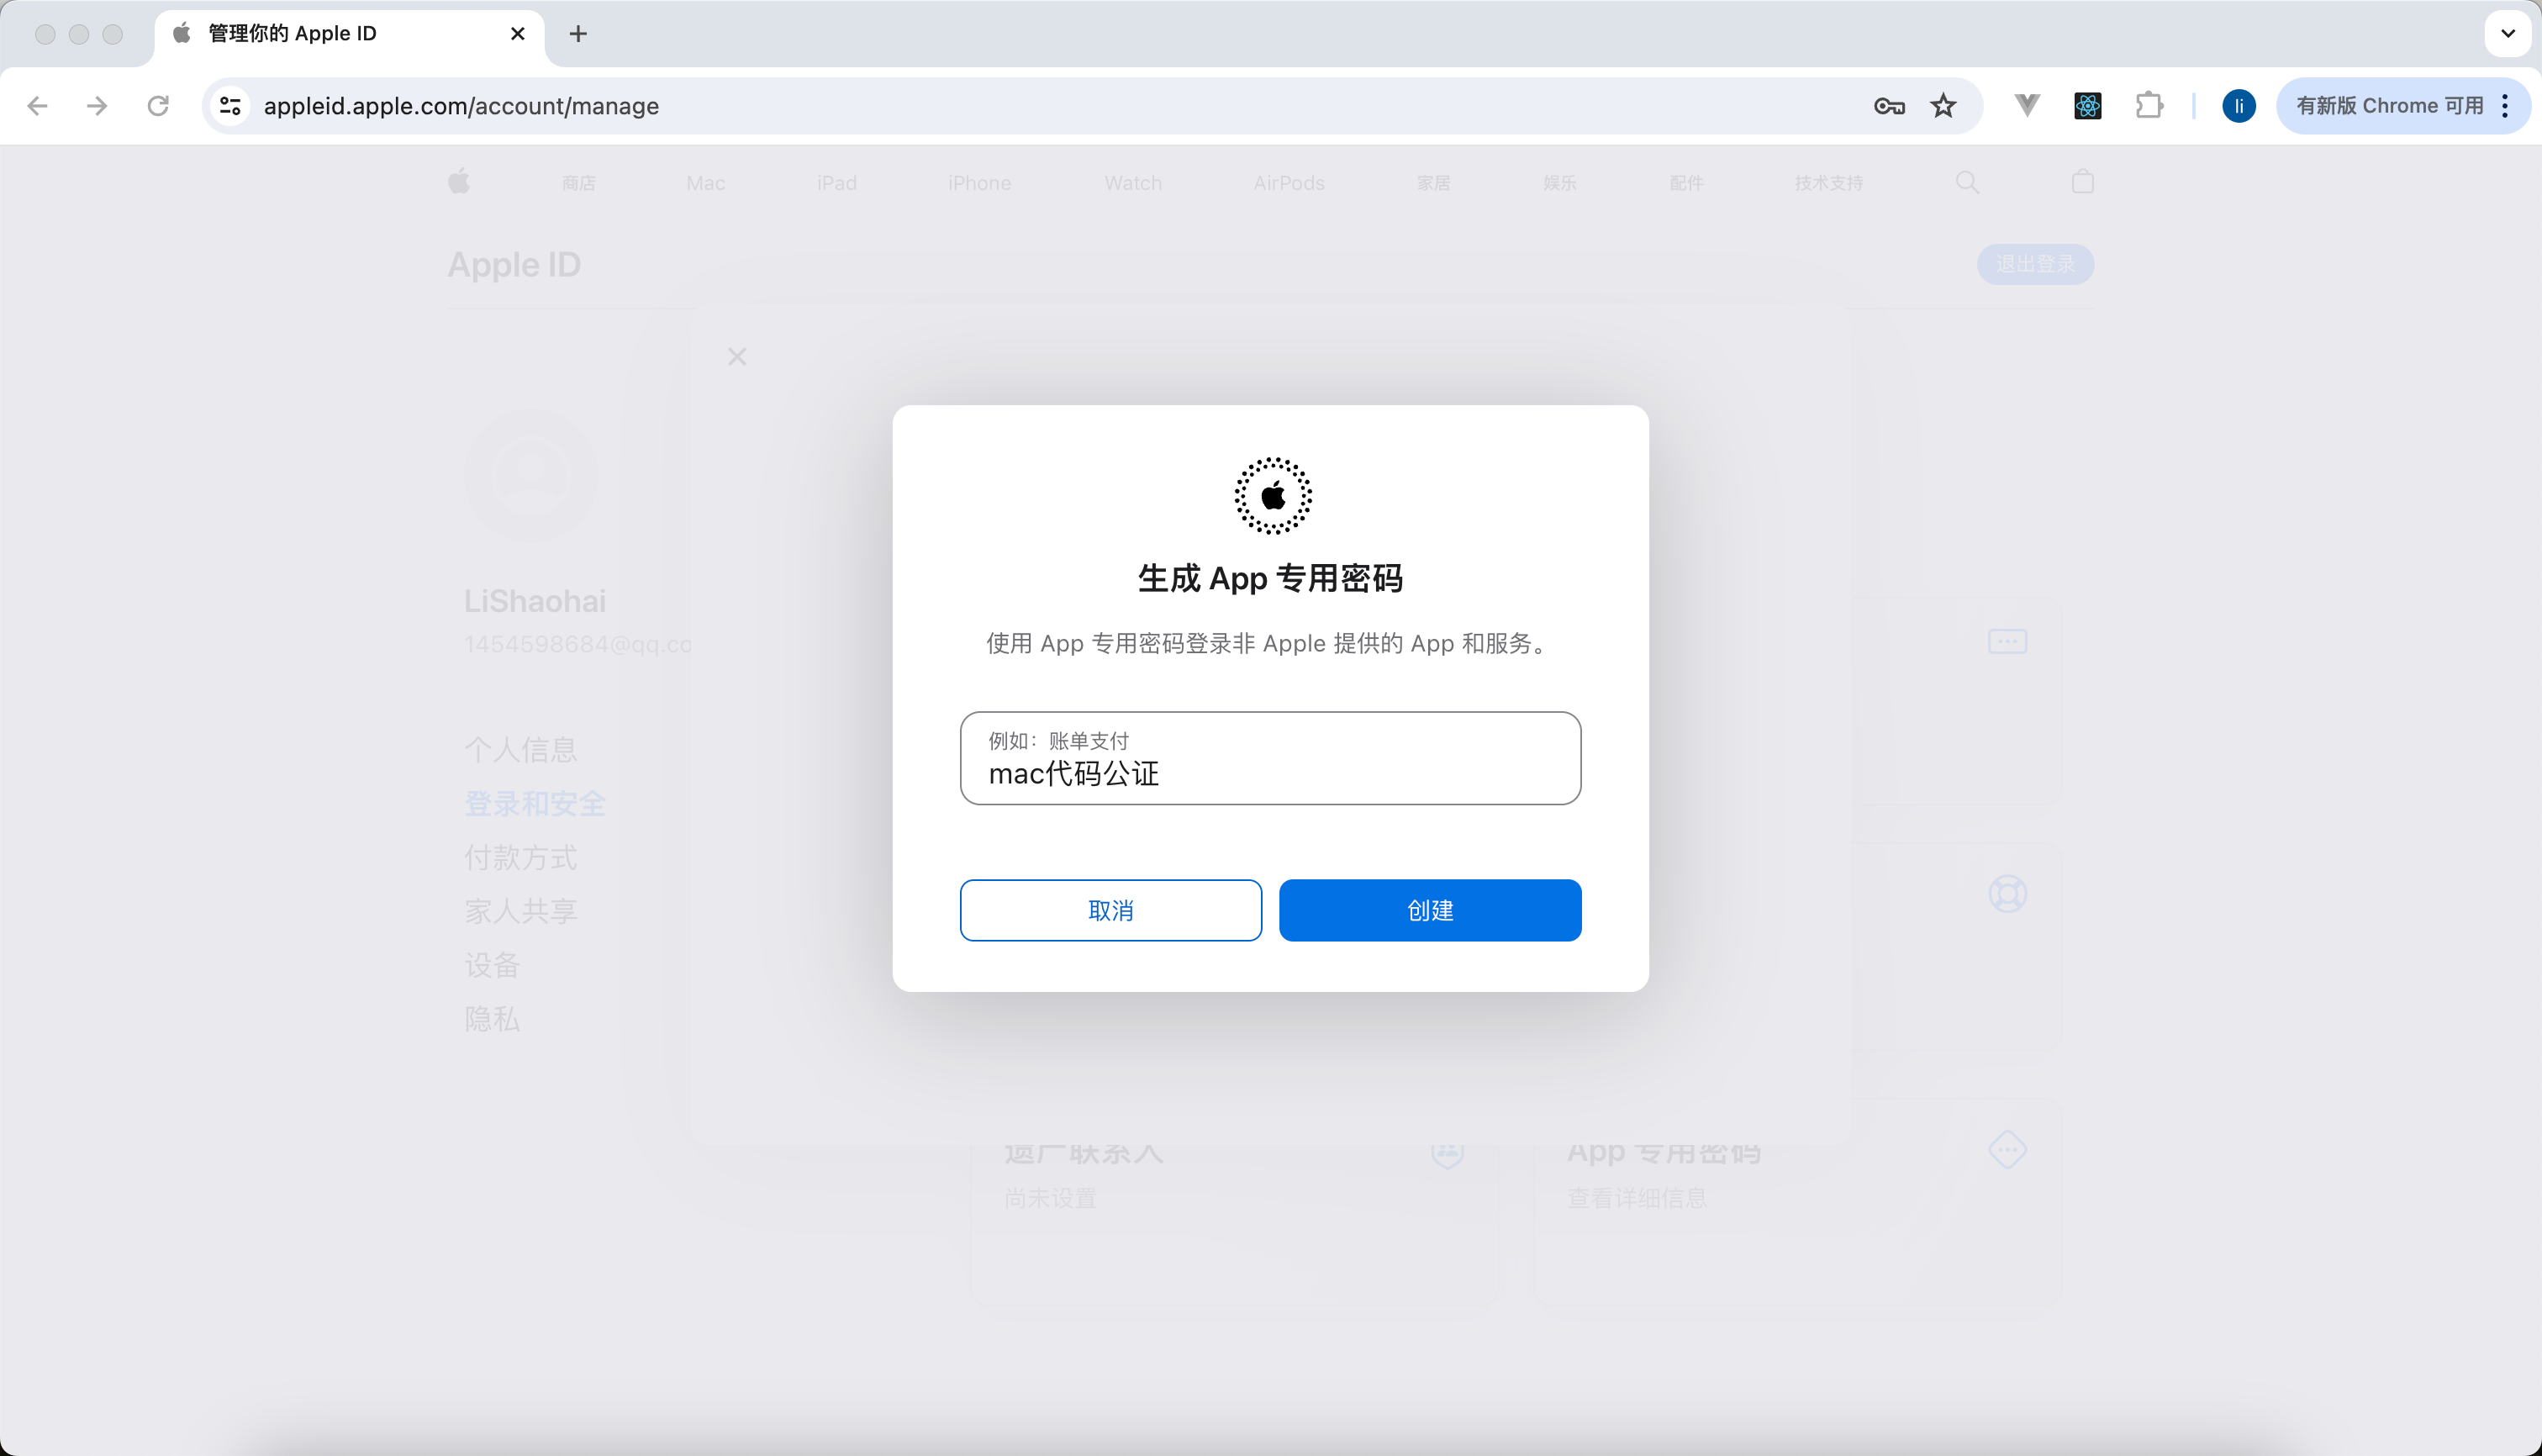
- 拷贝你的应用专属密码 - 关闭窗口就看不到了
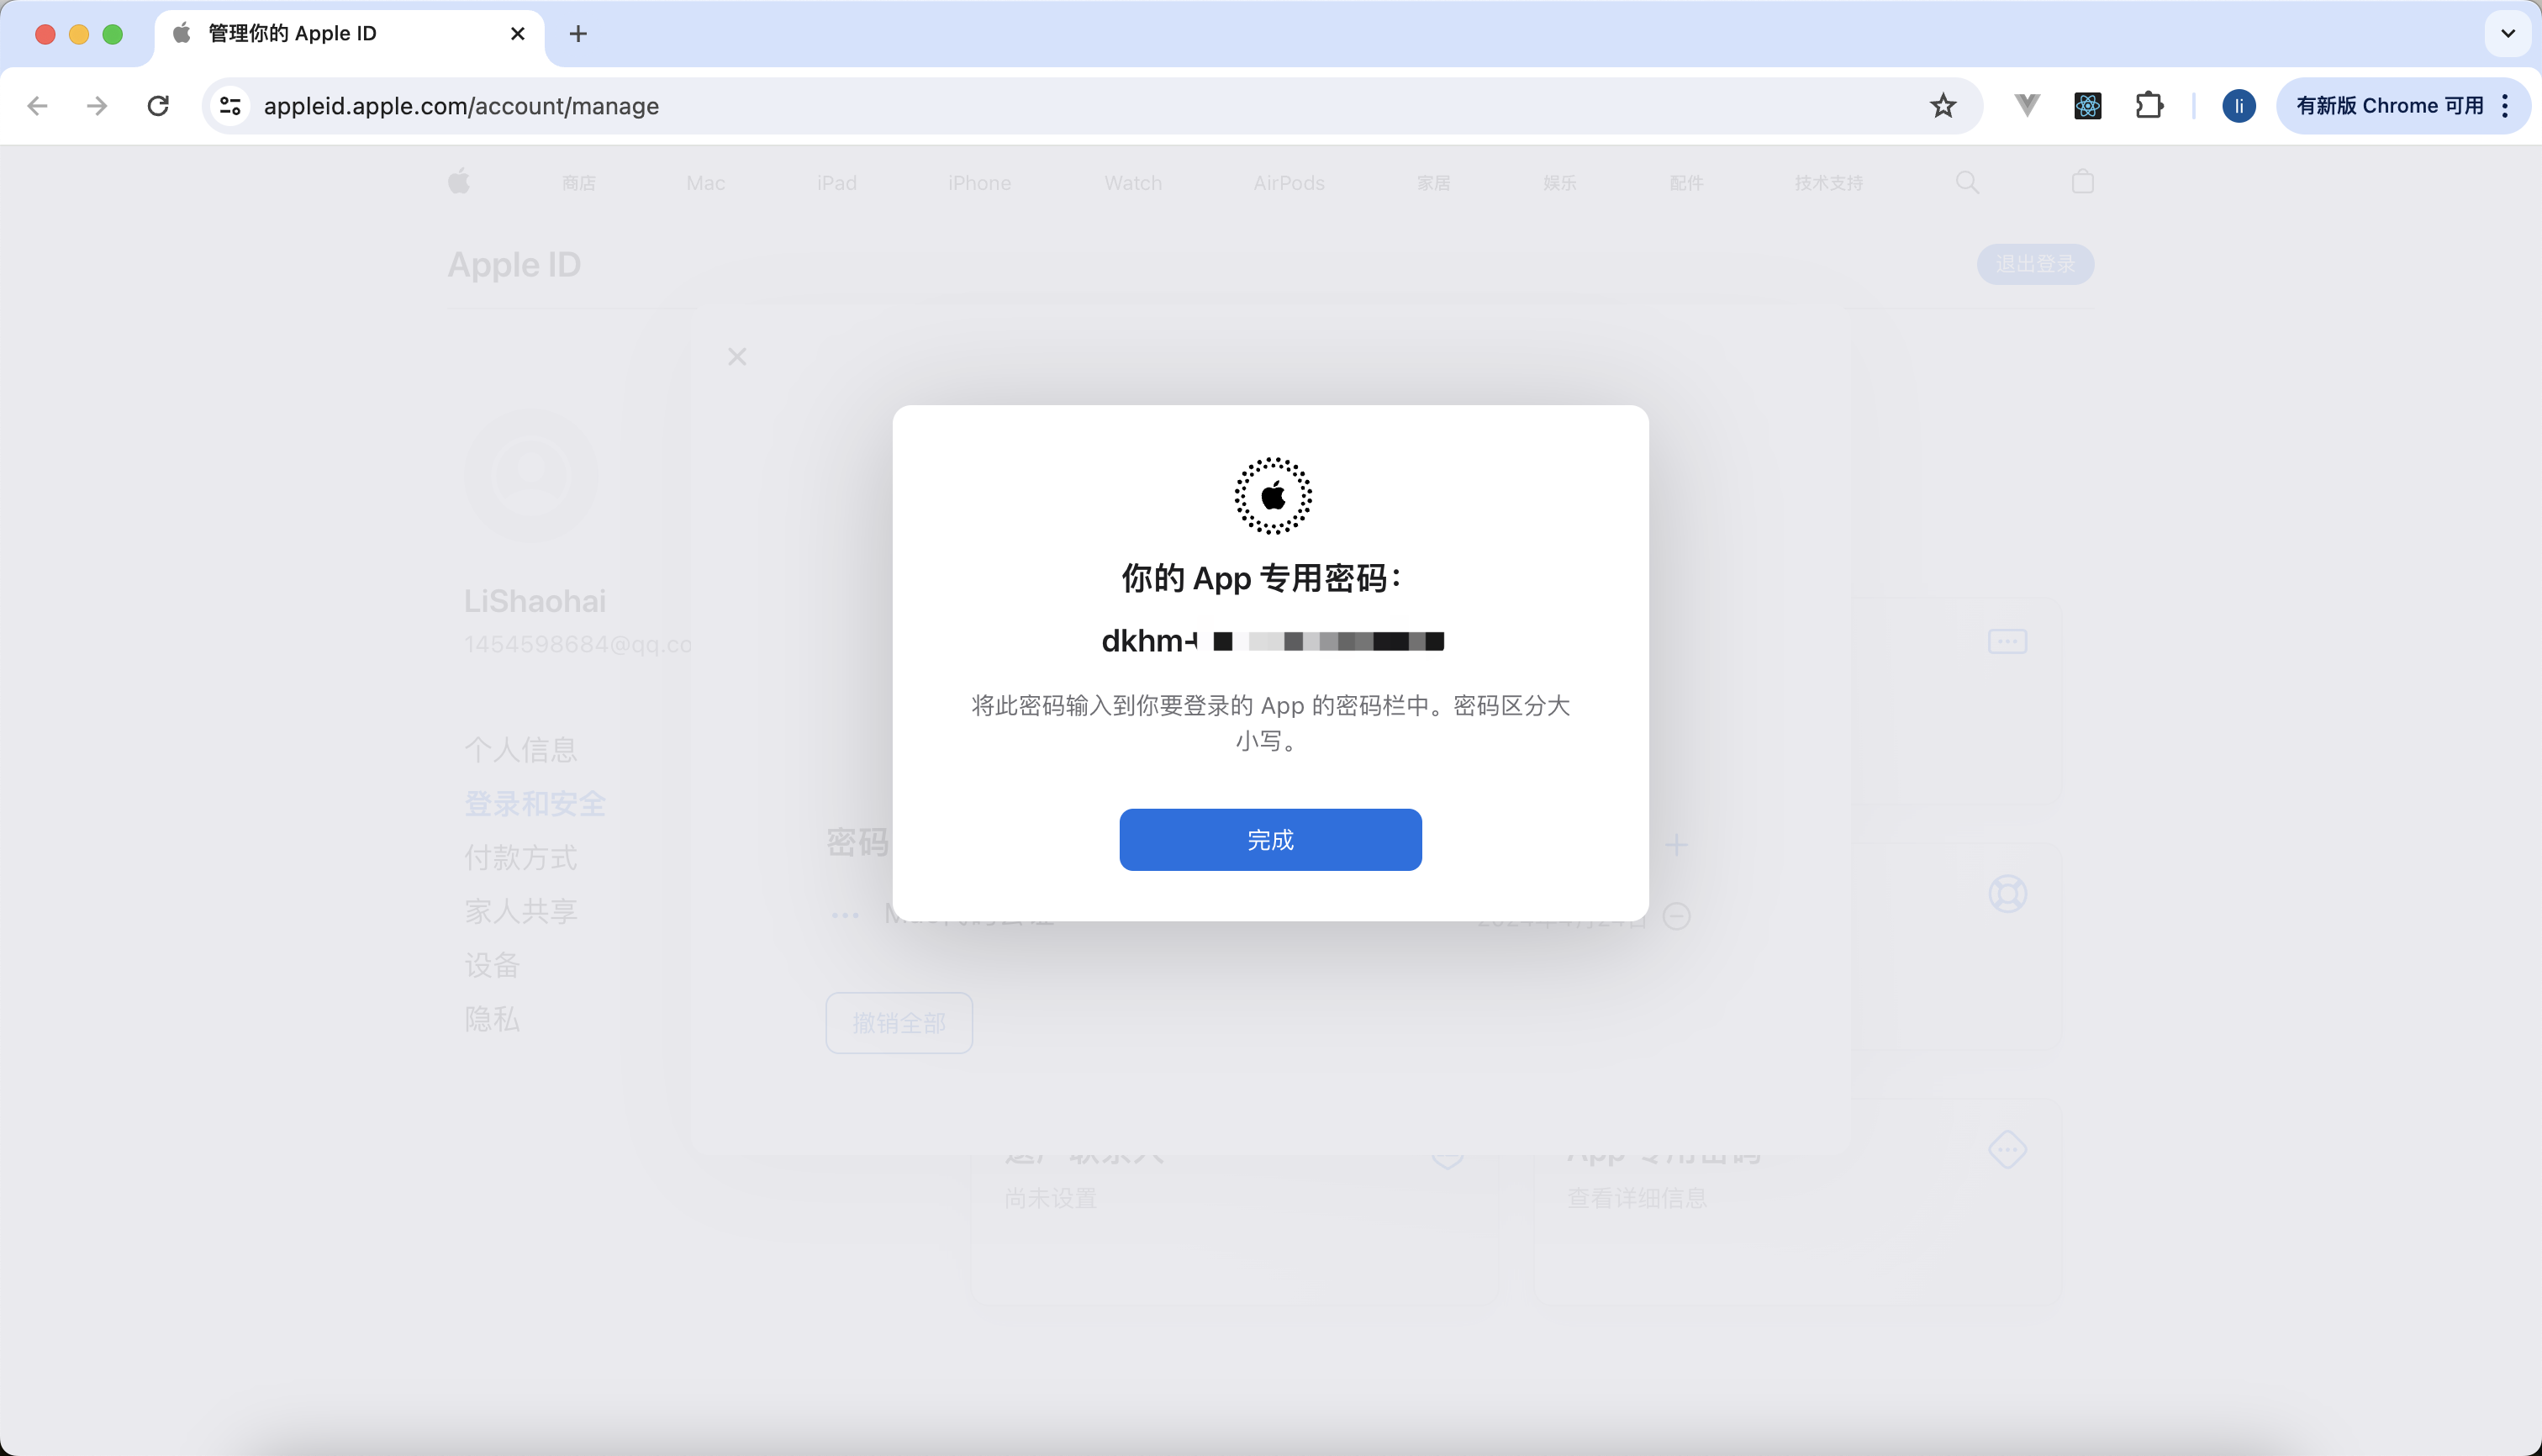
点击完成后你的 appleid 对应的邮箱也会收到一封邮件
- 把你的 appleid 和专属密码添加到 mac 项目的根目录的
.env.build配置文件的
NotarizeAppleId=苹果id
NotarizeAppleIdPassword=应用专用密码
例如:
# 公证所需的变量
# 苹果id
NotarizeAppleId=your_email@qq.com
# 应用专用密码
NotarizeAppleIdPassword=xxxx-xxxx-xxxx-xxxx
4. 配置环境变量
- .env.universal
每一次发布到 testflight 要提升一个版本 修改
故需要 修改 .env.universal 的 VUE_APP_MAC_VERSION 的值
VUE_APP_MAC_VERSION=56- .env.build
- (1)如果需要打包 mas-dev 的包,那么需要修改 IdentityNameMacDeveloper 为你自己的,IdentityNameMacDeveloper 必须是开发者
- (2)NotarizeAppleId、NotarizeAppleIdPassword、NotarizeTeamId、NotarizeAppBundleId 为公证所需字段,如果希望仅你自己可以公证,那么需在苹果开发者网站废弃现在的“应用专用密码(NotarizeAppleIdPassword)”,仅在你的电脑修改 NotarizeAppleIdPassword 字段后打包即可
# 为什么使用单独的 .env.build 文件而不把环境变量放到 .env.universal 中?
# 因为放在.env.universal中可以被主进程读取,从而导致密钥被窃取

# 公证所需的变量
# 苹果id
NotarizeAppleId=your_email@qq.com
# 应用专用密码
NotarizeAppleIdPassword=xxxx-xxxx-xxxx-xxxx
# 团队id
NotarizeTeamId=U2XXXXXXXX
# appId
NotarizeAppBundleId=com.xxx.YourCompanyMac

# 代码签名所需要的变量
# 3rd Party Mac Developer Application: Shenzhen YourCompany Technology Co., Ltd. (U2XXXXXXXX)
IdentityName3rdPartyMacDeveloperApplication="Shenzhen YourCompany Technology Co., Ltd. (U2XXXXXXXX)"
# 3rd Party Mac Developer Installer: Shenzhen YourCompany Technology Co., Ltd. (U2XXXXXXXX)
IdentityName3rdPartyMacDeveloperInstaller="3rd Party Mac Developer Installer: Shenzhen YourCompany Technology Co., Ltd. (U2XXXXXXXX)"
# Developer ID Application: Shenzhen YourCompany Technology Co., Ltd. (U2XXXXXXXX)
IdentityNameDeveloperIDApplication="Shenzhen YourCompany Technology Co., Ltd. (U2XXXXXXXX)"
# Mac Developer: Zhongyi Li (6CXXXXXXXX)
IdentityNameMacDeveloper="Zhongyi Li (6CXXXXXXXX)"
5. 执行命令实现自动打包、签名和公证
mas 是 "Mac App Store" 的简写
- 同时打包 mas-dev 和 mas 的包
bash
npm run build会依次执行 2 和 3 的命令。
- 仅打包 mas-dev (开发环境测试苹果沙盒环境、可以直接双击打开)
bash
npm run build:dev打包后会在 dist_electron/mas-dev-universal 目录中生成 yourappname.app,可以双击打开,如果打不开,那么需检查可描述文件是否正确安装,是否 mac 设备的配置 uuid 和 udid
- 仅打包 mas (必须在 testflight 或 apple store 下载后方可打开)
如果仅希望打包和上传到 testflight 那么你需要这个命令,这个命令会比较长时间(15 分钟左右)
bash
npm run build:prod打包后会在 dist_electron/mas-universal 目录中生成yourappname.app、yourappname-mac-universal-1.1.18(56).pkg,其中yourappname-mac-universal-1.1.18(56).pkg是我们需要的,后面把yourappname-mac-universal-1.1.18(56).pkg上传到苹果 apple connect 即可,该目录下的yourappname.app无法直接打开是正常的
注意:
打包过程中不要打开 VPN 翻墙,否则会出现时间戳错误
首次打包会出现 访问钥匙串 提示 - 要点击
始终允许
四、测试和上传到 testflight
- 苹果应用商店 搜索 “transporter.app” 安装并打开
- 使用你的 apple id 登陆,你的 apple id 必须是“开发者”,否则无法登陆
- 直接把打包好的
yourappname-mac-universal-1.1.18(56).pkg拖拽进去 - 等待检查完成,点击“交付”,即可上传
- 上传成功需要等待一会(15 分钟左右)才可以在 apple store connect 上看到上传的文件,上传成功后立即看不到是正常的
- 预计等待 30 分钟到 1 个小时,苹果审核通过,那么就可以在 testflight 测试,审核通过会有邮件通知你(apple id 的邮件)
- 苹果应用商店 搜索 “testflight.app” 打开就可以看到你的测试应用,如果有版本更新会在这里进行下载、安装、打开然后进行上线前的测试,如果你的 testflight 没有权限,那么需要管理者邀请你加入 testflight
五、上架 到 apple store
testflight 测试通过后,可以在 apple store connect 上提交你的应用,苹果一般在 1 ~ 3 个工作日审核通过就可以在 apple store 下载了。有问题会给出问题的地方,修改后重新提交即可。